
How to blink (or flash) a LED without delay() and detect button pushes
One of the limitations of the delay() function is that nothing else can really be done. This presents a problem when you want to flash a LED while waiting for a pushbutton to be pressed.
Flashing the LED with millis() and using a flag variable to find if the LED should be flashing solves this problem.
Consider this another example to my virtual millis() cookbook.
This code (below) should work with both Arduino (AVR) and Energia (supported boards), but to be honest, I haven’t had a chance to test it on my MSP430 yet.
The Hardware
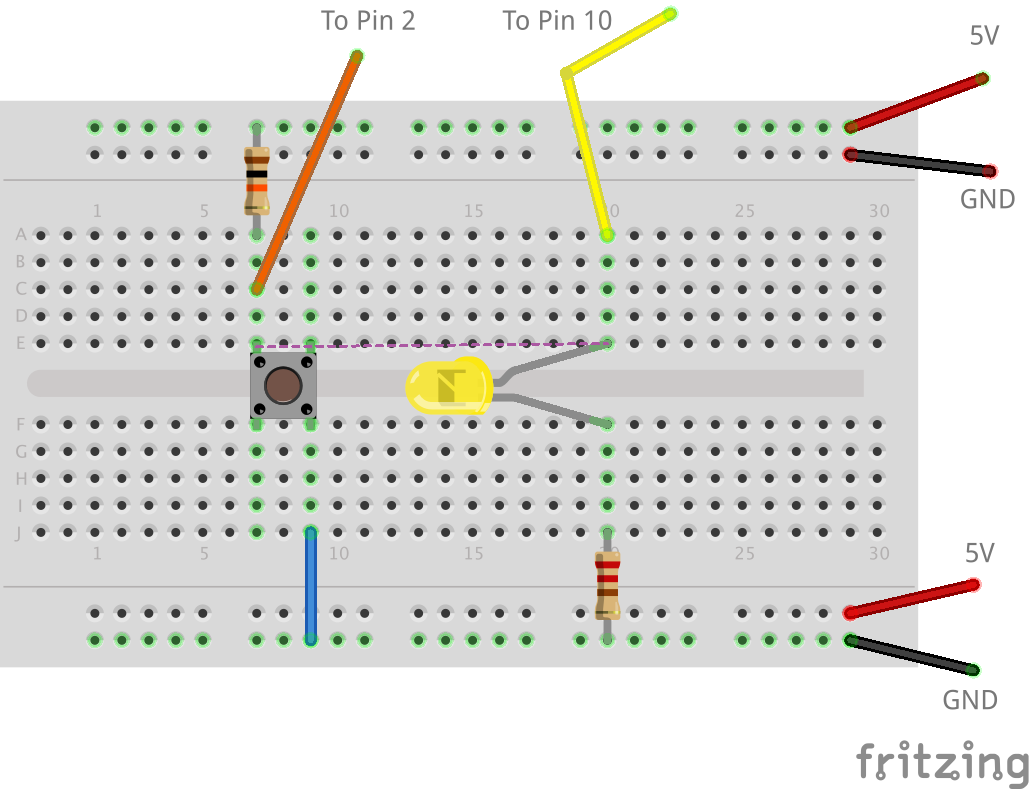
Very simple setup. A led with current limiting resistor connect from the I/O pin to ground.
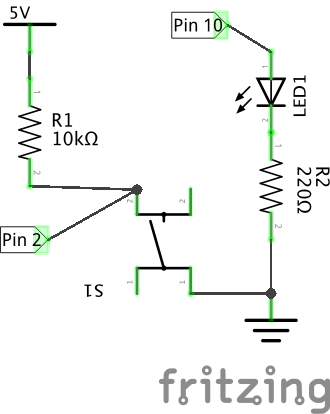
pushbutton and led schematic
The push button is connected with an external pull-up, but you could use the Arduino’s or MSP430’s internal pull-up instead. (To be honest, I just needed the image to look more interesting than JUST a button, so I used external resistors!)
The Code
You can also download this code from Pastebin.
const byte button=2;
const byte LED=10;

bool blinking = false; //defines when blinking should occur
unsigned long blinkInterval = 250; // number of milliseconds for blink
unsigned long currentMillis; // variables to track millis()
unsigned long previousMillis;

void setup() {
 pinMode(button, INPUT);
 pinMode(LED, OUTPUT);
}

void loop() {
 // this code blinks the LED
 if (blinking) {
  currentMillis = millis(); // better to store in variable, for less jitter
  if ((unsigned long)(currentMillis - previousMillis) >= blinkInterval) { // enough time passed yet?
   digitalWrite(LED, !digitalRead(LED)); // shortcut to toggle the LED
   previousMillis = currentMillis; // sets the time we wait "from"
  }
 } else {
  digitalWrite(LED, LOW); // force LED off when not blinking
 }
 int reading = digitalRead(button);
 delay(50); // crude de-bouncing

 if (reading==LOW) // buttons with pull-up are pressed when LOW
  blinking=true; // start blinking
 else
  blinking=false; // stop blinking
}
The key to the code is line 16 where we check the value of “blinking” on each iteration of loop().
if (blinking) {
If the “blinking” flag is set to true, that code executes.
The if-statement with currentMillis() and previousMillis() is to see how long we’ve waited to change the state of the LED pin.
if ((unsigned long)(currentMillis - previousMillis) >= blinkInterval) {
That’s how to handle a millis() rollover.
The next line of magic is at line 25. Here, the button is read and then sets the flag of the blinking variable.
 int reading = digitalRead(button);
 delay(50); // crude de-bouncing

 if (reading==LOW) // buttons with pull-up are pressed when LOW
You might notice a delay() is used for button debounce. It is possible to use millis() instead to de-bounce the button, which makes this code entirely non-blocking. However, adds a little more complexity than necessary in this example.
In other words, some times it is okay to use delay()!
So with just a couple of simple if-statements and flag variables, it is very easy to use a pushbutton to start and stop the blinking of a LED.