In the past, I’ve covered how to reset Arduino millis() and have provided a growing list of examples using millis(). While reviewing the code for the
elegoo Penguin Bot, I was reminded of a millis() mistake I see often: addition. The only way to properly handle millis() rollover is with subtraction. Let’s look at why (and how.)
What is Arduino millis()
The Arduino library has a function called
millis() which returns the number of milliseconds the processor has been running. On other platforms, you might see references to a “tick counter.” It is the same idea. A hardware timer keeps incrementing a counter at a known rate. In this case, that rate is milliseconds.
A mistake new programmers often make is trying to “reset millis().” A better method is to compare two time-stamps based on millis(). So this if-statement is comparing a previous timestamp to the current value of millis().
if (millis() - previousMillis >= interval) { ... }
The reason this code works is that you get the absolute value of the difference between the two numbers. Let’s say the value of previousMillis is FFFF F000. When the if-statement occurs, let’s say millis() returns FFFF FFF0. That means the difference between those counts is FF0 or, in decimal, 4080. That’s about 4 milliseconds.
Okay, now let’s wait a few milliseconds for Arduino millis() to roll over and reach 0000 0010.
The if-statement now becomes 0000 0010 – FFFF F000. In decimal we are subtracting 16 – 4,294,963,200. Oh noes! We get a negative number! But wait. We don’t. Arduino millis() returns an unsigned long (and I declared previousMillis as an unsigned long.) Since the variables aren’t signed, the math works out a little bit different. Instead, you get the absolute difference between the values which is 4,111. Which if you count the individual steps, is correct. So subtraction handled the roll-over.
I have
millis() rollover code examples you can try to see this subtraction work. Since I have covered this subject in more detail in that post already, here, I want to show what happens when you use a “wait for” variable with addition.
Addition doesn’t add up
Here is a common code I see around Arduino millis(). It uses a variable that continuously increments by a defined interval. Then millis() is compared to that new value.
void loop() {
    if (millis() > waitUntil) {
      ledState = !ledState;
      digitalWrite(LED, ledState);
      waitUntil += interval;
    }
}
Why is this a problem? Well, before millis() rolls over, this method works okay. And I understand why people use it. The method seems logical. Let me show you why it doesn’t work.
For this example, let’s advance waitUntil to a value near rollover. I’m going to pick 4,294,967,285 (0xFFFF FFF5).
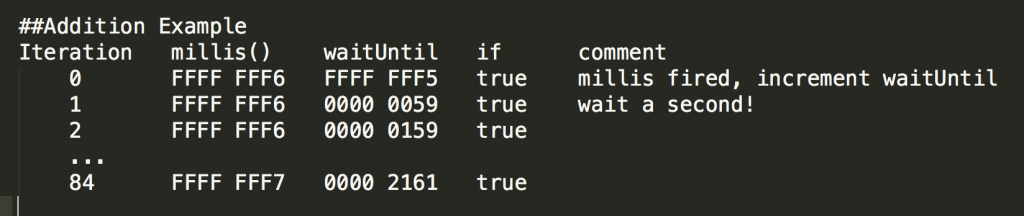
In this iteration table, I have an arbitrary counter column called Iteration. It represents each iteration of the loop() function. (Remember that loop() immediately repeats when you reach the end.) Arduino millis() and waitUntil are the current values in those variables during this iteration. The “if” column is how our millis() if-statement would evaluate.
On “iteration 0” millis() has a hex value of 0xFFFF FFF6. Before this iteration, waitUntil had a value of FFFF FFF5. Two things happen when this if-statement evaluates as true. The LED’s state changes and waitUntil gets incremented by 0x64 (100 decimal). But that increment causes waitUntil to roll over. So it actually stores 0x00000059.
In this case, there is no other code to execute, which means loop() iterates immediately. So on iteration 1 we are now comparing waitUntil’s 0x00000059 to millis()’s 0xFFFFFFFF6. Wait. Why aren’t we looking at a new value of millis? Well, using micros(), I benchmarked the LED flashing code. In this case, the code takes about 12 microseconds to execute. Arduino millis() stays the same value for 84 iterations! (Granted this timing changes with your specific code, but it does illustrate a worst-case quite nicely.)
Here is where addition fails. Because of the very next time we check millis() against waitUntil, waitUntil rolled over, but millis() did not. So if (millis() > waitUntil) evaluates as true! Keep in mind that each time that if-statement is true, we increment waitUntil. So the LED’s blinking pattern in messed up and waitUntil is going to be an erratic value until millis() finally rolls over, about 10 milliseconds later.
#Yes, but…
There are going to be a few people who object to this analysis. So let me address some of the frequently asked questions:
- What if I don’t care about rollover? My code won’t run for 49 days! In this situation, I understand your position. The addition code seems to make sense to the casual reader. However, it has a significant logic flaw. Perhaps in this particular project, it is not an issue. I prefer to use sound logic because habits form. I’d rather form a good habit at the start than fix a habit later on.
- My code takes longer than 12 microseconds! So it doesn’t matter! Again, my code is probably the worst case example because it does not do much. In most cases, more than a few microseconds pass between each if-millis check. However, this situation is still a problem if your interval is seconds or minutes long. You should be checking millis() more often than your interval. When the “waitUntil” variable rolls over, your code is going to become erratic.
- Wrong! The addition code works perfectly for me! Sorry, but no. It is impossible to test code enough to determine that it is working “perfectly.” You need to create a series of tests that encompass every possible value and state to determine “perfection.” Your testing does not. The code may be working “as expected” but it is not working “perfect.” And in 50 days, you will see what I mean.
Conclusion
This brief millis tutorial explains why you cannot, or should not, use addition to handle Arduino millis rollover. Stick to the subtraction method.
 plus addition does not add up")


2 Comments
so I have a project, there are input, output 1 and output 2. when I press input, then otput1 will be HIGH (output 2 remains LOW) and when my input is released, output 1 will be LOW and output 2 will be HIGH.
Great explanation. Thank’s