
- Hardware pieces I am using
- How to verify SIM808 (FONA) module is connected through Hologram via Serial Commands
- How to send HTTP/POST requests (including SSL) with the SIM808 (FONA)
- My (brute force) changes to the Adafruit FONA Library
- Code for sending MQTT payload (GPS Coords) to a dafruit.io dashboard
Hardware Pieces
Here are the individual hardware pieces I am using to make this GPS Tracker work. Given all the strings and ASCII text you need to communicate with the SIM808, I highly recommend a microcontroller with at least 8k of RAM. While I think this project could work on a 328p based Arduino, I am not sure the challenge is worth it.Teeny 3.2
I have two reasons for selecting the Teeny 3.2 for this experiment. One of the reasons is a real engineering trade off while the other is a real life compromise. The real-life trade-off is that I had a bunch of them and wanted a reason to use them. (Wait, that might qualify as an engineering reason.) The engineering reason is power consumption. I compared the 32-bit Teensy 3.2 to one based on an 8-bit Teensy 2.0. I found the 3.2 drew less current. Not bad for an ARM-based processor! One modification I had to make to my Teensy is disconnecting VIN from VUSB. I needed the ability to connect the USB cable to the Teeny for communication and programming. This mod lets me power the Teeny from the FONA’s power supply. That supply could be USB or a LiPo battery. This configuration means two USB connections during development. Fortunately, the Teensy has a small trace you can cut with a sharp knife, severing its connect to VBUS. PJRC thought through the hardware design of teeny boards. Oooooh, I get it now. FYI, the Teensy 3.2 is a 72MHz ARM-M4 with 64K of RAM, 256K of Flash and many flexible I/O options. Amazingly, the board is only about $20. Learn more about the Teensy series on PJRC.com.Adafruit FONA
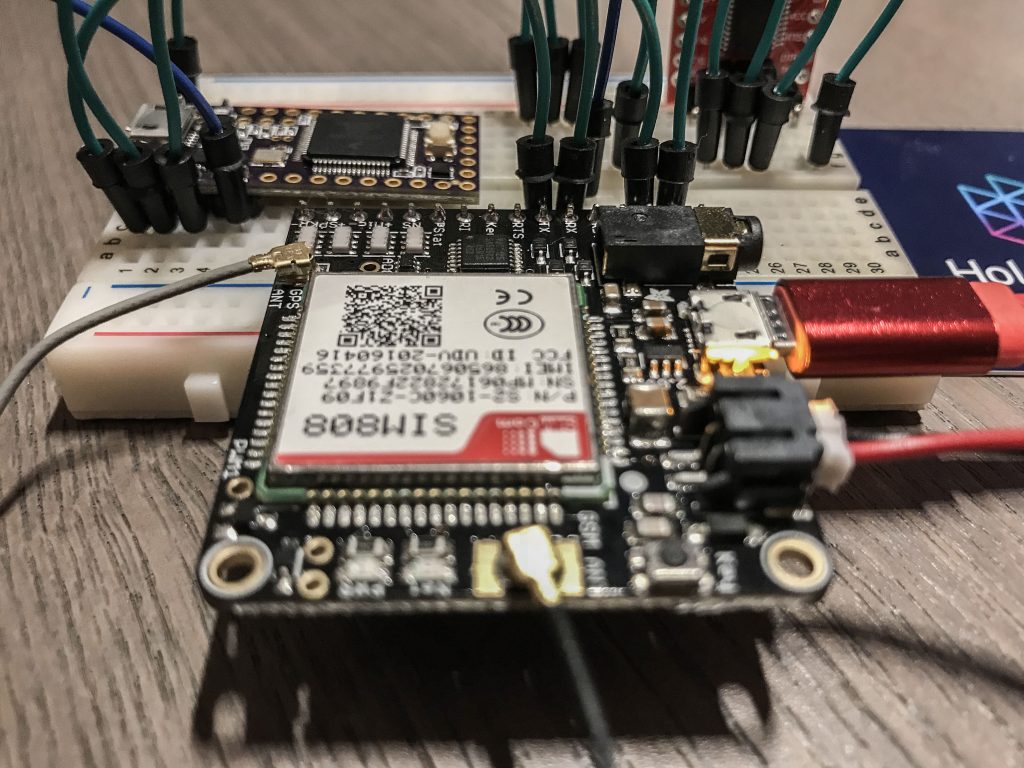 The hardware design of the FONA is deceptively dull. The board contains a SIM808 module, a battery charger IC, a voltage regulator, some passive components, and connectors. However, that SIM800 is one hell of a module. It is a SoC that makes interfacing with cellular networks a breeze. Want to build a phone? You can. Want to create your own texting pager? You can. Wish to develop an IoT device? You can.
$50 for the FONA might seem high. But, value wise, these are a fantastic piece of kit. Do not overlook the fact you are getting a pre-certified cellular radio. That process is not cheap, fast, or easy. It is incredible that you can just buy this module and connect to a mobile network–no questions asked. (Well, after adding a SIM card.)
The FONA interfaces with AT-style commands over UART serial. Operations like querying the network, getting GPS coordinates and sending HTTP requests are simple. It is possible to do all of that with just a handful of commands from a serial window. Below I will show you some examples to try out. Or you could program a microcontroller to do it. Like the aforementioned Teensy. (Code for that too.)
The hardware design of the FONA is deceptively dull. The board contains a SIM808 module, a battery charger IC, a voltage regulator, some passive components, and connectors. However, that SIM800 is one hell of a module. It is a SoC that makes interfacing with cellular networks a breeze. Want to build a phone? You can. Want to create your own texting pager? You can. Wish to develop an IoT device? You can.
$50 for the FONA might seem high. But, value wise, these are a fantastic piece of kit. Do not overlook the fact you are getting a pre-certified cellular radio. That process is not cheap, fast, or easy. It is incredible that you can just buy this module and connect to a mobile network–no questions asked. (Well, after adding a SIM card.)
The FONA interfaces with AT-style commands over UART serial. Operations like querying the network, getting GPS coordinates and sending HTTP requests are simple. It is possible to do all of that with just a handful of commands from a serial window. Below I will show you some examples to try out. Or you could program a microcontroller to do it. Like the aforementioned Teensy. (Code for that too.)
Antennas for FONA
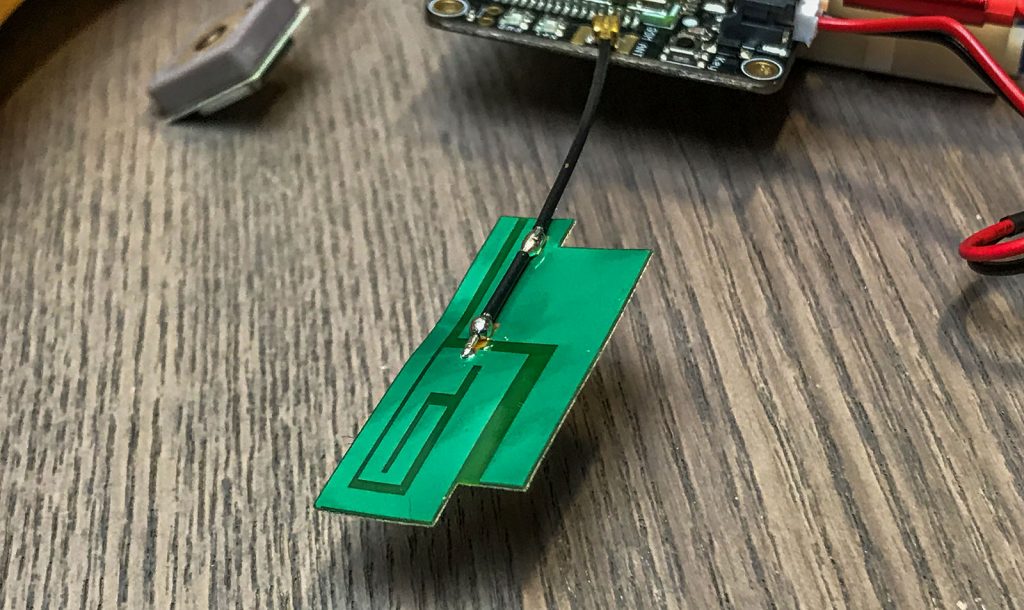 The FONA module does not come with any antennas. If you are not going to use the GPS module, you can skip it. However, for a reliable cellular connection, you will need that one. I used the flexible sticker-style GSM antenna with no signal problems even indoors. For the GPS, I used a passive GPS antenna. Indoors, I was able to acquire a 3D fix, for most of the time, while sitting on my desk. I cannot wait to see how well it works when I use it outside.
Hologram.io SIM
For the FONA module to work correctly, you need a SIM card. That SIM card needs to come from a data service. Hologram supports 2G, 3G, and 4G/LTE networks. I have several SIMs from Hologram laying around my lab. And it is not because I am internet famous (I am not). Hologram gives out their SIMs to developers for free. Well, you do need to pay for shipping. However, even that is not a big deal since you get 1 MB of data per month, again, for free. If you think 1 megabyte of data sounds small, you should keep in mind IoT devices send small payloads. Whether you are developing an actual IoT product or you just want to learn more about how GPRS works, this is a great option. They have got two maps of Zone coverage (Zone 2 overlaps Zone 1) which covers the majority of the world. Side note, I did kind of laugh that the United States is in Zone 1, but Canada is in Zone 2.Adafruit sells SIM cards from a company called Ting. Both Hologram and Ting use the T-Mobile network, at least in my area. How do you decide between the two? Easy, Hologram. First, it is developer friendly. Second, Ting sucks. I was up to $9 in charges for a SIM I only activated. I never sent any data with it. Someone is sending it SMS messages, and I am paying for it. Want to cancel your account? You have to call them. I am profounding disappointed that Adafruit sells their SIMs. Go with Hologram.io. (Psst, it is free.)
Roaming Note
When the FONA connects to the network, it returns service status “5 – roaming.” If you are using the Adafruit example code, there is a conflict here. The example expects the connect status “1,” which means the home network. From what I understand, there are no additional charges for “roaming” on Hologram. One of my modifications to the Adafruit library is accepting either a status of “1” or “5.”The FONA and MQTT
At first, I had significant trouble getting MQTT to work with my FONA module. I followed the Adafruit examples but got strings of errors. I came across some partial solutions that fixed some problems, but nothing could reliably send MQTT packets. For a bit, I thought it had to do with the time of day. Eventually, I determined there were two problems:- FONA module was not initialized correctly, and
- You HAVE to connect the VIO pin.
// check network status and signal
AT+COPS?
AT+CSQ

// close active actions
AT+CIPSHUT

//attach to GPRS
AT+CGATT=1

// single connection at a time
AT+CIPMUX=0

// manually read data
AT+CIPRXGET=1

// setup APN
AT+CSTT="hologram","",""

// turn on GPRS
AT+CIICR

// get IP address (this fails sometimes, if so, re do the entire sequence)
AT+CIFSR
Project Notes
Here are some of the notes I made while working with the hardware. It is in the order I did things. Like I said before, I do not mean this to be a tidy tutorial, but a list of what I learned. Please let me know in the comments if any of this helped saved you time.Testing FONA with HTTPS
The SIM808 handles HTTP/S connections internally. If your application just needs to use the HTTP POST method, this feature simplifies your code. From a project perspective, it makes it easy to test your connections. So in this case, I connect an FTDI adapter to the FONA.- TX to RX
- RX to TX
- GND (obviously)
- FONA VIO to VCC on the FTDI 🙂
AT+CSQ
+CSQ: 10,0

AT+CGATT?
+CGATT: 1

AT+SAPBR=3,1,"CONTYPE","GPRS"

AT+SAPBR=3,1,"APN","hologram"

AT+SAPBR=1,1

AT+HTTPINIT

AT+HTTPPARA="URL",”hologram.io/test.html"

AT+HTTPPARA="CID",1

# many tutorials miss this bit
AT+HTTPSSL=1

AT+HTTPACTION=0

+HTTPACTION:0,200,79
AT+HTTPREAD
+HTTPREAD:79
... response (in html)
Other cool FONA Commands
The FONA can grab the current time from the cellular network, and it can give you your GPS coordinates. Here’s the AT commands to make both of those happen. These are fun things to play with while connected by serial. First, here’s how to verify your connection.Check Network and Strength
#network
AT+COPS?
#signal strength
AT+CSQ
Network Time
There is a counter-intuitive step to make network time work. You need to turn on a register, save it to non-volatile memory, and then reboot the module. After that, the SIM808 will always get the current time from the network. Seriously, power cycle your FONA.
#Enable Network Time
AT+CLTS=1
at&w
(restart)

#Check the time
AT+CCLK?
+CCLK: "18/02/05,02:25:43-16”
GPS
# is GPS radio on?
AT+CGNSPWR?
+CGNSPWR: 0
# turns it on
AT+CGNSPWR=1

# is there a GPS fix?
AT+CGPSSTATUS?

# Get Location (if available)
AT+CGNSINF
+CGNSINF: 1, 1, 20180101193334.000, 39.352471, -132.181413, 149.300, 0.43, 228.4, 1, , 1.6, 1.9, 1.0, ,9, 6, , ,27, ,
GPS_STATUS: 1,
 FIX_STATUS: 1,
TIMESTAMP: 20180101193334.000,
LATITUDE: 39.352471,
LONGITUDE: -132.181413,
LONG_DIRECTION: 149.300,
 ALTITUDE: 0.43,
SPEED: 228.4,
HEADING, 1,
 SPEED_KNOTS
...
GPS Tracker Code
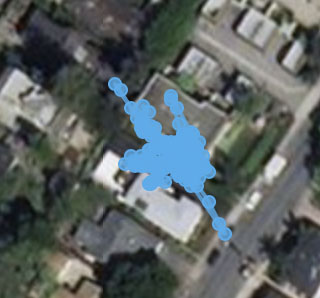
Instead of providing the code in this post, here is a link to my FONA GPS Tracker GitHub project. There I have uploaded the application code I am using along with the modified methods for the Adafruit FONA library. In general, I have followed the Adafruit MQTT Library FONA Example code. In setup(), I connect to the cellular with the Hologram.io SIM and enable the GPS. I use the Teensy’s onboard LED to know once setup() is done. Instead of loop(), I use a millis() timer check to update the GPS coordinates once per 10 seconds. If the SIM808 says it has a lock, I turn the pin 13 LED back on and publish two MQTT updates. The first one is the GPS coordinates and the second is altitude. These are posted to an Adafruit IO dashboard that I created. If MQTT fails to update more than three times, I call my FONA connect method again. This action resets the module, reconnecting it to the network. This failsafe catches a rare condition where the FONA fails to get an IP address. Perhaps in the future, I will make the connection code more robust. For now, this worksConclusion
This hardware setup was relatively easy to throw together. I have acquired these pieces over the past year. I am happy that they connected so quickly. Regarding prototyping a cellular-based IoT device, this has been an interesting exercise. Moving forward, I am working on a 3d-printable case so that I can clip this “device” to my bag. To track my progress (see what I did there?) follow my project on hackster.io Follow Project Updates on Hackster.ioWhat would you build with a FONA cellular module and a Hologram.io SIM card?


9 Comments
Any advice on troubleshooting AT+COPS? returning 0 (no connection to network)?
Planning to create a “hunters and rabbit” game where the location of the rabbit is forwarded to the hunters every X time, with a delay and/or a less accurate coordinate.
Hoping to get the kids away from their computers and outdoors, more occasionally. 🙂
I have been attempting to get my FONA808 to connect to AdafruitIO with no success for a little bit now. I found this article and downloaded the code from the github repo you linked in here. In the readme for the FONA additions, you mention that to implement your fix, one would need to add the jamesStart() function to the FONA library and call the function. My question is: Where does this function need to be called from? It does not appear to be anywhere in the .ino file that you uploaded to the Teensy. I am assuming that you called it from another function within the FONA library. If that is the case, could you please tell me which function was that? And where inside the function did you have to call jamesStart()?
Thank you for the help
It is called in FONAconnect of my modified fonaHelper.cpp.
I’m working on replacing a ting sim in a FONA-Feather project that monitors water quality. Works great with the ting sim but the Roaming problem for the Hologram sim has me stumped. Looks like your mods would fix it for me but I can’t figure out how to implement the mods. In particular what does one do with the file fonahelper.cpp? Do you have very simple example code that uses your mods? thanks
Install the Adafruit FONA library. Then add the code in my Github repo to each of the files of the library. fonahelper.cpp needs to be in the same directory as your sketch’s ino file.
But GPRS sunset is coming…do you think is it worthy spending time & money in this kind of communication? I’m seeking alternatives. The most direct one is 3G/4G, of coure, but they are a lot more expensive, though…so I’m in a cul-de-sac. Maybe LoRa could be the solution…but it’s another kind of animal. What do you think about the future of these technologies? Thanks!
Very interesting and I may well implement this using a RPi 3. I live in Germany and I do not think there will be any problems. I’ll need a diffferent GMS antenna . Perhaps using Galileo instead of GPS….but that may mean a diffent HW config….I’ll look into that. This article is inspiring.
I’m pretty sure Galileo would need an entirely different radio. But if you’re using a Raspberry Pi, there are probably USB-based options you could use for both cellular and GPS. For example for cellular, sticking with Hologram, you might want to consider their Nova board. It’s a USB-based unlocked modem.