

What happens when you have a random chip or sensor you want to interface with an Arduino, but don’t know how? You search for a pre-existing library of course. And where are many libraries hosted and available from? A place where eager developers hack together code, post updates, and collaborate with others: Github!
Installing a library
Many Arduino libraries are available from GitHub. It really fosters the spirit of Open Source work. If you come across a library you need on GitHub, getting it into the Arduino IDE is relatively simple. However, if you’re new to GitHub (or the Arduino IDE) you might miss the simple steps.
Step 1: Arduino IDE
Make sure you are running at least 1.0.5 or 1.5.x of the Arduino IDE (note: now 1.6.x contains all.)
1.5.x is the more “experimental” branch of the IDE. At the time of this posting, it has become much more stable, but still focused on the more advanced Arduino boards: Yún, (Intel)Galieo, and Due. So if you have a Nano, Uno, or Mega board, you may want to stick with the 1.0.x branch.
The reason you need these version of the IDE is because it adds support for the critical “Add Library…” function.
Step 2: Download the Library
You might notice on the GitHub page you can navigate through the various files of a library. It may be tempting to just download the .cpp and .h files then figure out where to put them. There’s a couple of other files that are included in an Arduino library, so this isn’t really the best option. Instead, on the project page look for the “Download ZIP” button.
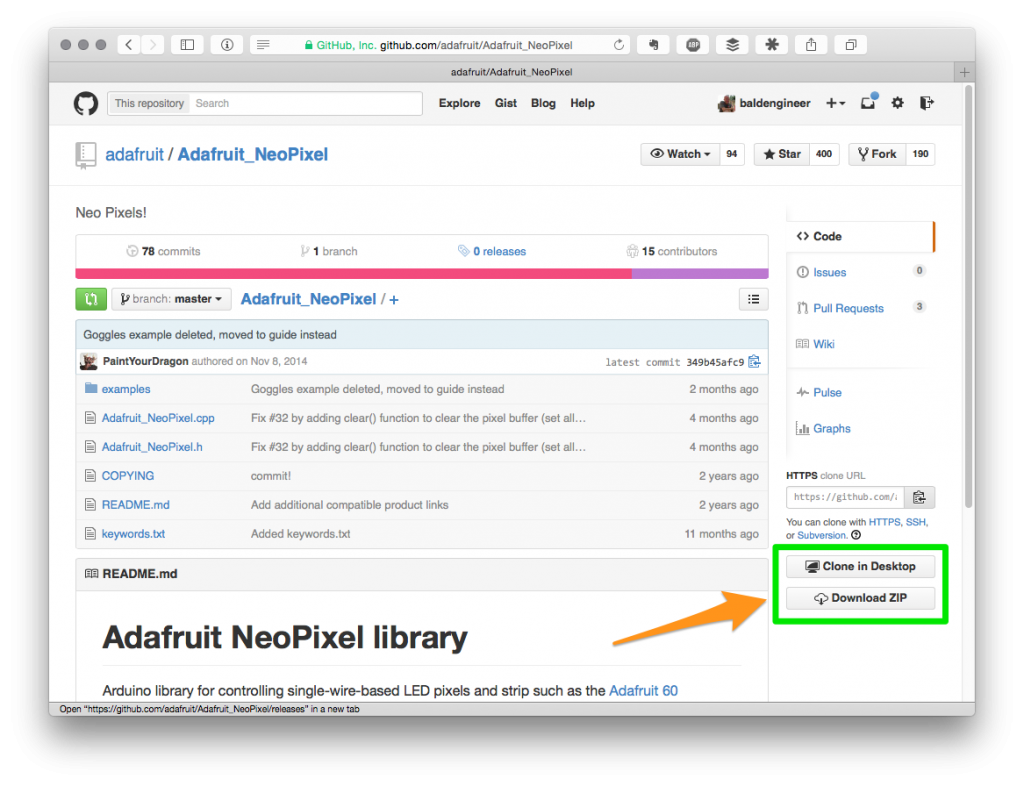
GitHub Example - Look For Download ZIP
This downloads the latest version of the files in the correct directories as a ZIP file.
Step 3: Rename the Library!
Okay, this step is bound to trip people up. In this example, we’re using the Adafruit NeoPixel library, which when downloaded becomes “Adafruit_NeoPixel-master.zip”.
That’s going to be a problem, because the Arduino IDE doesn’t like characters like “_” and “-”.
Step 3A) un-zip the library and rename the Folder
Use whatever unzip your OS requires and then rename the folder to remove the “_” and “-” characters. The IDE says it only wants “Basic ASCII” which is way to say “letters and numbers only.”
[optional] Also, GitHub adds the word “master.” Remove that too.
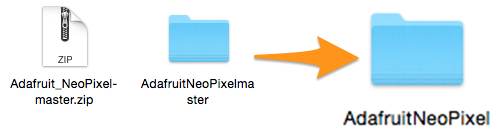
Once done, you should have a folder (or directory) just called “AdafruitNeoPixel”.
Step 4: Install the Library
In the past, this Step was difficult to get right. That’s why the IDE now has a “Add Library” option.
For this step, just do “Add Library” and navigate to you new library directory.
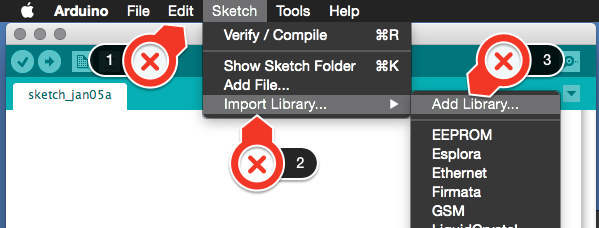
Step 5: Restart the IDE [optional]
Even though this step may be optional, I’ve found it is a good idea. Restart the IDE so that it properly loads the KEYWORD file, Examples, and adds the Library to the Library Menu.
Errors
If you get the following error, go back to Step 3.

The library ’’ cannot be used. Library names must contain only basic letters and numbers.
You’re probably trying to import that ZIP file directly (which contains the “bad” directory name) or the library doesn’t support the “Add File…” option. If that’s the case, post a link to the project below and see if someone can help.