 with buttons to delay events")
Understanding millis()
The Arduino millis() function will let you accomplish this delayed action relatively easily. First, read through my multitasking with millis() tutorial and then look at some of my millis() cookbook examples I’ve already posted. Getting used to seeing this kind of code will make this line by line tutorial on timed events using millis() easier to follow.The Full Code
(FYI, you can grab the complete code from pastebin if copy/paste doesn’t work here.)
//Global Variables
const byte BUTTON=2; // our button pin
const byte LED=13; // LED (built-in on Uno)

unsigned long buttonPushedMillis; // when button was released
unsigned long ledTurnedOnAt; // when led was turned on
unsigned long turnOnDelay = 2500; // wait to turn on LED
unsigned long turnOffDelay = 5000; // turn off LED after this time
bool ledReady = false; // flag for when button is let go
bool ledState = false; // for LED is on or not.

void setup() {
pinMode(BUTTON, INPUT_PULLUP);
pinMode(LED, OUTPUT);
digitalWrite(LED, LOW);
}

void loop() {
// get the time at the start of this loop()
unsigned long currentMillis = millis();

// check the button
if (digitalRead(BUTTON) == LOW) {
// update the time when button was pushed
buttonPushedMillis = currentMillis;
ledReady = true;
}

// make sure this code isn't checked until after button has been let go
if (ledReady) {
//this is typical millis code here:
if ((unsigned long)(currentMillis - buttonPushedMillis) >= turnOnDelay) {
// okay, enough time has passed since the button was let go.
digitalWrite(LED, HIGH);
// setup our next "state"
ledState = true;
// save when the LED turned on
ledTurnedOnAt = currentMillis;
// wait for next button press
ledReady = false;
}
}

// see if we are watching for the time to turn off LED
if (ledState) {
// okay, led on, check for now long
if ((unsigned long)(currentMillis - ledTurnedOnAt) >= turnOffDelay) {
ledState = false;
digitalWrite(LED, LOW);
}
}
}
Global Variables
[arduino firstline=”2″] const byte BUTTON=2; // our button pin const byte LED=13; // LED (built-in on Uno) Setup a constant for BUTTON and LED. (Read this post on why I am using const instead of #define.) [arduino firstline=”5″] unsigned long buttonPushedMillis; // when button was released unsigned long ledTurnedOnAt; // when led was turned on These two variables will store the “current” value of millis() when their “event” occurs. Instead of trying to reset millis(), we will compare against itself later on. [arduino firstline=”7″] unsigned long turnOnDelay = 2500; // wait to turn on LED unsigned long turnOffDelay = 5000; // turn off LED after this time These two values are arbitrary for this example. It’s how long we wait until we turn on the LED and then how long we wait to turn off the LED. [arduino firstline=”9″] bool ledReady = false; // flag for when button is let go bool ledState = false; // for LED is on or not. Two flag variables to create the states for the LED. For this simple example, I didn’t create an enum to track the states, but that could have been an option too. ledReady tells the Arduino to wait the amount of time in “turnOnDelay” before turning on the LED. Then it enables the next state, which is waiting to turn off the LED.void setup()
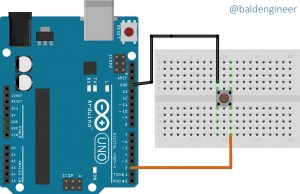
[arduino firstline=”12″] void setup() { pinMode(BUTTON, INPUT_PULLUP); pinMode(LED, OUTPUT); digitalWrite(LED, LOW); } Nothing unique here. In my circuit, I am using the built-in pull-up resistor on my button pin. Just so I know what state the LED pin is in, I set it to LOW.void loop()
[arduino firstline=”18″] void loop() { // get the time at the start of this loop() unsigned long currentMillis = millis(); Remember that loop() runs around and around. So each time loop() starts over, I store the current “time.” Back on the “blink without delay line by line” post, I used the analogy of looking at a watch. That’s what we are doing here, getting the current time. Note: This is where beginners get tripped up. They get focused on the XY Problem of Resetting millis(), it isn’t necessary. Just check to see what time it is!Check the button
 [arduino firstline=”23″]
if (digitalRead(BUTTON) == LOW) {
Since the button uses a pull-up resistor, a LOW means the button is being pressed.
Keep in mind, the Arduino checks this single if-statement a THOUSAND times while a human being pushes the button.
[arduino firstline=”23″]
if (digitalRead(BUTTON) == LOW) {
Since the button uses a pull-up resistor, a LOW means the button is being pressed.
Keep in mind, the Arduino checks this single if-statement a THOUSAND times while a human being pushes the button.
Store the time
[arduino firstline=”25″] buttonPushedMillis = currentMillis; As long as the button is down we are updating buttonPushedMillis with the value in currentMillis. Another option would have been to determine when the button was released, but that would have made the code more complicated. Even if the button bounces a little bit, this code works fine. [arduino firstline=”26″] ledReady = true; This flag enables the next “state” which is to wait long enough to turn on the LED.Turn on the led?
[arduino firstline=”30″] if (ledReady) { It might seem silly to set ledReady to TRUE and then immediately check to see if it is TRUE. None of this code “stops and waits.” We use this “flag” to let the Arduino know when we are ready to turn on the LED. [arduino firstline=”32″] if ((unsigned long)(currentMillis – buttonPushedMillis) >= turnOnDelay) { Standard millis() check. We compare the current value of millis(), stored in currentMillis, to the value in buttonPushedMillis. Keep in mind, buttonPushedMillis will keep getting updated as long as something is pressing the button down. So until you let go of the button, (currentMillis – buttonPushedMillis) is going to be zero (0). The gap between currentMillis and buttonPushedMillis will grow after the button is released. Once it gets to 2500 or more, the if-statement becomes TRUE. [arduino firstline=”34″] digitalWrite(LED, HIGH); Turn on our LED. Hopefully this one is obvious. 🙂 [arduino firstline=”36″] ledState = true; Get into the next state, which is waiting long enough to turn off the LED. [arduino firstline=”38″] ledTurnedOnAt = currentMillis; Just like the button push, we store the time when the LED turned on. Again, we just look at the clock so we can compare how long the LED has been on.Note: The variable you use needs to be an unsigned long


44 Comments
I was looking for a simple code that was to be activated via a Hall effect device and after a few trial and errors I was getting knowhere … and then after a Google search I found this and after moving the Line 34 above to 32 so I dont get a delay before it worked a treat, I then expanded for 3 buttons for the test and it all worked … Many thanks for the code …
THANK YOU!!! Your coding and explanations were just what i needed to implement this code into my sketch. I’m using it slightly differently to the way it was written, I’m just using the “unsigned long turnOffDelay = 2000” as i have actions that happen only while i hold the button down, and i need them to continue for 2 seconds after i release the button, so i set “unsigned long turnOnDelay = 0;” to cancel that function. Thank you again 🙂
hi James
Thank you for such a brilliant and informative lessons. I am just starting to learn the Arduino and you have helped a great deal and it is very much appreciated. 🙂
If I wanted to use the above program and wanted it to repeat say 5 times and then stop, I assume I would need to use: “(int j = 0; j < 5; j++){}
If so where would I position the code.
Thank you
hello james..Im very new with the arduino program how to modify your codes,to force off the led during led’s on? thanls before
Hello Jim
I am very new to Arduino, I have a need for your millis() with buttons and delay events sketch. But I need to add a couple more buttons and relays. Is there anyway you show me how?
Hello
Generally speaking, if you got the one button version woorking, adding extra buttons is simply a case of of adding extra instances.
Say you have now Button, Interval, LastMillis (your names might be different), you add extra ones by defining, say Button1, Interval1, LastMillis!; Button2, Interval2, LastMillis2 and so on. The millis() funtion remains the same for all.
Then you add extra digitalls for button inputs and extra outputs for your relays, like Button1 =4, Button2=5; Relay1=6, Relay2=7. Don’t forget pinModes in setup for each new digital. You might need pullup resistors for your buttons (external 10K) or use the internal ones with digitalWrite(Button1, HIGH). Don’t forget to put diodes across your relay coils
Sorry about the typos
LastMillis! should of course be LastMillis1
How can I add a second or third push button and led with different times in the above sketch (Use Arduino millis() with buttons to delay events)?
how i can insert another BUTTON and LED
Hello James,
I sent you a message that this code was good for my spot welder.
The code controls the relay for a time of 200ms. Press once and the relay starts 200 ms with a delay of 5000ms. When I now connect the relay to 220V and I press once, the relay goes 3 to 4 times and sometimes 2 times in a row and then stops.
what can I do any idea.
Exact circuit and code essential for helpful suggestions. A spot welder is going to be chucking out a lot of RF and other disturbances and your circuit is going to have to be well protected. Sensitive digital inputs aren’t going to like the stuff a welder sends out. I presume you have the basic protection, diode and possibly transistor on your outputs?
Tough to say. Could be an EMI problem. Make sure you are switching the “hot” and not the “neutral” connection. (Not sure if that is what they’re called in your region.) You might also consider adding an opts-isolator between the Arduino and relay, if the relay module doesn’t have one already.
Hello sir,
I want to thank you for the arduino code.
I use this for controlling my spot welder via a relay.
It works very well.
Thanks again
Sounds cool. Thank you for letting me know.
Hi sir.. The 18 void loop() {
19 // get the time at the start of this loop()
20 unsigned long currentMillis = millis();
command must be placed only one time in the begging off the loop, or every time when we have two or more buttons in our project ?? . How must be our code when we have two buttons or more , to light two or more leds. ?? Thanks in advance and thank you very mach for your lessons ..
Hello James. I`m struggling to figure how to modify your code in order to make the program to to wait a few seconds after a pushbutton press to turn on an LED. Then a few seconds later, the LED should turn off but while the button is pressed. After the button is released it will make the “same” loop but with other “delays”.
I started from your code using flags and state machine but I still don`t figure out, what I`m missing.
Here is my scketch (sorry that I`m using your code instead made a new one) :
Thank you !
Code :
[arduino firstline=”1″]
//Global Variables
const byte BUTTON= 2; // button pin
const byte LED= 7; // LED (built-in on Uno)
unsigned long buttonPushedMillis; // when button was pushed
unsigned long ledTurnedOnAt; // when led was turned on
unsigned long turnOnDelay = 500; // wait to turn on LED
unsigned long turnOffDelay = 3000; // turn off LED after this time
unsigned long buttonReleasedMillis; // when button was released
unsigned long ledTurnedOnAtRel; // when led was turned on
unsigned long turnOnDelayRel = 1000; // wait to turn on LED
unsigned long turnOffDelayRel = 4000; // turn off LED after this time
bool ledReady = false; // flag for when button is let go
bool ledState = false; // for LED is on or not.
int buttonDown = 0;
int buttonState =0;
int lastButtonState =0;
void setup() {
pinMode(BUTTON, INPUT);
pinMode(LED, OUTPUT);
digitalWrite(LED, LOW);
}
void loop() {
// get the time at the start of this loop()
unsigned long currentMillis = millis();
buttonState = digitalRead(BUTTON);
// check the button
if (buttonState != lastButtonState) {
if (buttonState == HIGH && buttonDown == 0) {
// update the time when button was pushed
buttonDown = 1;
if (buttonDown == 1) {
buttonPushedMillis = millis();
ledReady = true;
}
}
// make sure this code isn’t checked until after button has been let go
if (ledReady) {
//this is typical millis code here:
if ((unsigned long)(currentMillis – buttonPushedMillis) >= turnOnDelay) {
// okay, enough time has passed since the button was let go.
digitalWrite(LED, HIGH);
// setup our next "state"
ledState = true;
// save when the LED turned on
ledTurnedOnAt = currentMillis;
// wait for next button press
ledReady = false;
}
}
// see if we are watching for the time to turn off LED
if (ledState) {
// okay, led on, check for now long
if ((unsigned long)(currentMillis – ledTurnedOnAt) >= turnOffDelay) {
ledState = false;
digitalWrite(LED, LOW);
}
}
//================================================
else {
if (buttonState == LOW && buttonDown == 1) {
buttonDown = 0;
if (buttonDown == 0) {
buttonReleasedMillis = millis();
ledReady = true;
}
}
}
if (ledReady) {
if ((unsigned long)(currentMillis – buttonReleasedMillis) >= turnOffDelayRel) {
digitalWrite(LED, HIGH);
ledState = true;
ledTurnedOnAtRel = currentMillis;
ledReady = false;
}
}
if (ledState) {
if ((unsigned long)(currentMillis – ledTurnedOnAtRel) >= turnOffDelayRel) {
ledState = false;
digitalWrite(LED, LOW);
}
}
lastButtonState = buttonState;
}
}
[/arduino]
I don’t follow your explanation or the logic in your code. But I will try to offer some suggestions.
First, you need to be using an external pull-down resistor. Otherwise, your button’s behavior isn’t predictible.
Second, you should not be checking “leddReady” or “ledState” twice. You have not created a state machine, you have created a mess.
Third, maybe it is how the comment got formatted. But you would do yourself a HUGE favor to hit “ctrl-t” in the IDE. It will format your code so that it is readable.
Hello sir James.I am beginner with arduino.I would like to ask you how can we turn off the led not only with the expire of time (delay of 5 sec) but also with the same push button before the expire of 5 sec.I want to have 2 choices.Either by pushing the button so the led turns on and waits for 5 sec in order to turn off or by pushing again the button before the expire of 5 sec,so it will turn off immediately .
Sorry, but I won’t write your projects logic for you. Use the examples to solve the two states you want by themselvds: count up and count down. Then the push buttons can set flags that use that logic.
Good morning. It’s a very nice analysis . But what if the Button in the beginning is pressed on and then depressed. Can you show me the change of routine into the loop ? Thank you …
Change line 23 to look for a HIGH.
Sir thank you very much indeed for your answer .. It worked perfect .. But in my project i have two buttons, to light up two leds separately.. How must be now my code . Thank you in advance Sir …
i want a timer which turn on the relay for some time (2min) when button is pressed then off but if i press the same button before 2 minute then the timer of 2 minute again starts counting from start without turn off the output relay…
That’s just a basic millis() timer. Each time the button is pressed, reset your wait time. Something like:
[arduino]
void loop() {
// react when the button is pressed. if using the internal pull-up, PRESSED should be #define as LOW
// store the current value of millis, which "resets" the timer.
if (digitalRead(button) == PRESSED)
buttonPushedMillis = millis();
// see if "interval" amount of time has passed. set a global constant for 2000 ms for interval
if (currentMillis – buttonPushedMillis) > interval)
digitalWrite(relayPin) = LOW;
}
[/arduino]
Thank-you, Thank-you, Thank-you!! I am trying to learn Arduino while working on a project. I have the project working using old school hardware mainly based on mono-stable 555 timers. But then I decided to add a color display to serve as an object counter and Arduino was the best way I could think of to do it. Since I was going to add a pro-mini for the display I figured it would only make sense to do the whole thing with the Arduino. Once I had the counter/display working I tried to add the other functions that were being handled by the 555s. That’s when I quickly learned that using Delay wasn’t going to work. I’ve been trying to figure out how to implement Millis() for a week or more and just wasn’t getting anywhere. I wasn’t even sure Millis() was the way to go about it. I finally found this tutorial and at 1st thought it might work with a few changes. Then I realized that it was verbatim exactly what I was looking for. I ended up changing pin assignments and renaming the variables to reflect my project but otherwise I just copied your sketch. Now that i see how it is done I realize my attempts weren’t even close!! You have gotten my project past a major hurdle. It now runs simultaneous with the counter and i can move on to other aspects. In the meantime I will be studying this sketch (which I now call the 555 timer sketch lol) until I understand the reason for each line. You put a big smile on my face today. Thank-you again.
James Phillips
Magnificent! You are brilliant explaining and very generous of share your knowled
Nice job! Can we use this type of led off latency after a few push of button. Delay after state change (button push counter)
Sure, why not.
So in my case I am turning on a relay from a web interface button (to open a garage door) but I want it to stay on after I “unclick” the button for 500ms to make sure the contactor on the motor has time to pull in.
Can I compare the time from when the button was pressed (openTime) to millis() + 500. Is there a reason this won’t work? I ran it and it does not seem to be working but I’m wondering if its a syntax error.
if (request.indexOf(“/Open=HIGH”) != -1) {
digitalWrite(relayOpen, HIGH);
openTime = millis();
}
if (millis() >= (openTime + 500));{
digitalWrite(relayOpen, LOW);
}
Thank you for this write up
Code snippets rarely contain the actual problem.
#1 What variable type is openTime. It needs to be an unsigned long.
#2 The if-statement needs to be called inside of a loop. You can’t check if 500ms has passed, unless you keep looking at it.
#3 This code isn’t rollover-safe. To make the numbers easier to follow, let’s say rollover occurs at 10000. So let’s say openTime is 9900. Adding 500 to that will cause it to rollover to 400. Problem is when the if-statement before millis() rolls over your check could be 9904 >= 400. That would evaluate as true. This reason is why you should always use “the current time” subtracted from a “previous time” compared to an inverval. (I doubt this is why the code is not working though, since you probably haven’t hit rollover yet. unless maybe you’re using an int for openTime. However this will give you problems eventaully)
Very nice, just what I was looking for.
Needed a push button to initiate a timed output to reset a real time clock at midnight
Thank you
does the “check the button” image misleading? seems like it is missing a supply and resistor.
No. Both are provided by using the internal pull-up resistor (enabled with line 13.)
What if you wanted to change this code so that it starts the timer as soon as the button is pressed instead of released? In my case, a switch will turn on and stay on for the entire loop. I want the LED to turn on as soon as the switched is set HIGH.
You would just need to follow the button state change example on arduino.cc.
[arduino firstline=””]
if (buttonState != lastButtonState) {
[/arduino]
In the if-statement, check to see if the button is ON (HIGH or LOW depending on your situation) and then set the ledReady to true.
[arduino firstline=””””]
unsigned long currentMillis = millis();
if(buttonState != lastButtonState); //compare to previous state
if (buttonState == HIGH){
buttonPushedMillis = currentMillis;
co2ValveReady = true;
}
if(co2ValveReady){
if((unsigned long)(currentMillis – buttonPushedMillis) >= turnOnDelay){
digitalWrite(co2Valve, HIGH);
co2ValveState = true;
co2ValveOnAt = currentMillis;
digitalWrite(co2Off, LOW);
co2ValveReady = false;
}
lastButtonState = buttonState;
[/arduino]
This doesn’t seem to work correctly. Need it to turn the LED on for 3 seconds as soon as the button is pressed, and then off – although the button will remain pressed until reset.
I don’t have time to look in depth, but add an AND statement to your button check to ignore it if co2ValveReady is true. There’s no reason to check the button at that point (and you keep updating the buttonPushedMillis) in that case.
did you get this sorted out? if so can you share? In similar situation at the moment. Thanks
I amend code to blink when you press button and at the end of setup time, but when ever you press button within this time led is blinking again and I want to switch it off this behavior.
something like this:
press the button –> LED (on and off)
time is ticking
press the button again –> LED stay off only millis() time is reset to begin
time is off –> LED (on and off)
I would create a flag called “isBlinking”. When the timer runs out, set it to false. If the button is pressed and isBlinking is true, set it to false.
How you can disable led blinking every time when you press button with in turnOffDelay?
I don’t understand your question. I guess you need to create a flag variable for LED-blinking.
Can be the possibility of millis() roll over if the arduino is left ON for enougth time ????
Yes, of course. It rolls over about every 49 days. This code is specifically written to handle the rollover.
[arduino firstline=””]
if ((unsigned long)(currentMillis – buttonPushedMillis) >= turnOnDelay) {
[/arduino]
This article discusses how this rollover handling works.