
This week’s MQTT Tutorial connects a Raspberry Pi, ESP8266 (or Arduino), and a PC together. Remember last week’s post provided an overview of message brokers and MQTT. We learned that MQTT is a hub and spoke protocol for sending messages between IoT devices. Clients can subscribe or publish messages to a central server, called a broker.
Now it’s time to connect our IoT devices together!
For this MQTT tutorial, I have three main elements:
• My Computer, which will act as the broker.
• Raspberry Pi running Python
• ESP8266 controlling an LED
The idea is that the Pi (via Python) will send messages to the PC broker to tell the ESP8266’s LED what to do. For our simple MQTT tutorial, the Pi will blink an onboard LED on the ESP8266 one time.
In this MQTT Tutorial
I am not going to cover how to connect to your network (at least not in detail.) There are plenty of tutorials on that piece for each of the devices mentioned here.
Instead, I am only going to give an overview of communicating with MQTT on each IoT piece.
MQTT for PC
There are quite a few options for an MQTT server. Services like Amazon’s AWS IoT and AdafruitIO are cloud-based brokers. Each offers some advantages. Depending on your project needs you may or may not need the full support of a cloud-based service.
Mosquitto
If you want to host a broker, the open-source MQTT Mosquitto is an excellent option. This fully compliant MQTT broker also comes with command-line utilities for publishing and subscribing.
For Windows, there are binary installers on mosquitto.org. For Linux, check your package manager for “mosquitto” or “mosquitto-mqtt.” On Mac, you can use homebrew to install mosquitto.
Running Mosquitto
By default, mosquitto runs on port 1883 with virtually no security. For getting started, this is fine, but eventually, we need to look at adding some security stuff (hey, future post idea!).
I recommend running mosquitto in verbose mode, so you can get a good idea of what it is doing.
MacMan:~ james$ mosquitto -v
1456272937: mosquitto version 1.4.5 (build date 2015-11-09 14:23:46-0800) starting
1456272937: Using default config.
1456272937: Opening ipv4 listen socket on port 1883.
1456272937: Opening ipv6 listen socket on port 1883.
Testing Mosquitto
With the server code running in verbose mode, open up two more command prompts. We are going to use mosquitto_pub and mosquitto_sub to send ourselves test messages.
Subscribing to MQTT Topic with Mosquitto
First we are going have our client subscribe to a topic called “debug”. Use this command line in your “subscriber” window.
mosquitto_sub -h 127.0.0.1 -i testSub -t debug- The host flag (-h) is the server running mosquitto, in this case, localhost.
- The identity flag (-i) isn’t required. When a client id is not provided, mosquitto_sub will create one.
- The topic flag (-t) is the topic we want to subscribe to, in this case, “debug”.
Notice on the server I didn’t create the topic, the topic is created when the subscriber or publish first hooks into it.
Publish to MQTT Topic with Mosquitto
Now that we have a client listening to a topic, let’s have a client publish to it, here’s the command for that.
mosquitto_pub -h 127.0.0.1 -i testPublish -t debug -m 'Hello World'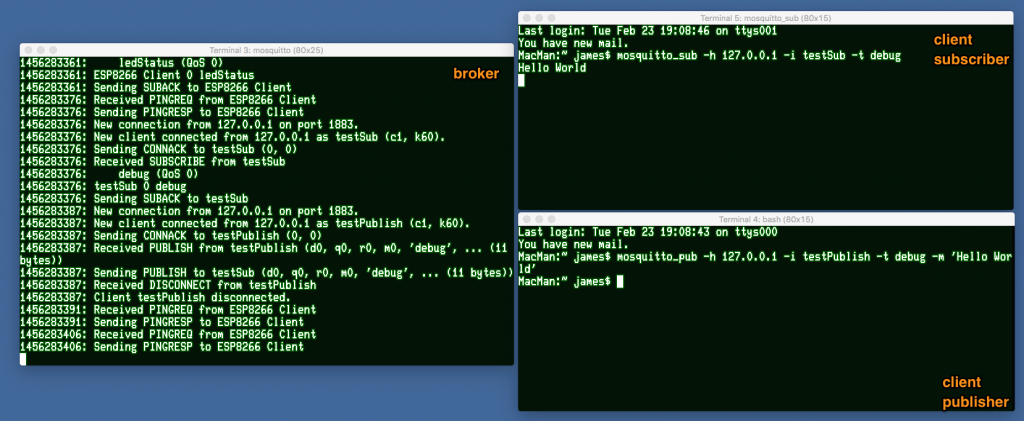
And we see our client window comes back with our published message! Check out the —help flag on both the mosquitto_sub and mosquitto_pub utilities. There are lots of useful options for both, including -l which reads the message from STDIN.
Okay, now that we have our mosquitto broker running, let’s communicate with our devices.
MQTT for Raspberry Pi (or Python)
One option for MQTT messaging on the Raspberry Pi is just to install mosquitto! You can use the same mosquitto_pub and mosquitto_sub command-line tools to communicate with an MQTT server.
The other option is to use an MQTT library for your preferred language. In this case, let’s look at Python.
Install MQTT for Python
The MQTT library I’m using is the Paho Python Client. It’s open-source and supports the latest version of MQTT.
Installation is simple. First, install “pip” and then run:
pip install paho-mqttExample MQTT Python Code for Raspberry Pi
Paho makes communicating with your MQTT server very simple.
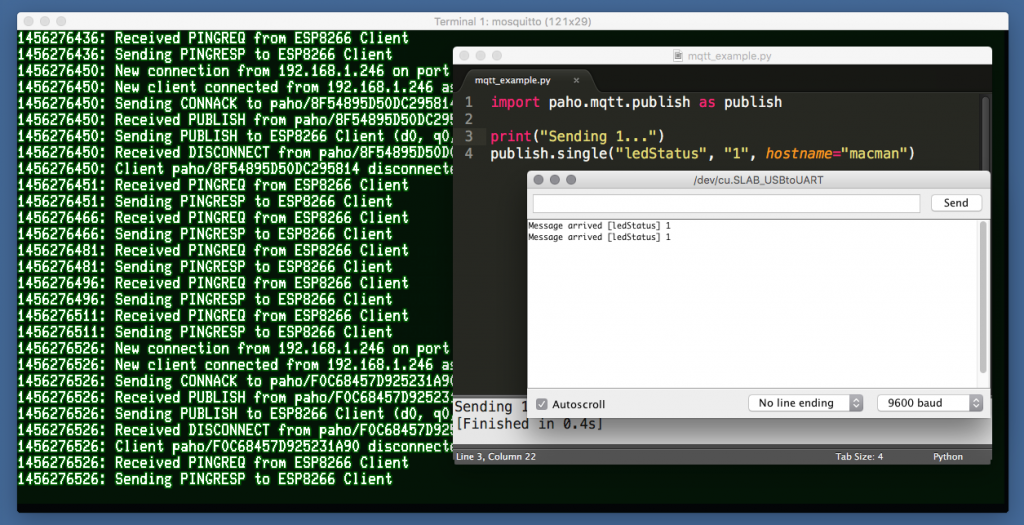
import paho.mqtt.publish as publish
import time
print("Sending 0...")
publish.single("ledStatus", "0", hostname="macman")
time.sleep(1)
print("Sending 1...")
publish.single("ledStatus", "1", hostname="macman")
Seriously, it is that simple. Tell the script the hostname of your server (macman), the topic (ledStatus), and the message (0) or (1).
In this MQTT Tutorial example, we’re sending a ‘0’, waiting one second, and then sending a ‘1’. These actions will cause the LED on the ESP8266 to turn off briefly and then turn (back) on.
Now that our Raspberry Pi is sending MQTT messages let’s receive them. The next section gets our ESP8266 (or could be an Arduino with WiFi/Ethernet Shield) receiving messages on the topic “ledStatus” and blink an actual LED!
MQTT for ESP8266 (and Arduino)
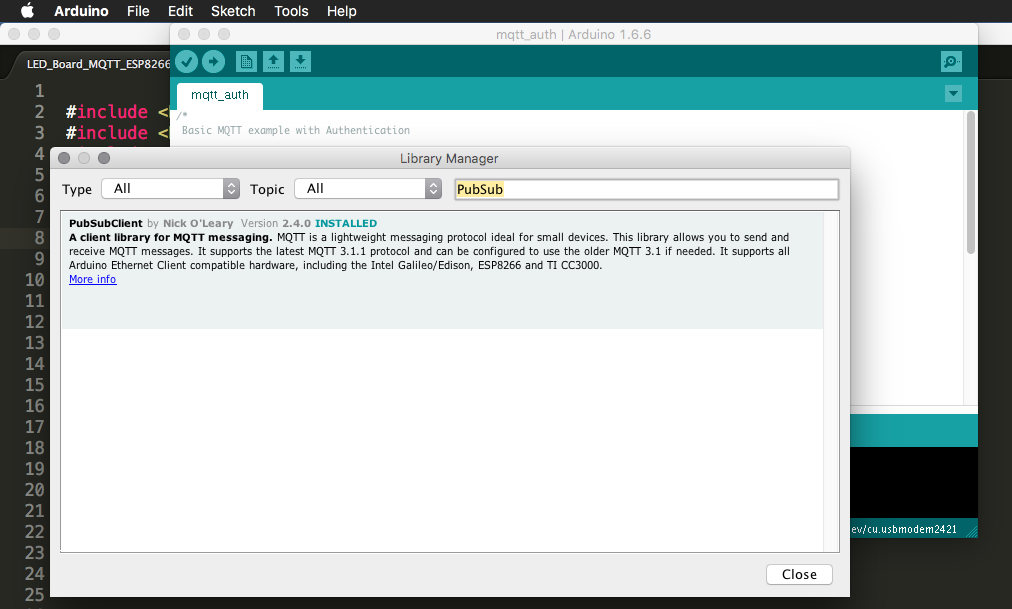
PubSubClient is an Arduino-based MQTT client. With just a few lines of code, it is very easy to either subscribe to topics or publish new ones.
In my setup, I am using the Arduino IDE to program my ESP8266. Read my ESP8266 caution post for why I use the Adafruit Huzzah and not the junk from eBay.
Install MQTT for Arduino IDE
Installing PubSubClient for the Arduino IDE is easy. Either install manually from GitHub or use the Arduino Package Installer. Simple!
Arduino ESP8266 and Uno Note
Switching between my Uno with Ethernet Shield and an ESP8266 took no effort on my part. The library works great with either.
Code Example for Arduino MQTT
The examples included with the PubSubClient are excellent. I think there are even ESP8266 examples particular to MQTT. Make sure you check those out when you are getting started.
Here’s my code for connecting to WiFi and subscribing to the topic “ledStatus”. When the ESP8266 receives a message, it acts by turning the “ledPin” on or off.
#include <EEPROM.h>
#include <ESP8266WiFi.h>
#include <PubSubClient.h>
#include <Wire.h>
#include <Adafruit_INA219.h>

// Connect to the WiFi
const char* ssid = "Dear John";
const char* password = "password123";
const char* mqtt_server = "macman";

WiFiClient espClient;
PubSubClient client(espClient);

const byte ledPin = 0; // Pin with LED on Adafruit Huzzah

void callback(char* topic, byte* payload, unsigned int length) {
Serial.print("Message arrived [");
Serial.print(topic);
Serial.print("] ");
for (int i=0;i<length;i++) {
char receivedChar = (char)payload[i];
Serial.print(receivedChar);

if (receivedChar == '0')
	// ESP8266 Huzzah outputs are "reversed"
	digitalWrite(ledPin, HIGH);
	if (receivedChar == '1')
		digitalWrite(ledPin, LOW);
	}
	Serial.println();
}

void reconnect() {
	// Loop until we're reconnected
	while (!client.connected()) {
		Serial.print("Attempting MQTT connection...");
		// Attempt to connect
		if (client.connect("ESP8266 Client")) {
			Serial.println("connected");
			// ... and subscribe to topic
			client.subscribe("ledStatus");
		} else {
			Serial.print("failed, rc=");
			Serial.print(client.state());
			Serial.println(" try again in 5 seconds");
			// Wait 5 seconds before retrying
			delay(5000);
		}
	}
}

void setup() {
	Serial.begin(9600);

	client.setServer(mqtt_server, 1883);
	client.setCallback(callback);

	pinMode(ledPin, OUTPUT);
}

void loop() {
	if (!client.connected()) {
		reconnect();
	}
	client.loop();
}All of the magic happens inside of the function “callback”. In your real code, you probably want to write a function to handle receiving messages. Since I’m only sending single-character messages on one topic, this simple code works.
Conclusion
This MQTT tutorial is pretty basic. However, it shows the minimum necessary to connect a Raspberry Pi, ESP8266 (or Arduino), to a PC running an MQTT Broker.


147 Comments
A piece of trivia for you.
Did you know MQ started life at United Airlines, as Communications Manager (Comms Mgr), then renamed to Communications Integrator (CI). The rights were sold to Microsoft and IBM, where it became Message Queuing (MQ). Various functionality were added, one such is MQTT.
Nice tutorial. Unfortunately it doesn’t appear to work on current Mac OS. After installing with Homebrew, any attempt to publish to the broker at anything other than localhost or 127.0.0.1 results in “Error: Connection refused.”
I’ve even reconfigured Mosquitto to run on startup as a daemon under the root user, and you still can’t publish to it. This is a problem I’ve found several other reports of, but no solid explanation or solution.
Hi, I would like to connect an Arduino Nano to a MQTT service BUT in a more SECURE manner. Is that possible with the Arduino?
MQTT uses Transport Layer Security (TLS) encryption with user name, password protected connections, and optional certifications.
And how could it be done by replacing WiFi with LoRa?
The MQTT protocol runs over TCP/IP so you need a LoRa gateway to the Internet and, ultimately, to your MQTT broker of choice.
Hi James,
Excellent tutorial. This actually gave me the idea to use MQTT for controlling the 9 controllers that I will have driving strips of LED’s.
in Rod Serling’s voice:
Picture if you will a Raspberry PI, running the MQTT broker, and a Web Server. The Web Page has several selections on it that will direct the 9 controllers’ LED activities.
what I am trying to sort out (while the power supplies and additional hardware arrive) is what is the best method to broadcast the information?
A) Do I send out on ONE topic, 9 different messages and let each client figure out if they are supposed to do something.
or
B) use 9 topics with a message specific to each controller as it subscribes to it’s particular channel?
I can see making a case for either way. but as I’m new to this I figured I’d see if you had an insight that might tip the balance
thanks,
chris
Hello, personally I would tend to keep the MQTT traffic as low as possible so I would try method A first. But as you rightly say both have thier advantages…but keeping traffic low is always a good thing. All the best on your project!
Yes that makes the most sense. probably why I picked it to be option A) my power supplies arrived yesterday and my additional microcontrollers arrive today. so I hope to have 3 prototype clients up and running this weekend.
Hi,
I’m new to MQTT, ESP8266 and so on but have some experience in arduino programming. Installed Mosquitto and Node Red in a raspberry pi. Downloaded some code I found on internet and compiled/downloaded via arduino ide into a NodeMcu ESP8266. Can read/set LED, temp and humidity via Node Red dashboard. Very nice.
So I tried with a sonoff TH10. Began with some code that was supposed to blink the LED on GPIO13, nothing more. Just to se that it was alive before it was time to do some mqtt stuff. I managed to compile and download via arduino ide, but then nothing. No blinking LED. Tried the one on GPIO12 but nothing there. 3.3 and 5.0 V is available on board. Did the same thing with a sonoff S26 with the same result.
What is different between a NodeMcu and sonoff TH10/S26? Both are build on ESP8266… Happy for any advice.
/Johan
Hi,
Ok, so I have my mosquitto broker set up & running and I have several esp8266’s reporting data to it. My issue is data logging, I’d like to log my sensor data to file(s) on some machine on my network but I can’t find a convenient way of doing this given my software skill level. Python would seem to offer all the tools but I’d like something that can be set up as a background service and which doesn’t need a command console window to be kept alive to run. Any thoughts on doing this?
Thanks.
I’d be surprised if there isn’t a utility that does the following already. My hack would be to write a python script that subscribes to the topics of interest and saves them to a file. You could use “screen” let it run in the background. Or you can make it a startup service.
Hi.
Take a look at https://github.com/jpmens/mqttwarn
Good tutorial, My question is in regard to the data send and received thru the network, home or internet. I did connect a few raspberry zero thru an ATT modem to a broker in my home and I use MQTT because I read about the low data it uses. The modem plan rate is 1 MB/month for $1.50 1 MB is not much when you use WIFI but when you use LTE-M it is expensive. The problem I am having with the raspberry is I think that because of other services from the OS it uses a lot of data even without starting the MQTT, It is possible to reduce the data usage to only MQTT. Maybe you don’t see the question relevant but the main advantage of using MQTT is to be disconnected from the cloud (that use MQQT and charge you for the server use) and to reduce the use of data because MQTT is good to that. But if you waste your data on other services there is not most advantage left.
I would setup a reverse-firewall on the Pi to block non-MQTT traffic.
I want to run mqtt on a automatic tea machine, thereby I can turn on/off remotely from my mobile phone.
or even I can program in python in way it orders tea powder from amazon by itself if its getting below a certain level.
can i follow the procedure for ESP32
Question, in the last example for the ESP I don’t see where you make the connection to,the WiFi network.
However it works to my surprize! But the ssid and password are never referred to. How does this work?
I was also curious if bacnet commands would travel well through mqtt.
Wonder if wireguard would work with linux mqtt…
Thank You for amazing code sir, But i am facing [Error-2] Name or service not known.
ESP8266 is giving RC=2.
I am new to these things, please help me.
sorry for mistyping…RC= -2
James – Great tutorial and for someone like me that is just getting into MQTT has been a great help, looking forward to more. The one on security would be very useful.
I don’t know if its just me but I’m finding it very hard to get any real noobie details on the PubSubClient library (and I find this with most library’s) other than the basic command list.
So far I have my Pi3 set up with Mosquitto and Node-Red, set up a basic LED on one pin, a dashboard and have the basic sketch working to read the any changes published for the LED.
Where I’m struggling now is where in the basic sketch do I start putting my code to publish data, for example, If I want to publish the temp from a sensor does this go in the normal loop (assuming after the client.loop(); command) or in the callback loop?
Thanks in advance for any help given.
Chris
It’s pretty simple. You just call publish, wherever you need to publish it. The basic example shows exactly this method. On line 46 you give it the topic and message. That’s it.
Its exactly the same for me… it seems for the programmes so easy but im struggeling with it
I would like to read temperature and acceleration via ardunio uno and send the data to ibm bluemix via esp 8266
could u guide me
Thanks James,
Can you make a tutorial to control an RGB / WS2812 kind of led strip color control where led strip be connected to esp dev board and raspberry pi makes the wireless communication with esp to set the desired color.
Kudos
Hello Baldengineer, its an awesome tutorial on MQTT communication. I am curious to know if its possible to port the same tutorial on a platform like Onion Omega 2 kind of hardware which is much cheaper as compared to Pi and possessing same power under the hood.
Thanks.
Probably. mosquitto is an open source project. Personally, I have no interest in exploring the Onion Omega.
Hello! I want to ask you about how to make a simple MQTT server using java. I hope you reply my comment directly to my email. Thanks.
I know nothing about programming in Java. Nor do I know anything about how to create a MQTT broker.
Need Help…. for my mqtt i am using username and password. On raspberrypi mosquito_sub -d -u username -P password -t “dev/test” work fine but i am stuck in arduino
not sure if you figured it out or not but this seems to answer our question
http://www.instructables.com/id/MQTT-Bare-Minimum-Sketch/
void reconnect() {
// Loop until we’re reconnected
while (!client.connected()) {
Serial.print(“Attempting MQTT connection…”);
// Attempt to connect
// If you do not want to use a username and password, change next line to
// if (client.connect(“ESP8266Client”)) {
if (client.connect(“ESP8266Client”, mqtt_user, mqtt_password)) {
Serial.println(“connected”);
} else {
Serial.print(“failed, rc=”);
Serial.print(client.state());
Serial.println(” try again in 5 seconds”);
// Wait 5 seconds before retrying
delay(5000);
I’d like to see a tutorial running the broker on a PI and 2 separate ardruino zeros; 1 as a sensor, the other to control a relay.
There isn’t a need for a separate tutorial. mosquitto runs fine on the Pi. It is a linux PC. Only reason I put a PC here was to make the roles clear. For my house, my Pi runs the broker and the UI client that talks to it. (allowing other clients to talk to the broker as well.)
Hi,
Interesting article.
Do you know if the same can be achieved by using bluetooth (BLE) instead of WiFi?
Regards
I’m playing with the IC Station NODEMCU modules with onboard usb. Very inexpensive, reliable, and fun to program with the Arduino IDE. A nice match with the BME20 temp / humidity / barometric pressure module. Also interfacing with a inexpensive relay module. MQTT may be just the ticket for me. Thank you for the explanation.
James;
Retain flag
Rather than just asking how this works, I played around with it. This is what I found for the retain flag. Simply putting -r
at the end of the publish command sets the retain flag. So if a subscribing client has been off line and comes back up after the “publish” was sent. As soon as it comes back online and subscribes to the topic, it receives the last message sent. You probably already knew that but I had been trying to figure out how the LWT and QOS was going to get me the last message sent for this scenario. mosquitto_pub -t ‘mytopic’ -m ‘mymessage’ -r
This works typing it on a command line on the Raspberry Pi but does not compile using arduino ide.
“`
client.publish(“Charts/PS”, “0” -r);
“`
Any suggestions?
I just received an OpenMV Cam M7 from openmv.io – this is a camera board that runs MicroPython.
Wondering if anyone has used this or a similar board to run a MQTT client using the vendor’s WiFi shield? Seems like it should work similarly to the Raspberry pi running Paho-mqtt. I’ll give it a shot and post my results here…
Thanks,
Kevin
I would be interested in that. I’ve just got my M7.
19.5.2018
Hello Kevin,
At the moment I am stuck on a RPi3B+ and OPENCV problem.
I’ve decide to try out a new idea by putting all IO intensive Sensor programmes on an Anduino ( I need 3 A2D’s) and shift most of my sensors there. Then transmit common data via MQTT . That could make expansion a lot easier.
Have you got any further on the M7? I am wondering now if that is the way to go – RPi3 and a WebCan + OPENCV3.4. I am very interesting to hear what you have found .
In the picture on top of the article it seams you use an touch display with your Pi. Even trying some tutorials and reading a lot, I do not get a own GUI with some buttons and functions. Would be nice to see ho you managed this
Thanks you
https://www.baldengineer.com/raspberry-pi-gui-tutorial.html
Thank you very much 🙂
I want to control the GPIO on ESP8266 from a python script on my RPi. The ESP runs standalone with ESP Easy, I have mosquitto and Paho installed on the RPi. Do I have to change the ESP firmware to get it to work?
Personally I dislike using any Cloud service and so reject such solutions. I suppose one could create ones own cloud – but probably addressing each Computer would be easier.
Nothing in this tutorial is “cloud based.” It is all hosted on a local network.
True, my mistake.
“Services like Amazon’s AWS IoT and AdafruitIO are cloud-based brokers” gave me the wrong impression…..
The rest of that sentence is “you may or may not need the full support of a cloud-based service.” With the very next sentence being “If you want to host a broker”.
Sorry I couldn’t make it clearer.
It was clear enough, the fault lies entirely with me. I think I read the
article far too superficially.
I now have a Broker on a Pi2 and simple MQTT request a working. Now for more publichings and getting the RPi’s to work on the received subscriptions. Then I want to wite a form of monitor on the PC that reads all topics and displays them on screen. I would like to use
Qt5 and C++ for that.
Hi!
Thank you for your easy to follow explanations. I am trying to get my ESP8266 talking via MQTT to the terminal on my Pi. I used CloudMQTT(the free service) as a server and it worked very well. I then used different brokers and it all worked well. However, for my application I would like to have the server/ broker sit on the Raspberry Pi itself.
So I tried using 127.0.0.1 as my host. However, using PubSubClient for the ESP, on the serial monitor, it connects to wifi but at “Attempting MQTT connection”, it returns failed with rc = -2. Am I missing something.
1. The Pi, and the ESP both are connected to the same WiFi network.
2. When I open two terminal windows on the Pi, use 127.0.0.1 as my host, and pub from one and sub from the other, it works very well. It also works when I am sending messages using the python library from my Pi to the terminal windows on the Pi itself. It is only when my ESP tries to use 127.0.0.1 that the problems arise. What am I missing?
Also, is it okay if I ask you a question about the PubSubClient library? I have an issue getting the willQoS for the client.connect call to work.
Thank you,
Sohum
Hi Sohum,
127.0.0.1 is the address for localhost. When you use that address, it is telling the machine to search itself internally. On the Pi, to a Pi window, that works great! When you say go search for 127.0.0.1 from the ESP, you are always saying look to itself and don’t bother looking on the local network for the Pi.
You might try using all static IP addresses such as 192.168.5.1 Pi
192.168.5.10 Esp 1
192.168.5.11 Esp 2
That way the IP addresses are still non-routable (world wide internet cannot log to them direct) yet the network would probably not interfere with normal house routers which normally select 192.168.0.1 or 1.1 for the start of the network
As usual, I am a amateur and a professional may have a much better idea.
Regards, Bill
Hi Bill,
That makes a lot of sense. Thank you for your reply.
I was going to get the public IP of the Pi from itself, and use that instead of 127.0.0.1 as my next try. I’ll let you know how that goes. But assigning static IPs is obviously a lot more sophisticated and I’ll keep that in mind.
Maybe I can ask a follow up question here:
Once I use the correct(Pi) IP address, either static or public as my server, the Pi becomes my broker, is that right? Once Pi becomes the broker, my messages travel from the ESP to the Pi, latching on the WiFi, with no need to travel to any remote/ cloud-based server. Am I thinking about this in the correct way? That way all my data stays local(within the bounds of my WiFi network).
You should set a fixed IP (one is enough) on the PI for the broker. Setting a fixed IP an the Pi ist easy there are a lot of tutorial on the internet. The benefit is you can access the Pi from anywhere in your network without looking what DHCP address it got, for example to access it via SSH. You ESP should send its data to this address too and your broker should listen on IP 0.0.0.0 that means an all addresses it knows, so in your case to localhost 127.0.0.1 and the fixed IP you gave him. So local and remote access is easy possible. So the ESP can directly address your PI via WiFi. Attention if you use both the ETH0 (cable ethernet) and WLAN0 (WiFi) you should give the bot different IP addresses but on the sam network. i.e. if your local network ist 192.168.1.0/24 you Pi my have 192.168.1.100 for eth0 and 192.168.1.101 for WLAN0. Also if you give static IP addresses to you Pi, you should disable the DHCP daemon. Never give the Pi a public IP address, without realy know what you are doing, if you need access to your Pi from the internet put it behind a well defined firewall and use NAT for the special ports you need. If you need access to the internet from the Pi i.e. for update getting programms etc. give it a default gateway in the IP configuration leeding to your internet router.
Thank you for your reply Rainer!
I am not trying to use the pho mitt library. It seems it is rather limited in its functionality.
Is there anyway to read the ‘payload’ to check whether it is equal to some known value?
message.payload would be the way, but how do you configure message in the first place? Any ideas?
@Sohum April 14,2017 I do not really understand your question. In fact I use HomeAssist to Display the values from the ESP Sensors, mosquitto as a broker, both on a Raspi 2 with fixe IP and sketch I found here https://home-assistant.io/components/sensor.mqtt/ wich lets sleep the ESP for 10 minutes after each messurement. I power it with al small solar panel and aLiPo accu. Runs fine since weeks now
I have found that you can use the hostname instead of the IP address – this makes life a lot easier. I set the host name on myRaspberry pi as “broker” and could connect to all devices.
Very nicely and detailed explanation. I run the mosquito broker and it worked well. Now my question is about stacking the mqtt messages. what if I publish the data and there is no subscriber. would that data be queued by the broker and I will get them all by the next subscription or my published data to that topic will be lost.
In above example I published three massages at the same topic, one by one, while there was no subscriber. Now I subscribed to the same topic and I should get those messages but I got no massages at all.
Depends on the service level of the message. There are 3.
Both the publisher and the subscriber can request different levels of service. So if you wanted to guarantee delivery, you would need to publish with #2 or #3 and subscribe with #2 or #3.
Note that the wording for Level 0 means that the message may not be delivered. By default, most clients will publish and subscribe at level 0.
One scenario I don’t know about is on Level 2. I believe the client MUST be subscribed in order for guaranteed delivery. Otherwise, it seems like the broker would have to store messages indefinitely. So if you have a case where clients unsubscribe, you probably need a secondary method for queuing messages.
Got it. Quality of service (QoS) was needed to pass as a parameter with -q option and it will queue the message in absence of subscriber. Settings are found in the path /etc/init/mosquitto.conf for playing with the number of messages and etc.
Thanks for your replay
Hello Mr James,
I have the arduino MEGA 2560 which already includes the Ethernet shield. i want to use MQTT protocol for online monitoring the temperature and current value of motor of plant. Right now i am stuck with the coding and the connection with the server. It would be great help if you give me some guidance regarding this.
Hello Mr.James,
its a great tutorial i have done this and it works perfect. so, now i am working on project where if the RPI3 goes down because of some reason the whole network nodes should get connected to some MQTT servers on cloud automatically by using this “pubsub client library” i could not get connected to the cloud which gives publickey (used adafruit.io) i used this “boolean connect (clientID, username, password)” and passed client id, my user name and public key as password as parameters to the function but it didn’t work . it is getting connected showing it up on the serial monitor and again getting reconnected so is there any other way to connect to cloud with public key using same library please i need to know it fast as my project(Improving fault tolerance in MQTT embedded systems network) submission date is approaching fast
Thank you
Hey some one reply man it’s really important for me please
I have no idea.
But to back up. Your project is “improving fault tolerance” and you’re following an introductory tutorial? Seems like you should be the expert in this case.
as James said you want fault tolerence and it seam you need it. So first you should ask yourself if RPI3 is the right plattform for a mission critical system. Even my Raspis even Ver 2 oder Ver 3 are running months without going down. Sorry but second building fault tolerance system are nothing for beginners, what you seem to be, needing basic tutorials. On the other way there are tutorials connecting to MATT brokers with username and password and even SSL/TLS, I think I even have seen solutions with pulickey, so you may google for that. Tutorial are tutorials, that means they are for learning, given hints for real project, even if they are the complete solution for some projects they are still examples. For a fault tolerance system as you seams to need, you should be an expert, not still needing open source tutorials are ask or pay an expert, there are out a lot.
Sorry but thats my opinion.
Rainer
Thank you for your replies folks i don’t want something that is extra ordinary what i want is simple…. every cloud platform is having their on library for esp8266 which i cannot use for mosquitto but their must be a way to connect to these cloud platform with public keys using generic library if i can know this i will do rest of the project
Thank you
Hallo James,
one question, how can I set a fixed IP for the ESP8266 E12. I knew a method, but you do another initialisation for the WiFi, I even can find where you pass ssid and pass
Thank you Rainer
Hi Ranier and James
(James, If I mess this up, please update with the correct information)
Up in the Declarations (above void Setup), set the IP information:
[arduino firstline=””]
////////////////////// code snip 1 ///////////////////////////
// router settings
const char* ssid = "XXXXXXXXX"; // router network
const char* password = "YYYYYYYYYY"; // router password
IPAddress ip(192, 168, 0, 100); // ip address to call up the esp8266
IPAddress gateway(192, 168, 0, 1); // router address
IPAddress subnet(255, 255, 255, 0);
//////////////////////////////// end code snip 1 ///////////////////////////////
Down in the void setup () where you call the WiFi setup:
////////////////////////////////////// code snip 2 /////////////////////////////////
//Connect to wifi network
Serial.println();
Serial.println();
Serial.println("Connecting to: ");
Serial.println(ssid);
WiFi.config(ip,gateway,subnet); // to use a static ip address
WiFi.begin(ssid,password);
while(WiFi.status() != WL_CONNECTED){
delay(500);
Serial.print(".");
}
Serial.println();
Serial.println("Wifi connected");
//////////////////////////////////////////// end code snip 2 ////////////////////
[/arduino]
Hope that answers your question.
Hello William,
that’s the way I know, to init WiFi on the ESP8266. I changed the original code as you adviced and get a WiFi connect but no more connection to my MQTT broker.
I still do not understand who the WiFi connect works in the original working code, getting IP address via DHCP. Where are the credentials SSID and Password passed to the WiFi firmware.
@James please clarify
@William, thanks for your post, but why does the MQTT connect
Sorry Ranier but my wordy reply was blocked by the site. So here is brief suggestions.
Start easy and put the IP address of the MQTT broker in the declarations like:
const char* mqtt_server = “192.168.X.Y”; //X and Y real numbers
You can ping between all parties??
Regartds, Bill
Hello William, that point was clear, the brokers address never was the problem, I would just give the ESP a fixed IP too, as DHCP addresses change from time to. I know I can give clients fixed IP with DHCP but in the 30 years I am in the IT I learned that this sometimes do not work, so giving the fixed IP to the client direct ist the best. I am not totally new to the ESP but I still do not understand, how the original code works without the WiFi.begin. Nevertheless all is working, next is to make the communication secure via SSL.
Rainer
Solved, sorry for reasking. I did not realize the broker had stopped, so no connection would be possible. Restarting the broker all went find with the correct IP
Thanks for Help
Rainer
Hi,
thank you for this tuto. But I want to know can I use the Arduino PubSubClient to publish sensors data to Mosquitto broker and to MySQL database via USB port?? because I don’t have Ethernet shield. Thank you
PubSubClient uses Arduino’s Client.h interface. In theory, you could write a wrapper to work with serial. I have not yet seen that yet.
Hey James!
Thanks for tutorial. When I tried running test mosquitto I have a trouble: Havinga inform:
Error: Only one usage of each socket address (protocol/network address/port) is normally permitted.
Please help me!
Thank you
Hey James!
Your tutorial is cool. I haven’t tried this part out yet, because I have a question.
1) Instead of going around and having three different platforms be made to talk to each other, would it not be more streamlined and easy to have the Pi be the broker, or is there a specific reason you would recommend avoiding that for a beginner like myself?
2) I know that you recommend the Adafruit Huzzah, but all I have with me is a generic ESP8266 module. I know this is not a huge issue, since most of the code and implementation is going to be identical anyway. However, my module does not seem to like sending data over to the serial monitor here. Not sure why. The FTDI cable I am using programs the ESP8266 just fine. I know because I tried a simple Blink program by hooking up the GPIO pin 2 on the module to an LED and blinking that. Works perfectly. But still, nothing on the serial monitor. Any ideas?
Thank you,
Sohum
Yes, you can use the Pi as the broker. I kept them separate in my example to make the responsibility of each device clear.
Nice work James! Interesting series of tuts. I have a question though… You mention Arduino and ESP8266 in one breath. But these are totally different beasts, isn’t it? Or is the ESP connected to an Arduino serial I/O? Ik have a few ESP’s laying around (Yes, the chinese junk…) but you need to talk kinda “AT” language to the ESP. If the ESP is connected to the Arduino, then I can understand that the library handles the AT messages part.
Apart from that; the bigger ESPs can be programmed using NodeMCU, which makes it possible to put the program IN the ESP instead of using it as an WiFi “peripheral”.
Egbert Jan, NL
I don’t use the “AT” firmware. I program my ESP8266s with the Arduino IDE, or more correctly, the Arduino libraries. I found it silly to connect an 8266 to a 328 and talk to it with serial AT commands. The 8266’s SOC has a perfectly good microcontroller. If I needed more or stronger I/O, then I would connect the two with SPI or I2C. Touched on in this post: https://www.baldengineer.com/esp8266-5-reasons-to-use-one.html.
So when I combine them in the same breath, I’m basically saying programming the ESP8266 board directly with Arduino libraries, like PubSubClient.
That is what I thought! The ESP can do this easily on its own. But the ESP-12 on the breakout board must contain NodeMCU firmware, not the AT stuff. I’ll have to figure out how to get the IDE to talk to the ESP. I see the potential but do not grasp the ESP fully yet. (turning 62 next week…need some time learning)
CU
Egbert Jan
I can relate. It has taken me some time to understand what the ESP8266 really is. I plan some post/video on its basics soon.
Hi James,
Firstly thank you for sharing a informative tutorial.
and I had explored this and I got good knowledge on mqtt protocol.
here i have doubt that is, can i change port 1883 to other? if yes how?
Thank you in advance.
Yes. All the tools and libraries support custom ports.
Hi James,
Beautifully written tutorial. I had one slight problem. Perhaps it is because I am working with a Wemos esp8266. I have my RPi3 as both the MQTT broker as well as the wifi access point. I was not able to connect to the network until I added a small connection function from the sample esp8266 code from PubSubClient into your suggested code.
[arduino firstline=”1″]
void setup()
{
Serial.begin(9600);
setup_wifi(); // added this line of code !!!!!!!
client.setServer(mqtt_server, 1883);
client.setCallback(callback);
pinMode(ledPin, OUTPUT);
}
void setup_wifi() {
// added this function – without it the mqtt part will not connect
delay(10);
// We start by connecting to a WiFi network
Serial.println();
Serial.print("Connecting to ");
Serial.println(ssid);
WiFi.begin(ssid, password);
while (WiFi.status() != WL_CONNECTED) {
delay(500);
Serial.print(".");
}
Serial.println("");
Serial.println("WiFi connected");
Serial.println("IP address: ");
Serial.println(WiFi.localIP());
}
[/arduino]
Great page. Just not sure why the ESP8266 is slow a publishing to MQTT. I am struggling to get 3 msg per second. Whereas with the RPi on paho client I am getting 50 per second. Any idea why? I am guessing the pubsub lib is not very efficient or the ESP8266 just does not have the grunt?
Can you give an example where the arduino subscribes to multiple topics ?
Thank you for your beautiful tutorials 🙂
Good idea. I’ll put a full tutorial together. However, the key is using “strcmp()” on topic. For example:
[arduino firstline=””]
void callback(char* topic, byte* payload, unsigned int length) {
if (strcmp(topic,"red")==0) {
Serial.println(F("Processing red"));
if (payload[0] == ‘0’)
setPWM(red, 0, useEEPROM);
if (payload[0] == ‘1’)
setPWM(red, 1000, useEEPROM);
}
}
[/arduino]
Inside of the callback(), I check the value of topic to see which topic generated the event.
Did you do the “strcmp()” tutorial? I looked and couldn’t find it. This would be most helpful. Thank you for your contributions; teaching us MQTT
I think you’re looking for this one on multiple MQTT subscriptions?
YES! Thank you very much.
Hey James,
Nice tutorial, Thank you.
I was wondering what SSID & password are doing here since they are not used ??
Tkx for the reply.
Leo
The ESP8266 WiFi Library I used when I wrote the example looked for globals SSID and password. Probably time to update with more recent libraries.
Hello
Don’t know if you can help or not with this problem.
I have mqtt mosquitto loaded on a raspberry pi 3 and all works great.
In one of my program that needs to use the mqtt broker the script is:
exec(“C:\Program Files\mosquitto\mosquitto_pub.exe”, “-h 10.1.1.120 -p 1883 -t /HOME/LIVINGROOM/COMMAND -m Command:Lounge_Lights_On’ “)
The problem is here, as you can see, is that the script uses the mqtt broker on a Windows machine (“C:\Program Files\mosquitto\mosquitto_pub.exe”) and not a raspberry pi.
Is there a way to connect to the pi mqtt instead of the pc mqtt and then run the rest of the script?
exec(“run-from-pi-broker”, -h 10.1.1.120 -p 1883 -t /HOME/LIVINGROOM/COMMAND -m Command:Lounge_Lights_On’ “)
Any help is welcomed.
John
If the script is running on the Pi, why wouldn’t you just use “mosquitto_pub”? Use “which” to find its path.
The example script I have above has the mqtt broker on the Windows PC.
My mqtt broker is on the Pi.
The script runs from the PC in a program.
Running the script above tries to connect to the PC mqtt broker.
I need the script to run from the Pi mqtt broker.
I am unsure what to substitute(if I can at all) to have the script run from the Pi mqtt broker.
Like I said not even sure if it can be done?
Thanks for your reply.
You need to have mosquito_pub installed on the PC. You give the script the IP address of the Pi running the broker.
Hi James,
Great post. Thanks for that! I have been experimenting with the pubsub as well as paho libraries on Arduino sending MQTT via Ethernet. The latter I understand supports SSL. I am trying to implement pre-shared-key based SSL/TLS support. Do you have any experience/example how to implement this on Arduino?
Hi Tom, no I don’t have experience with SSL yet. That was next on my list and then got distracted. Even though I don’t use my IoT stuff outside of my home network, I still want the traffic encrypted. I’d love to hear if you figure out how to do the pre-shared keys.
Hi James, sorry for my late reply. I have found a great post here about the issue (https://hackaday.io/project/12482-garage-door-opener/log/43368-adding-tls) but did not succeed yet to implement it. For some reason I cannot connect to mosquitto any more once I implement the certs. Maybe you can have a look at it.
I am working on this, not finished yet
found the following
https://io.adafruit.com/blog/security/2016/07/05/adafruit-io-security-esp8266/
http://stackoverflow.com/questions/26657319/how-do-you-set-up-encrypted-mosquitto-broker-like-a-webpage-which-has-https
https://primalcortex.wordpress.com/2016/03/31/mqtt-mosquitto-broker-with-ssltls-transport-security/
http://www.switchdoc.com/2016/02/tutorial-installing-and-testing-mosquitto-mqtt-on-raspberry-pi/
May be it helps
http://lukse.lt/uzrasai/2015-02-internet-of-things-messaging-mqtt-1-installing-mosquitto-server/
May be this can help. I still did not try yet, but I will.
A good tutorial – well done!
A naive question:
I want to read data from each Rpi and send data to each Rpi. So I need a broker and client
on each RPI?
Something like :
RPI1 send2 data1 processes data1,Data2 and data3
RPI2 sends data 2 processes data1,Data2 and data3
Rpi3 send data 3 processes data1,Data2 and data3
I think this should be possible – or is there a better way?
One of the RPI can be both a broker and a client.
Sounds like you just need to create a topic for each node and then have the other nodes subscribe to it.
1) I tried to install mqtt on WIn 10 and followed the instructions including copying the dll – no go!
2) I see you use mosquitto-sub – I do not have that . An apt-get install moquitto-sub didn’t find it in the installs.
3) at the moment I am getting on my python programme:
File “/usr/lib/python2.7/socket.py”, line 571, in create_connection
raise err
socket.error: [Errno 111] Connection refused
A security problem, perhaps??
Please note that mqtt is listening on 1833 .
I would bee must grateful for any help on these points.
I had my MQTT broker running in RPi. Worked perfect! Thanks for this tutorial:)
Hooray for trial and error…!!
For me, the mqtt_server needed to be the IP address of the machine running mosquitto..
mqtt_server = “192.168.0.11”;
PS, also in case anyone else had the same issues.. Windows needs the ‘ replaced by ” in the mosquitto command line examples. (this may be a regional thing..)
I now have the LED flashing.
Thanks!
Richard
Just found this tutorial, and must say it is very helpful. I see some others have had issues with Windows and Mosquitto. I did as well , but realised that in the read.me it explains exactly what Dlls are required to be copied, and these were not present in the Open SSL install that I downloaded. Perhaps they have updated, but I found the Dlls in another download. For reference and to help others, the files to get are ” libeay32.dll ssleay32.dll”, as well as Re” pthreadVC2.dll” from sourceware.
Now my question… I have three mosquitto windows all talking nicely, using your examples, but my ESP8266 cannot see the mqqt server, I just get “Attempting MQTT connection…failed, rc=-2 try again in 5 seconds
”
. I note that in the ESP code you have “const char* mqtt_server = “macman”; and wonder of this is my problem..
I did not see any command to Mosquitto to set “macman”, and I’m not sure what alternative to use.. Presumably is is something associated with my specific machine, but what is it?
I have looked, but have not found any easy documentation to show me how to set it. Presumably its something so very simple that no one thinks it needs explaining.. .
Help would be appreciated.
Richard
PS I’m using NodeMCU . They may be very cheap, but they seem to work very well, and having the USB port on-board is very useful.
I think he put dummy values in SSID, Password, and mqtt_server.
I believe you need to set the mqtt_server value = to either an IP address/secure DDNS address of the computer or rPI hosting the mosquitto server (I use my internal IP addresses if using within my home server, i.e. “192.168.0.5” which would be the internal IP address of my desktop hosting the mosquitto server), or to a web-based MQTT server such as “http://www.cloudserver.com….whatever the rest of the address is for that web hoster.
Excellent article!
The Arduino code worked perfect on my Wemos d1 mini after removing line
#include
and changing
const byte ledPin = 0;
to
const byte ledPin = LED_BUILTIN;
For CC3200 from Texas Instruments
I HAVE INSTALLED MQTT (PUBSUB CLIENT ) ON ESP8266 NOW WAHT NEXT I SHOULD DO … ALSO I NEED TO CONNECT IT TO THE DATABASE TO GET DATA IN CONTROLLER WHERE MQTT IS INSTALLED AND VERIFY THE DATA STORED HERE AND CARRY OUT THE LIGHT SWITCH ON AND OFF PROCESS. SO CAN U JUST THE WAY
I am sorry but I do not understand your questions or what you are trying to accomplish.
Hi James, great post indeed. Maybe you can help me on solving my issue:
Basically i’m controlling a robot using MQTT on a raspberry pi (python), then i have a arduino UNO board which receives values from my broker and turn on robot’s motors. Everything is working pretty well, but the issue comes when i lose internet connection. So basically i would like to know if there’s a way to set a reconnection loop in python (which is my publisher), in case of a network problem, which keeps trying to reconnect. Sorry for my bad english adn thanks in advance. Cheers!
Sorry, I don’t know of a simple answer to this question.
Hi,
Great post.
This is a request for guidance.
My ESP8266 module connects to “test.mosquitto.org” and subscribes to a topic say “b1”. What ever is published to “b1”, it can read it immediately.
Problem happens when my second ESP8266 module subscribes to “test.mosquitto.org” to “b1”. It continuously returns :
WiFi connected
IP address:
192.168.0.9
Attempting MQTT connection…connected
Message arrived [b1] 0
Attempting MQTT connection…connected
Message arrived [b1] 0
Attempting MQTT connection…connected
Message arrived [b1] 0
Attempting MQTT connection…connected
Could you kindly suggest what might be going wrong. I look forward to your advice.
Thanks for the post James. I have a Arduino MKR1000 and a Raspberry Pi model B running a flask server. I can communicated between the Pi and Arduino when I run a python script (not Flask), but when I try to incorporate MQTT with Flask, the flask app subscribes but does not receive any data. I tried to import my stand-alone mqttTest.py (that works) into my flask app but then my flask app freezes up on load.
Do you know the proper way to implement MQTT with flask? Any help is greatly appreciated.
hello ,
I have run above program on Raspberry pi to connect with AWS-IOT.But I can not get any Status Update on AWS-IOT consolve. Thank you…
Sorry, I haven’t done anything with Amazon’s IoT / MQTT service yet.
[code]
mqttc = mqtt.Client(client_id="mqtt-test")
mqttc.on_connect = on_connect
mqttc.on_subscribe = on_subscribe
mqttc.on_message = on_message
#Configure network encryption and authentication options. Enables SSL/TLS support.
#adding client-side certificates and enabling tlsv1.2 support as required by aws-iot service
mqttc.tls_set("/home/user/root-CA.crt",
certfile="/home/user/cc/certificate.pem.crt",
keyfile="/home/user/cc/private.pem.key",
tls_version=ssl.PROTOCOL_TLSv1_2,
ciphers=None)
#connecting to aws-account-specific-iot-endpoint
mqttc.connect("https://ajnozx45566v5.iot.us-west-2.amazonaws.com", port=8883) #AWS IoT service hostname and portno
#the topic to publish to
mqttc.subscribe("$aws/things/raspberry/shadow/update/#", qos=1) #The names of these topics start with $aws/things/thingName/shadow."
#automatically handles reconnecting
mqttc.loop_forever()
[/code]
Hi James,
I am new to arduino and mqtt. Want to ask about the client.loop() function, inside the sketch main loop(), the last command is client.loop(). Can I put other command after client.loop()? Will the execution go back to main loop() after client.loop() ? I ask this because I want to implement mqtt publish (client.publish) and subscribe in the same device.
I need to put client.publish() inside the main loop, lets say every 5 minutes it will publish message to other device, at the same time will also listen to subcribed topic. I just not sure where to put the client.publish, should i put it after client.loop() or before? If I put it before client.loop(), will the execute loop back to main loop after client.loop()?
Thanks.
Benny.
Nice tutorial!
anyway, i have one quick question,
When uploading the code, what board should i use? Generic ESP8266 Module OR Arduino UNO?
Because i cant use the #include when i uploaded it to Arduino Board.
Thank you 🙂
I’m sorry I don’t understand what you mean you can’t use the #include.
Use Generic ESP8266 or if you have a devboard use that. I have a NODEMCU board so I use NODEMCU 1.0 (ESP-12E Module)
I forgot to mention that the model I’m using the ESP8266 is the ESP-01, the value of ledPin I changed it to “2”.
Sorry for my English.
Greetings, thanks for the tutotail.
I tried using an Ubuntu 14.04 portable as broker, Raspberry Pi 2 as transmitter of messages and ESP8266, but never reached publication the laptop error: out of time, so use the Raspberry Pi 2 as a broker and the laptop as a publisher and all it worked great.
I use my Raspberry Pi 2 connected directly to ESP8266 through the TX and RX pins, the Raspberry Pi 2 has enough power to feed the ESP8266 to 3.3V, so the expense of buying a FTDI saving me besides that everything I program in C language Linux and installed the Arduino IDE version 1.6.9. in my Raspberry Pi, I had to make a major change with the toolchain esp-open-sdk for the Arduino IDE could complilar and upload the firmware without problems.
I found out where I went wrong. I can not use the IP 127.0.0.1, this is the IP that my station assigned to mosquitto that runs it. I therefore have to use the IP that the router attached to my linux – in the case 192.168.2.111.
Now it’s working.
Still, grateful and congratulations for your article!
Hi my friend,
Congratulations for your post. Maybe you can help me solve this problem.
I have a mosquitto broker on local ip 127.0.0.1 port 1883 (default)
Tested and working from a terminal window. My system is a Ubuntu 15.10.
I can’t connect from a sketch with ESP8266 to the broker, receive state -2.
The code to connection to the broker is:
#define BROKER_PORT 1883
#define LAT “-29.1838681”
#define LONG “-54.8528838”
#define ID_MQTT “-29.1838681/-54.8528838”
IPAddress localMQTT(127,0,0,1);
…..
…..
MQTT.setServer(localMQTT, BROKER_PORT);
…….
void reconnectMQTT() {
while (!MQTT.connected()) {
if (MQTT.connect(ID_MQTT)) {
Serial.println(“Conectado”);
MQTT.subscribe(TOPICO);
} else {
Serial.print(“reconnect failed status “);
Serial.println(String(MQTT.state()));
Serial.println(“Try to reconnect again 2 sec”);
delay(2000);
}
}
}
In terminal windows I can access the broker. Publish and subscrib to topics. But from the sketch can not.
I saw you use a dns to specify the mqtt_server :
const char* mqtt_server = “macman”;
I don’t know how to do this, then I use the IP. 127.0.0.1, port 1883
But is not working….
Do you have any idea what might be happening?
Thank you and regards.
Forget about the 127.0.0.1. Put the real ip address. Try with ifconfig -a
Yeah ! After losing some time I remembered it.
Still, grateful for the help!
Hi
how can tested the mosquitto in windows , I ready installed also I check the service for mqtt is running
Thanks
I have no experience running mosquitto on Windows.
Hi James, great tutorials. I’ve learned so much from your site and videos. So, thank you and please keep them coming! I’m currently learning all of this stuff concurrently, no easy task. I have the mosquitto broker setup on my NAS. Eventually, I’d like to be able to send temp inputs and other various inputs to the MQTT broker, then populate an SQL database on my website on the internet. And be able to communicate the other way, from pushing a button on a web page, which will send to the broker and back down to the ESP8266. All of this with security in place. I’ve had some success using a json file, but security is tough to implement and the refresh rate is slow and clumsy. This turorial has me on my way and I’m guessing it will take me a few hours to start communicating between my broker and ESP. The challenge will then be security and reaching out to the internet and a hosted server. I’d love any help or thoughts you could lend on any of this moving forward.
Ideally I’d setup a web page on the internet which would communicate via MQTT to my in house NAS and allow me to control my ESPs that way.
Cheers and thanks again for this tutorial!
Security is something I plan to look at soon. When I have devices communicating on my own network, I’m less concerned about security. If I were to communicate with an outside server, I would probably look at a RESTful API for MQTT Broker to Web Server communication. For example, I would have a script subscribed to a MQTT feed and when messages are received, post a REST call to my web server. That chain I would encrypt with SSL using self-signed keys. That way I’m not dealing with “authentication” but have a secured connection.
I have used the Blynk app on my smart phone. It requires a configured sketch on a wifi equipped arduino ( used a sparkfun ESP8266 Thing). You can build a really nice Human-Machine-interfface on the Blynk app. I could control microprocessor driven stuff at home from anywhere i could get celll service for 3g connectivity.
Blynk supplies the code for the sketch btw.
James,
Where did you get the ESP8266WiFi.h file? Is it from the esp8266.com community library?
Came with the ESP8266 package from the board manager.
Thanks for the tutorial. Clean and to the point. I adjusted the code for an Arduino + ethernet shield. Works great, and I can now build on these basic principles.
Unable to install Mosquitto on Win 10. After installed libeay32.dll and ssleay.dll that was missing I got next issue: Can’t find number 175 in DLL-file \\mosquitto.exe.
Installed: “binary installers on mosquitto.org”
/Stefan
Sorry, but I have no experience with mosquitto on Windows. You might want to try the mosquitto mailing list:
https://dev.eclipse.org/mailman/listinfo/mosquitto-dev
Is there a way to use the arduino connected to the pi through serial, to send the messages through. I was thinking of building sensors using the Adafruit Feather 32u4 RFM95W LoRa Radio – 900MHz and then using another or an uno with the radio breakout as the gateway to connect to the pi. I’m hoping to avoid wifi for the network of sensors/nodes, and if I can avoid buying an ethernet breakout board or shield and save a little money, that would be good.
Yes, the Pi is a small computer running Linux. The Pi can communicate over usb-serial with an Arduino just like your PC can.
while running mosquitto -v in comment prompt I get error: no error. how to fix it?
If on Linux, you may need to run with sudo since it defaults to such a low port number.
Also, mosquitto is run as service by default on Ubuntu 16.04(and maybe others as well). You will need to stop the service before stating mosquitto in verbose mode.
What’s the command you would use to turn off/restart a service in Ubutunu ?
I am running MQTT Broker on a ESP8266 or on my ESP32. It is cheaper then a raspberry pi. See it in action on http://myesp8266.blogspot.ro/2016/02/mqtt-broker-on-esp8266.html.
Cool! I’ll keep an eye on your progress.