The Arduino is fast, humans are slow. When you push down a button, what seems like a single change to slow humans is really multiple presses to an Arduino. This is known as “bouncing.” Figure 1 is an oscilloscope screenshot showing what could happen when a button is pressed.
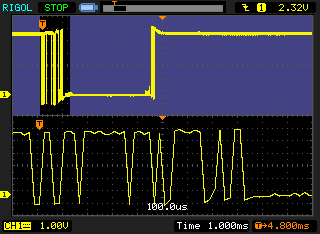
The top trace shows the high-low-high transition of the button press. But notice all of the activity at the start of the high-to-low transition. The bottom trace is a “zoomed-in” view of that area. The button is actually transitioning multiple times before staying low. Internally the contacts are “bouncing.” This could result in false reads. In software, we can ignore these bounces by waiting some period of time after the first transition.
Using LED to show Bouncing
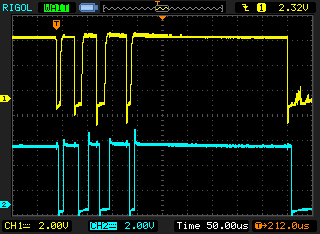
In this code example the LED on Pin 13 is setup to display the state of the input on Pin 2. Switch bouncing occurs so quickly that you won’t be able to see it the LED flicker. Figure 2 is an oscilloscope screenshot where channel 1 (yellow) is the button and channel 2 (blue) is the LED. Notice how the LED is doing exactly what the button does.
A De-bounced Switch
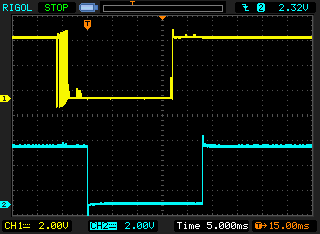
Using the code below, the button is properly “debounced” so that instead, Figure 3 occurs. A pre-defined amount of time must occur after the button’s first transition before the LED (or OUTPUT) is switched. So there is a slight delay, however, the LED is no longer bouncing–or more correctly, flickering.
Example Code
Note that this code makes use of the internal pull-up but does not care if your switch is wired to be active or active low. You’ll need to wire a button to pin 2 with one side connected to ground, since the internal pull-ups are used. The variable “buttonWaitInterval” is set based on the switch and determines how much time is used to “de-bounce.”
millis() vs micros()
Since we had an oscilloscope to see the switch used here, we could see that the average bouncing stopped after 4 ms. The millis() function has a resolution of about 4milliseconds so the “micros()” function is used instead. It’s just like millis(), except for the finer increment “microsecond.”
Using the code
In order for this code to work, you must periodically call the function “updateButton()”. Otherwise, Pin 2 will never be read. In normal code just putting it in loop() should be fine. However, if you have really long calculations, you might need to call it more often. Calling it more often has no ill-effects.
The Code
// Buttons with Pull-Ups are "backwards"
// Some DEFINEs to make reading code easier
#define PUSHED false
#define NOT_PUSHED true
#define WATCH_BUTTON true
#define IGNORE_BUTTON false

// Time to wait for bounce, in MICROsconds
const int buttonWaitInterval = 6000;
// Pins for LED and Button
const int LEDpin = 13;
const int BUTTONpin = 2;

// Used to track how long between "bounces"
unsigned long previousMicros = 0;

// Used to track state of button (high or low)
boolean previousButtonState = NOT_PUSHED;

// Variable reporting de-bounced state.
boolean debouncedButtonState = NOT_PUSHED;

// Tracks if we are waiting for a "bounce" event
boolean bounceState = false;

// Nothing surprising here
void setup() {
   pinMode(LEDpin, OUTPUT);
   pinMode(BUTTONpin, INPUT_PULLUP);
}

void loop() {
   // This needs to be called periodically to
   // update the timers and button status
   updateButton();
   // This replaces: digitalRead(BUTTONpin);
   digitalWrite(LEDpin, debouncedButtonState);
}

// All of the magic happens here
void updateButton() {
   // We are waiting for any activity on the button
   if (bounceState == WATCH_BUTTON) {
      // Get and store current button state
      boolean currentButtonState = digitalRead(BUTTONpin);
      // Check to see if a transition has occured (and only one)
      if (previousButtonState != currentButtonState) {
         // A transition was detected, ignore the others for a while
         bounceState = IGNORE_BUTTON;
         // Store current time (start the clock)
         previousMicros = micros();
      }
   // Keep storing existing button state, if we're watching
   previousButtonState = currentButtonState;
   }
   // We are waiting for the buttonWaitInterval to elapse
   if (bounceState == IGNORE_BUTTON) {
      // Compare current value of micros to previously stored, enough time yet?
      unsigned long currentMicros = micros();
      if ((unsigned long)(currentMicros - previousMicros) >= buttonWaitInterval) {
         // Store the state of the button/pin to debouncedButtonState, which "reports"
         // the correct value. This allows for the code to handle active high or low inputs
         debouncedButtonState = digitalRead(BUTTONpin);
         // Go back to watching the button again.
         bounceState = WATCH_BUTTON;
      }
   }
}


8 Comments
Hi, it is not if (bounceState == WATCH_BUTTON) but if (bounceState != WATCH_BUTTON) ??
Probably could be, but it doesn’t read as straightforward as the way I did it.
Why do you think millis(6) couln’t be used instead of micros(6000) to make the proper delay? The resolution of millis() is better than 1 millisecond, not 4 milliseconds. The resolution of micros() is 4 microseconds.
millis() just returns the number of milliseconds the processor has been running. It doesn’t do anything else.
micros() and delay() stop your program from executing.
The resolution of millis() is the same as delay().
delay() actually calls micros(), to see how long it has been sitting around doing nothing.
Hi,
micros() does not stop the program execution, its prototype is:
unsigned long micros();
it does not have the input parameter ant it just (same as millis() does) returns the value. You can look at its source at:
https://github.com/arduino/Arduino/blob/master/hardware/arduino/avr/cores/arduino/wiring.c
There you can find the delay() too.
delay() calls micros() similarly as your Chasing LEDs code calls millis() – to check the passed time interval.
Delay:
while (ms > 0) {
yield();
if (((uint16_t)micros() – start) >= 1000) {
ms–;
start += 1000;
}
}
Not only micros() does not stop the program from executing, it even calls yield() inside the while loop to pass the control to other tasks.
Your code:
// Get current time and determine how long since last check
unsigned long currentMillis = millis();
if ((unsigned long)(currentMillis – previousMillis) >= interval)…
Regards
Yes, you’re right. I was thinking of delayMicroseconds().
micros() is the same as millis(), it just returns a time.
Should have realized my mistake when I looked at delay() and saw micros() there, being called inside of a loop.
so what is the correct code?
https://github.com/thomasfredericks/Bounce2