Funny how a simple idea can spider out into multiple paths. Arduino EEPROM seemed like a straightforward concept. A few a years ago it was as easy as having either 512 or 1024 bytes of flash memory. The Arduino IDE offered an EEPROM library which let you read and write a single byte. Today, however, with many different processor architectures saving data to EEPROM varies. It is now possible to save any datatype to EEPROM but not on all boards and not all using the same method.
While programming an coin accepter sold by Adafruit on an AddOhms live stream, I discovered two “new” methods in the Arduino library. At least, these functions are new to me! A couple of years ago EEPROM.get() and EEPROM.put() appeared. Using these functions, you can store any datatype in EEPROM.
This post covers tidgets related to using Arduino EEPROM to store any value across multiple boards, or platforms. Specifically boards such as the Uno, Nano, Mega, and Zero are covered. Additionally Arduino-compatible boards from Espressif, PRJC, and Adafruit are covered as well.
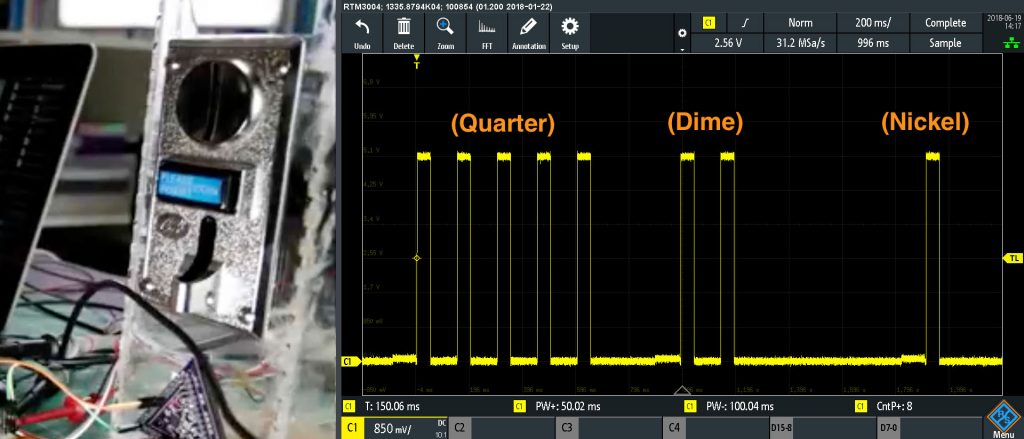
Pulses generated from coin acceptor (using US currency.)
In my coin acceptor project, I am counting pulses which represent $0.05 each. Temporarily the value is stored in RAM which, of course, is lost when removing power. Such behavior does not make for an acceptable bank.
Side note: if I were using a TI MSP430 which has “FRAM” then the data would not be lost. FRAM is a ferroelectric memory which is much faster than traditional flash memory and is non-volatile. However, more on that in the future.
I needed a way to save the float value. My idea was that after the last pulse, a timer starts counting. Once it times out, the value in RAM transfers to EEPROM. It seemed like it would be as simple as this code.
Except, that write() is for bytes. Not even integers, but bytes. A float in Arduino, or avr-gcc, is four bytes wide. One approach would be to store each of those four bytes into the EEPROM one at a time. However, in a rare moment of brilliance, I did a bit of RTFMing and found the two new functions.
Let’s look at these Arduino EEPROM functions in more detail.
Arduino EEPROM: get() and put()
I opened the local copy of the Arduino library, and all I could find is an EEPROM.h file. Where is the code? I double checked the Arduino avr-core GitHub repository, but nothing is there either. So how does this file work? Looking closer, this is a very tightly written “library.” There is only a .h file which has templates for the member functions. Pretty clever.
Taking a look at the .put() function, it is a straightforward implementation.
    template< typename T > T &get( int idx, T &t ){
        EEPtr e = idx;
        uint8_t *ptr = (uint8_t*) &t;
        for( int count = sizeof(T) ; count ; --count, ++e )  *ptr++ = *e;
        return t;
    }
The template passes the datatype to the function. Inside, a for()-loop iterates through the bytes of that datatype saving each to EEPROM. It is that simple.
Interesting to note is that .put() makes use of the .update() function. This function checks the value at the current Arduino EEPROM address and only writes if the value is different. This step provides additional wear-leveling protection. I still recommend doing what I did, which is only to call .put () or .update() if your variable has changed. However, at least if your code is stuck in a loop writing the same value, you will not destroy the flash memory.
At this point, I was excited. I could store my float no problem. Also, since these functions are in the Arduino library, it must be easy to use on every platform, right?
Nope.
Boards/MCUs supporting .put() and .get()
The GitHub link I gave previously comes from the AVR core branch. Which means boards based on the ATmega328p or ATmega2560 can use .get() and .put(). Since I have a variety of board supported by the Arduino IDE and library, I decided to check if each works with .put() and .get().
Arduino EEPROM Code on GitHub
I uploaded the full code I used for testing each board to GitHub. It writes a value to EEPROM, reads it back, and then prints it. There are comments for changes you need to make for each board type listed below.
Teensy 3.2 – Works
On my Teensy 3.2, the example code worked fine. I am not at all surprised because PJRC does a fantastic job of making his boards code-compatible with the Arduino library. If you are not aware, PJRC implemented NXP MCUs on the Teeny 3.x boards. Even so, it is nice that the Arduino EEPROM functions work fine with it.
ESP8266 (ESP-12) – Works
The ever-popular ESP-12 based ESP8266 boards work with code modification. The first change is that the ESP does “EEPROM Emulation.” Unlike the AVR there is no dedicated EEPROM silicon. Instead, part of the program memory’s flash shadows a section for “EEPROM” usage. In the code, you define the amount of that space you want to use. It also means you need to flush the RAM buffer; otherwise, you’ll lose the “contents.”
EEPROM.put(0, 12.34); // fails
float tempValue = 12.34;
EEPROM.put(0, tempValue); // works as expected
Early on, I made the mistake of using a constant instead of a variable in the EEPROM.put() call. The AVR and Teensy compilers had no issue. The ESP8266, however, generated a compiler error. Keep that in mind when programming the ESP12.
ESP32 – Works (Kinda)
I have had an ESP32 in my kit for a while, but this was my first time using it. When using Arduino EEPROM functions, the compiler generates errors. It appears the ESP32’s code branch has not yet fixed this common error. You can read more about it in this issue. Fortunately, that same issue has the solution. Copy and paste the code near the bottom to replace your EEPROM.cpp in the hardware/expressif/esp32/libraries directory.
Once you solve that problem, you’ll quickly see that the ESP32’s Arduino library implementation does not support .put() or .get(). However, it does have a function called EEPROM.writeFloat() and .readFloat().
These non-cryptic named methods work as expected. Based on the EEPROM.cpp file, most datatypes have a similarly named function.
SAMD21 / M0 – Nope
The SAMD21-based boards, aka the M0+, like Arduino Zero and Adafruit Trinkets do not have EEPROM! Like the ESP chips, EEPROM emulation could be an option. However, the bootloaders do not support it. So anytime the bootloader re-programs the program memory space, the EEPROM “contents” get wiped as well. That said, I did not bother to try using .get() or .put(). You should probably use an external EEPROM when using these platforms.
Update: FlashStorge is a library on GitHub that enables EEPROM emulation on the SAMD21. It does not sove the problem of wiping the contents on program upload, however.
Conclusion
The good news is that the Arduino EEPROM functions work on boards with EEPROM. They all have an easy function or method to store values other than just a single byte. In most cases you can use the .put() and .get() functions. I suspect that the ESP32 library will be updated eventually.
Fan of making things beep, blink and fly. Created AddOhms. Writer for Hackster.io News. Freelance electronics content creator for hire! KN6FGY and, of course, bald.
I cant get the code for ESP32 to compile.
I get the same error as in the issue thread with the old and new EEPROM.ccp for Arduino IDE 1.8.5
Any suggestions what to do?
Could you at some point please explain blow by blow what is going on in that template function, I have tried looking at it for some time and cant get my head around it. keep up the great work
I don’t fully understand C++, but I did ask some others what was happening. Here is my understanding. The template allows the compiler to create a function for whatever datatypes are used in the program. This method eliminates having to create a function (or method) for each datatype. The compiler creates them as needed. Inside the function there is a get() and put(). Each make use of the sizeof() function to determine the size of the datatype passed in. From there a loop just chunks the incoming datatype into an appropriate number of bytes.
With my ESP8266, I used the default get and put samples from the Arduino.cc site, for storing several fields of information (ssid & password, etc) in an array. Just had to add a EEPROM.begin(1024) before the get or put, and a EEPROM.commit(); after the EEPROM.put http://arduinotronics.blogspot.com/2018/06/the-esp8266-doesnt-have-eeprom.html
Absolutely excellent point! I should have thought of that while doing the code. I’m glad you reminded me. In the final video, I will make a point about why you should NOT use a float for money. I’ll go the “count the ticks” as an integer then do the integer math whenever displaying the value.
I read the issue with EEPROM emulation on the SAMD21 M0 core is that avrdude clears all of memory when it uploads a new program thus wiping out any EEPROM storage area. Have to mod avedude. I decided it was easier to solve the problem with hardware. And I just saw that Adafruit actually sells a EEPROM-like I2C breakout board, so that’s what I’m going to use. Maybe the next step is to mod the EEPROM.get() method to support this I2C solution.
I encountered the need for EEPROM functionality on my Adafruit Feather M0 based datalogger project just yesterday. After discovering what you’ve covered here, I stumbled on a post showing how to connect a MicroChip I2C EEPROM DIP chip to a microprocessor. Lots of capacity. I can send the link later if you are interested.
Like other websites, this one uses cookies to remember things. Mostly, I use Google Analytics to know how many people come here. ¯\_(ツ)_/¯
By clicking “Accept”, you consent to the use of ALL the cookies.
This website uses cookies to improve your experience while you navigate through the website. Out of these, the cookies that are categorized as necessary are stored on your browser as they are essential for the working of basic functionalities of the website. We also use third-party cookies that help us analyze and understand how you use this website. These cookies will be stored in your browser only with your consent. You also have the option to opt-out of these cookies. But opting out of some of these cookies may affect your browsing experience.
Necessary cookies are absolutely essential for the website to function properly. These cookies ensure basic functionalities and security features of the website, anonymously.
Cookie
Duration
Description
cookielawinfo-checkbox-advertisement
1 year
Set by the GDPR Cookie Consent plugin, this cookie is used to record the user consent for the cookies in the "Advertisement" category .
cookielawinfo-checkbox-analytics
11 months
This cookie is set by GDPR Cookie Consent plugin. The cookie is used to store the user consent for the cookies in the category "Analytics".
cookielawinfo-checkbox-functional
11 months
The cookie is set by GDPR cookie consent to record the user consent for the cookies in the category "Functional".
cookielawinfo-checkbox-necessary
11 months
This cookie is set by GDPR Cookie Consent plugin. The cookies is used to store the user consent for the cookies in the category "Necessary".
cookielawinfo-checkbox-others
11 months
This cookie is set by GDPR Cookie Consent plugin. The cookie is used to store the user consent for the cookies in the category "Other.
cookielawinfo-checkbox-performance
11 months
This cookie is set by GDPR Cookie Consent plugin. The cookie is used to store the user consent for the cookies in the category "Performance".
CookieLawInfoConsent
1 year
Records the default button state of the corresponding category & the status of CCPA. It works only in coordination with the primary cookie.
viewed_cookie_policy
11 months
The cookie is set by the GDPR Cookie Consent plugin and is used to store whether or not user has consented to the use of cookies. It does not store any personal data.
Functional cookies help to perform certain functionalities like sharing the content of the website on social media platforms, collect feedbacks, and other third-party features.
Cookie
Duration
Description
language
session
This cookie is used to store the language preference of the user.
Performance cookies are used to understand and analyze the key performance indexes of the website which helps in delivering a better user experience for the visitors.
Analytical cookies are used to understand how visitors interact with the website. These cookies help provide information on metrics the number of visitors, bounce rate, traffic source, etc.
Cookie
Duration
Description
_ga
2 years
The _ga cookie, installed by Google Analytics, calculates visitor, session and campaign data and also keeps track of site usage for the site's analytics report. The cookie stores information anonymously and assigns a randomly generated number to recognize unique visitors.
_ga_LHR6J24XSY
2 years
This cookie is installed by Google Analytics.
_gat_gtag_UA_42726312_1
1 minute
Set by Google to distinguish users.
_gid
1 day
Installed by Google Analytics, _gid cookie stores information on how visitors use a website, while also creating an analytics report of the website's performance. Some of the data that are collected include the number of visitors, their source, and the pages they visit anonymously.
browser_id
5 years
This cookie is used for identifying the visitor browser on re-visit to the website.
CONSENT
2 years
YouTube sets this cookie via embedded youtube-videos and registers anonymous statistical data.
Advertisement cookies are used to provide visitors with relevant ads and marketing campaigns. These cookies track visitors across websites and collect information to provide customized ads.
Cookie
Duration
Description
VISITOR_INFO1_LIVE
5 months 27 days
A cookie set by YouTube to measure bandwidth that determines whether the user gets the new or old player interface.
YSC
session
YSC cookie is set by Youtube and is used to track the views of embedded videos on Youtube pages.
yt-remote-connected-devices
never
YouTube sets this cookie to store the video preferences of the user using embedded YouTube video.
yt-remote-device-id
never
YouTube sets this cookie to store the video preferences of the user using embedded YouTube video.
yt.innertube::nextId
never
This cookie, set by YouTube, registers a unique ID to store data on what videos from YouTube the user has seen.
yt.innertube::requests
never
This cookie, set by YouTube, registers a unique ID to store data on what videos from YouTube the user has seen.


9 Comments
I cant get the code for ESP32 to compile.
I get the same error as in the issue thread with the old and new EEPROM.ccp for Arduino IDE 1.8.5
Any suggestions what to do?
Could you at some point please explain blow by blow what is going on in that template function, I have tried looking at it for some time and cant get my head around it. keep up the great work
I don’t fully understand C++, but I did ask some others what was happening. Here is my understanding. The template allows the compiler to create a function for whatever datatypes are used in the program. This method eliminates having to create a function (or method) for each datatype. The compiler creates them as needed. Inside the function there is a get() and put(). Each make use of the sizeof() function to determine the size of the datatype passed in. From there a loop just chunks the incoming datatype into an appropriate number of bytes.
With my ESP8266, I used the default get and put samples from the Arduino.cc site, for storing several fields of information (ssid & password, etc) in an array. Just had to add a EEPROM.begin(1024) before the get or put, and a EEPROM.commit(); after the EEPROM.put
http://arduinotronics.blogspot.com/2018/06/the-esp8266-doesnt-have-eeprom.html
… except you should never use a floating point number to represent a monetary value. For a hobby project, it’s probably no no biggie, but here’s why you shouldn’t do it in general: https://spin.atomicobject.com/2014/08/14/currency-rounding-errors/ and https://stackoverflow.com/questions/3730019/why-not-use-double-or-float-to-represent-currency. In this project, an alternative might be to store integer cents or integer pulses (nickels).
Absolutely excellent point! I should have thought of that while doing the code. I’m glad you reminded me. In the final video, I will make a point about why you should NOT use a float for money. I’ll go the “count the ticks” as an integer then do the integer math whenever displaying the value.
See https://github.com/arduino/ArduinoCore-samd/issues/145
I read the issue with EEPROM emulation on the SAMD21 M0 core is that avrdude clears all of memory when it uploads a new program thus wiping out any EEPROM storage area. Have to mod avedude. I decided it was easier to solve the problem with hardware. And I just saw that Adafruit actually sells a EEPROM-like I2C breakout board, so that’s what I’m going to use. Maybe the next step is to mod the EEPROM.get() method to support this I2C solution.
I encountered the need for EEPROM functionality on my Adafruit Feather M0 based datalogger project just yesterday. After discovering what you’ve covered here, I stumbled on a post showing how to connect a MicroChip I2C EEPROM DIP chip to a microprocessor. Lots of capacity. I can send the link later if you are interested.