
Back in 2013, a Kickstarter ran for a project to put a python interpreter on a microcontroller. At the time I could not see the benefit. Cool project, but I asked myself: “why?” On my last Adafruit order, I received a free Circuit Playground Express. The board comes with CircuitPython pre-installed. After playing with Circuit Python, or CP, I finally “get it.”
For Valentine’s Day, I made an animated LED heart for a new love in my life, Circuit Python. Well, love is a bit of a strong word. The past couple of weeks I have been learning Circuit Python, and I am excited by what it offers.
What is Circuit Python?
It is a Python implementation that runs on microcontrollers. The code exists on the microcontroller as text. The interpreter runs the code from that text file. Circuit Python is built on, or based on, MicroPython. Adafruit is designing it to teach programming. It is easy to get started, just open up the code.py file from the auto-mounted drive and start typing. When you hit save, the code runs. That’s it.
What is MicroPython, then?
MicroPython (MP) is the original Python 3 on a microcontroller project. It aims to be as compatible as possible with the “PC version” of Python. By the way, the “regular” version of Python gets called “CPython.”
Micro Python vs. Circuit Python
Okay, so what’s the difference? They are both Python, and they both run on microcontrollers, right?
Circuit Python is a fork of MicroPython, with a slightly different goal. At the core, MP is still there. From various Github and blog posts I found, it appears there is a slight difference in architecture as well as philosophy.
CP appears to have a better abstraction from hardware, allowing code to be more portable between (future) microcontrollers. MicroPython, on the other hand, seems focused on strong CPython compatibility.
The focus of Adafruit’s implementation seems to be the Atmel SAMD21 chips. That is the ARM Cortex-M0 found in the Arduino Zero, and the Adafruit M0 Feathers, which I wrote about previously.
[shareable]Circuit Python vs Micro Python. They’re both Python, so if nothing else, pick based on the board.[/shareable]What can you do with Circuit Python?
Circuit Python supports Adafruit’s popular LEDs, sensors, motors, and LCD screens. There are easy to use libraries, ready to go. Even with a minimal amount of Python knowledge, you can make NeoPixel blink patterns, display graphics on an LCD, or read temperature sensors.
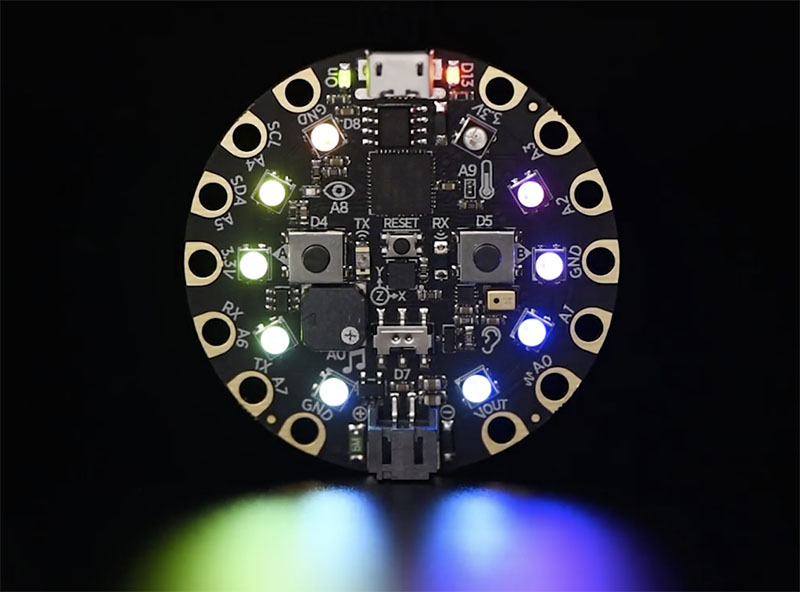
Their Circuit Playground Express board is a fantastic example. It has a sound sensor, light sensor, accelerometer, gyroscope, NeoPixel ring, and touch-sensitive pads. CP supports all of the hardware on the playground express. (This $25 board makes for an excellent platform to programming electronics hardware.)
How can it really be used?
Even if you know how to program, or are comfortable with microcontrollers, Circuit Python, or MicroPython for that matter, is still a valuable tool.
First, do you know Python? If not, learning to blink some LEDs or read sensors is an amusing way to learn the language. While toggling an LED might not get used in a spreadsheet script, knowing Python’s structure is still transferable.
Next, consider Circuit Python, or again MicroPython, a rapid prototyping tool for rapid prototyping tools. The proof-of-concept project I built was the LED matrix, shown below.
Why is Circuit Python better than MicroPython?
Well, it is not better. It is, slightly, different. Like all things in engineering, there are trade-offs. A perfect solution for one application may not be ideal for another. Instead, I can tell you why I like Circuit Python. It is easy. Literally.
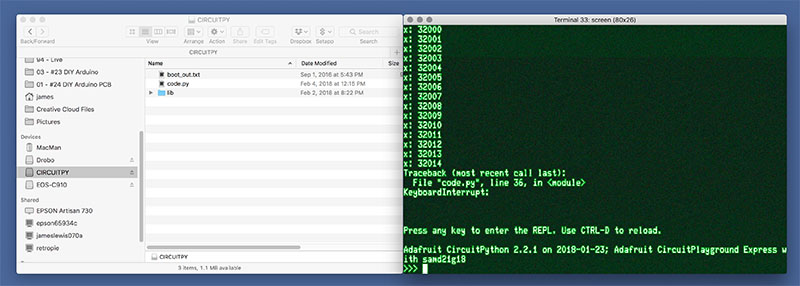
If you have a board with Circuit Python already loaded, it will appear on your computer as a disk drive. To run Python code, just create a file called “code.py” on that virtual drive. Whenever you save, CPX will automatically run the file.
That is it! No compiling. No uploading. Just File -> Save.
If your ESP8266 or M0-based board does not have CP yet, follow the installing Circuit Python instructions. It only takes a few minutes to flash the new bootloader with BOSSA.
Code Editor and Serial Monitor
Adafruit recommends using the “mu” editor. If you are new to programming or working with microcontroller boards, mu is a fine editor. However if you, like me, you have other tools in your workflow, no problem. No special tools are necessary to interact with Circuit Python. For example, I use Sublime Text to edit and screen to connect to the serial interface.
Serial Console
In addition to being a virtual disk drive, CP devices also have a virtual serial port. So open up your preferred serial terminal and connect to the virtual COM port.
Remember, there is no uploading involved. So it is no problem to keep your serial connection open while modifying the code.
In Python just use print() statements to send information back to the Serial Console. But that is not all. You can interact with your microcontroller directly as well.
Python REPL
Just like with CPython, you can interact directly with the interpreter. Opening the serial connection connects to Circuit Python’s console. If a script is running, just hit CTRL-C to cause a break. Type some commands. CTRL-D resumes the program.
Circuit Python Limitations
Running Python, or any interpreted language, on a microcontroller with tiny bits of RAM, does come with some limitations. RAM limitations and a friendly interpreter prompt reminds me of running BASIC programs on a C64, come to think of it.
Code Size
100 lines of code are only a few K of bytes. The libraries you pull in to support your code also take up space. Adafruit’s “Express” boards have 2 Mbytes of Flash memory. They can easily store your code plus the 350 Kbytes of Python libraries.
Boards like the Trinket or Feather M0 only have 256 K. Much of that is eaten up by the base Circuit Python. It appears you have about 30-40 Kbytes of space available for your code. This Flash limit means you need to manage the libraries a bit. Fortunately, it is as simple as copying libs to and from the “drive.”
RAM
The amount of RAM available becomes a trickier issue. Your code has to fit into RAM along with whatever variables you are using. Until now, I have not found a way to monitor RAM usage. From the documentation, it does appear you will get a memory error when you run out. Keep reading though, because I do not think this is an issue.
Limited Serial Interaction
One of the downsides to being so related to Python is that Circuit Python inherited the same keyboard input behavior. Which means, there is no way to read characters over USB without your code blocking.
There are two workarounds:
- You could push buttons for interaction. Or,
- Attach a separate USB to Serial adapter. There is an additional UART available, provided you are not using it.
I suspect this may get resolved over time. The pushback today is how to implement such a functionality correctly.
Speed
Remember, you are running interpreted code. It is not going to run nearly as fast as C code. That said, for a microcontroller platform, the performance is surprisingly high. Code execution speed or performance is not a reason to be using Python.

My Circuit Python LED Matrix
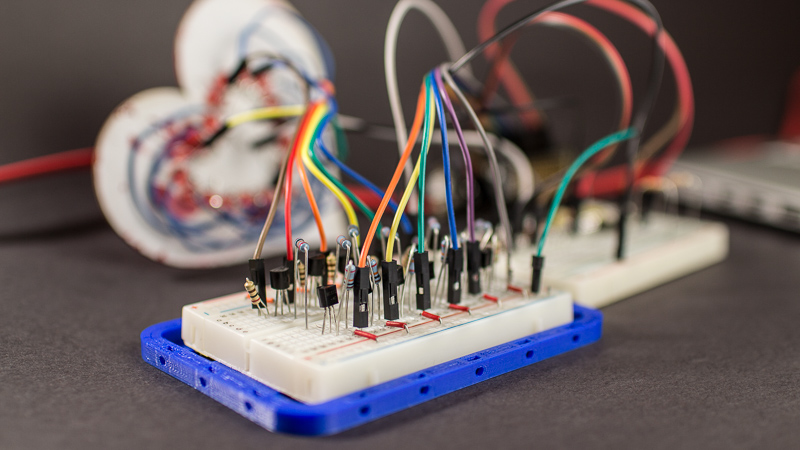
The first bit of code I wrote, didn’t work. Multiple LEDs were turning on at the same time. I stared at the code for what seemed like hours. (It was probably 30 seconds.) Then I started changing bits of code to see how the matrix’s behavior would change. With each change, I just hit save and immediately saw the result.
At one point, the REPL interface enabled me to drive individual pins manually. That is when I realized, the behavior only made sense if the transistors on the bank select were PNP. Guess what. They were.
Could I have done the same thing in C? Of course. However, it would take several minutes longer. The re-compile and upload time adds up. I am not ashamed to admit maybe even 10 minutes longer with how many changes I made to the Python code.
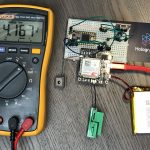
The Hardware
Here’s the circuit I used to build my heart shaped LED matrix. I wired the LEDs into three banks with a common cathode. The anodes were wired together into six “columns.” The matrix is driven by the M0 Basic Proto Feather. (These do not come with CP pre-installed, you’ll need to re-flash it.)
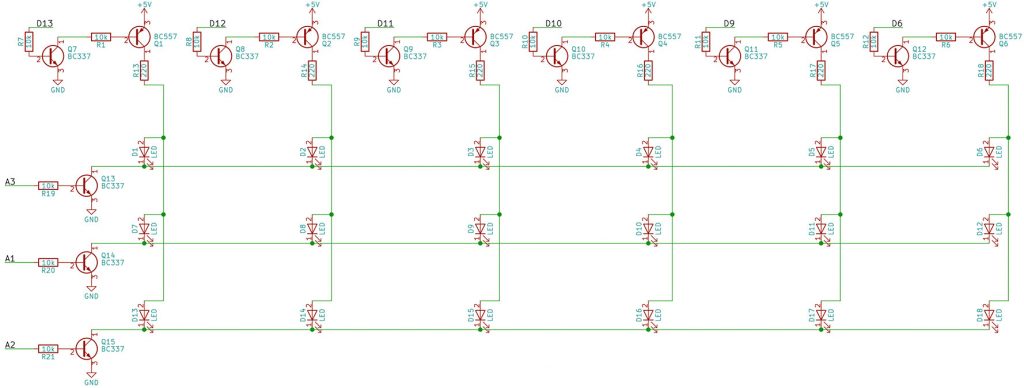
If I had to do the circuit over again, I would have wired the anodes as common. I forgot I was using the SAMD21 as the controller. Its I/O, as configured in CircuitPython, only provides 7 mA source and 10 mA sink. So to drive them, I needed a transistor. USB’s 5 V drives the LEDs, which means a PNP with NPN driver. This decision complicated the design a bit.
The Script
Here’s the Circuit Python code for the matrix. It is about 100 lines, with comments. The top section has some declarations (constants), a few global variables, and then some helper functions. Near the bottom, I provide some one-time run instructions, like an Arduino setup(). Then there is a “while True:” loop that runs until you hit CTRL-C or save new code. The expand() function loads a list of lists, which is the LED sequence.
[python] from digitalio import DigitalInOut, Direction, Pullimport board
import time
import sys
######################################################
# Globals / Constants
# M0 Pins connected to the common cathode banks
bankPins = [board.A3,board.A1,board.A2]
bankState = []
# M0 Pins connected to the "columns"
colPins = [board.D13,board.D12,board.D11,board.D10,board.D9,board.D6]
colState = []
# Array that maps LED to bank and col (LED number is index)
# first is bank, second is column
ledMap = [[0,0],[0,1],[0,2],[0,3],[0,4],[0,5],[1,0],[1,1],[1,2],[1,3],[1,4],[1,5],[2,0],[2,1],[2,2],[2,3],[2,4],[2,5]]
######################################################
# Functions
def fill(sequence):
global colState
global bankState
for seq in sequence:
# turn on LEDs in this array
cycleCount = len(sequence)
while(cycleCount > 0):
for led in seq:
bank = ledMap[led][0]
col = ledMap[led][1]
bankState[bank].value = True
colState[col].value = True
# no flicker, but kind of dim
time.sleep(0.001)
bankState[bank].value = False
colState[col].value = False
cycleCount = cycleCount – 1
# hold last pattern
cycleCount = 100
while(cycleCount > 0):
for led in sequence[len(sequence)-1]:
bank = ledMap[led][0]
col = ledMap[led][1]
bankState[bank].value = True
colState[col].value = True
time.sleep(0.001)
bankState[bank].value = False
colState[col].value = False
cycleCount = cycleCount – 1
alloff()
return
def alloff():
global colState
global bankState
for col in colState:
col.value = False
for bank in bankState:
bank.value = False
return
def expand(sequence):
global colState
global bankState
for seq in sequence:
# turn on LEDs in this array
cycleCount = 10
while(cycleCount > 1):
for led in seq:
bank = ledMap[led][0]
col = ledMap[led][1]
bankState[bank].value = True
colState[col].value = True
time.sleep(0.01)
bankState[bank].value = False
colState[col].value = False
cycleCount = cycleCount – 1
return
######################################################
# This stuff is like setup() in Arduino
# setup bank pins for OUTPUT and off
for x in range(len(bankPins)):
bankState.append(DigitalInOut(bankPins[x]))
bankState[x].direction = Direction.OUTPUT
bankState[x].value = False
# setup columns for OUTPUT
for x in range(len(colPins)):
colState.append(DigitalInOut(colPins[x]))
colState[x].direction = Direction.OUTPUT
colState[x].value = False
print("And we’re off…")
######################################################
# Patterns (I guess this could go in the globals section)
# but I wanted it close to the while() loop, so I could tweak them=
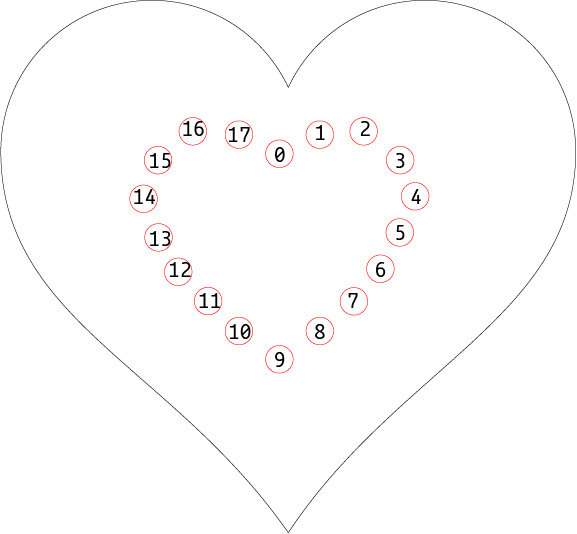
trickle = [[0,0],[1,17],[2,16],[3,15],[4,14],[5,13],[6,12],[7,11],[8,10],[9,9]]
chase = [[0],[1],[2],[3],[4],[5],[6],[7],[8],[9],[10],[11],[12],[13],[14],[15],[16],[17]]
filling = [[0],[0,1,17],[0,1,17,2,16],[0,1,17,2,16,3,15],[0,1,17,2,16,3,15,4,14],[0,1,17,2,16,3,15,4,14,5,13],[0,1,17,2,16,3,15,4,14,5,13,12,6],[0,1,17,2,16,3,15,4,14,5,13,12,6,7,11],[0,1,17,2,16,3,15,4,14,5,13,12,6,7,11,8,10],[0,1,17,2,16,3,15,4,14,5,13,12,6,7,11,8,10,9]]
######################################################
# A while True is like loop() in Arduino
while True:
print ("Down Trickle")
expand(trickle)
print ("Chase")
expand(chase)
print ("Filling")
fill(filling)
This graphic matches the LEDs on the matrix to the code.
Resources
With CircuitPython being relatively new, it can be a bit tough to find answers to some basic questions. The bits and pieces are all out there, just scattered about a bit. I imagine a few months after this post, that will not be the case. In the meantime, here’s a collection of links I found helpful.
- Installing Circuit Python
- CP Documentation (more API and less “how to”)
- Microprocessor Support Matrix
- Trinket M0 Examples (Basic I/O, Analog I/O, Cap Touch)
- Playground Express Examples (Specific to the CPX Board, but helpful bits.)
Conclusion
I have had a blast playing with Circuit Python. There is a magic feeling when you hit CTRL-S and your hardware’s behavior changes. The feeling is even more magic when it does what you expect.
If you have an ESP8266 or M0, I highly recommend giving Circuit Python a try. If you do not have an Adafruit board, then go for MicroPython. I think playing with that would be as equally fun.


6 Comments
The thing I miss most is concurrency. No asyncio or threads or callbacks. Yeah, I know, they add to the learning curve A LOT but without them it is so hard to code for any sort of human (and other real-world) interaction, which is often asynchronous, without getting bogged down (in code or inefficiency) in polling.
In the absence of true concurrency in circuitpython I’d like to see some example code where the burden of efficiently managing event polling is hidden away in the framework and the learner can get on with doing the interesting stuff.
Sure, we can write our own scheduler/pollers etc (and many probably have done so) but if encouraging beginners is one of the goals and justifications of circuitpython, some tools do it efficiently would help.
Thanks for this. Just a quick note about monitoring memory usage since I had the same desire. I’ve found it useful to run the following:
“`
gc.collect();gc.mem_free()
“`
Pretty obvious what it does.
“`
>>> #do this a bunch
>>> x[random.random()] = random.random()
>>> #until…
>>> x[random.random()] = random.random()
Traceback (most recent call last):
File “”, line 1, in
MemoryError: memory allocation failed, allocating 25832 bytes
>>> gc.collect();gc.mem_free()
19152
“`
(dunno if that formatting will work but you’ll get my drift, I’m sure 😀 )
Nice summary, just started to play with Circuit Python on a Trinket M0
The Trinket is an impressive board for $9. I was using one to communicate with my FONA module. (The original post was going to be using CircuitPython to send data to Adafruit IO. But I thought the heart would be better for the 14th.)
For your heart project did you use an Adafruit M0 as the controller?
Yes. The M0 Proto Basic Feather. (I updated the post to include that bit.) The M0 is my new favorite for non-WiFi stuff. (Although to be honest, I think my favorite changes every week.)