
The last time I looked at using an X-Carve for Printed Circuit Boards (PCBs), I created a demo board with EAGLE. Since then, I have learned more about using KiCad, the open source electronics CAD suite. While not a step-by-step tutorial, here is my rough KiCad to X-Carve PCB workflow. These are just the high-level steps, the tools necessary, and the settings I’ve discovered for each—so far.
Eventually, I will make this a more detailed KiCad to X-Carve PCB tutorial, so make sure you subscribe to my RSS feed for updates.
Here’s the Basic Steps:
- KiCad: Draw Board
- KiCad: Plot Gerbers
- KiCad: Generate Drills
- pcb2gcode: Generate G-code
- Text Editor: Clean Up G-code Files
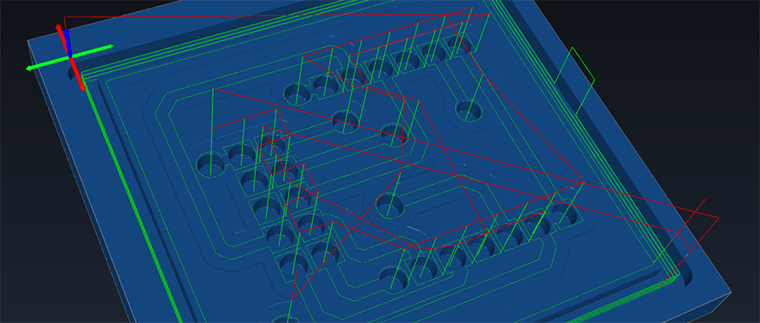
- Camotics: Simulate G-code
- ChiliPeppr: Send G-code and control X-Carve
- X-Carve: Make the boards!
Continue Reading »
A gCode viewer is essential when doing anything with a CNC. Knowing where the tools is going to run can mean the different between a failed cut and a broken bit. Or let’s say you’re trying to debug some gCode scripting, no need to wait an hour to find out you messed something up. That’s where a GCode Viewer can help.
There are several on-line options that let you upload files and see them in a 3D view. However, if your CNC is setup like mine, there isn’t a good internet connection available. Camotics, formerly the unfortunately named OpenSCAM, is a cross-platform open source gCode viewer / simulator.
Most recently I used it to debug some gCode that pcb2gcode generated from a Kicad board I am working on.
Check out more about Camotics on their site: http://camotics.org
(more…)