Tag

arduino

Browsing

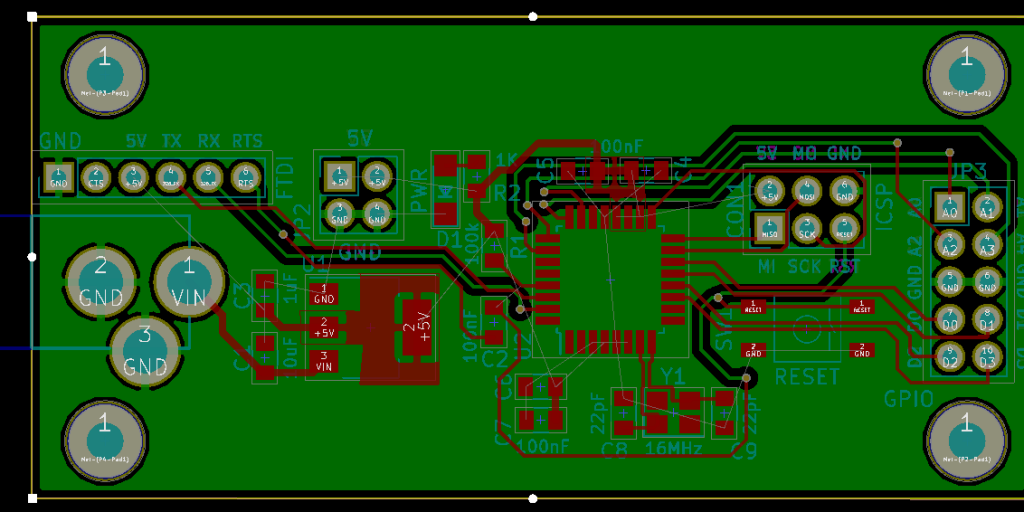
Continuing the DIY Arduino tutorial series, this AddOhms episode shows how to create a PCB in KiCad. I make a joke that the original design was a rectangle, which I found boring and pointless. So instead, I designed a triangle to give the board 3 points. Get it? Puns! I am calling it the Pryamiduino. To be honest, I found not having a constraint to be a problem. By forcing a specific board size and shape, many decisions were more manageable.

boring rectangular arduino nano clone
First design – Boring!

In the end, the video ended up more edited than I planned. KiCad is just so finicky and crashy that I could not make a coherent start to finish tutorial. At least, I could not work with a board at this level of complexity. Something simple like a 555 flasher would be easier to show from start to finish. I am planning some immediate follow-ups with quick tips on using KiCad. It is a frustrating suite of applications, but the results can be quite nice.

AddOhms Pyramiduino Show Notes

One of the last significant steps in a project is designing the custom PCB. This stage means creating a DIY Arduino board that is custom to the application. Two examples of my past projects are BinBoo, a Binary Clock, and Open Vapors, my reflow oven controller.

While working on a project for a friend, I got to thinking; it would be nice to have a checklist for circuit elements to include on a DIY Arduino board. In the early days, I forgot to add a filter cap to AREF, for example.

These tips are based on an 8-bit AVR design, like the ATmega328p chip. You could apply these tips to other 8-bit AVRs. Until now, I have not designed a custom board around a 32-Bit/ARM board. Though at only $16, I would be tempted to just solder the Teensy module directly to my finished board.

Below is a written list of items for a DIY Arduino checklist. If you’d like to see me design this board in KiCad, check out this AddOhms Tutorial.

As a kid, I got the book “Upgrading and Repairing PCs.” (Now in its 22nd edition.) It was the first book to explain to me the PC architecture. I considered, how were there so few pins on an AT-style keyboard connector when there were 101 keys on the keyboard? That is when I first learned about the keyboard matrix.

Intel_P8049_AH_controller
Original image from Deskthority Wiki. (Edited image is shown.)

The keyboard matrix itself did not amaze me, but instead the idea there was an entirely separate 8-bit microcontroller inside of the keyboard. Early keyboards may have used the P8049AH, which, there is still some stock available to purchase. I was fascinated with the idea an entire computer was necessary to run the keyboard, to use my “real” computer. Why did it take something as complicated as a microcontroller?

If you need a reason to be an Element 14 member, let me suggest their Road Test program. Companies partner with Element14 to get people to try out their gear. A couple of years ago I got a new microcontroller board. This week I received a new test instrument. Here’s my hands-on Picoscope 2204 review.

The scope is bus powered. With the BNCs and type-B USB connector, it is slightly larger than an external USB hard drive. There is not much weight to the device. It does not feel cheap, just lighter than I expected.

Getting the scope up and running is a breeze. Pico Tech included a CD (or DVD?) to install the software, but I could not find my drive to check it out. Software downloads from Pico Tech’s website work great. It looks like you can even download the software and use it in “Demo mode” if you are curious how it works–without purchasing anything.

Sending simple serial commands to an Arduino is the easiest way to communicate between an Arduino and a computer. The computer could be a PC, a Raspberry Pi, or any device that communicates with serial. By sending and “decoding” a single character it is easy to add a simple debug menu or even serial menu. Plus, it is easy to extend.

Single Character vs. Full Words

The mistake I see many people make is that they try to send full-text strings as serial commands. For example, to turn on a LED, I have seen (silly) commands like “RED LED ON” or “RED LED OFF.” While you could use something like strcmp(), as I showed on the Multiple MQTT Topics example, that tends to be overkill for most serial commands. Humans like words, computers like binary. Just send one character over serial.

switch (variable) {
  case 'a':
	// A Stuff

  case 'b':
  case 'c':
	// B and C Stuff
  break;
}