
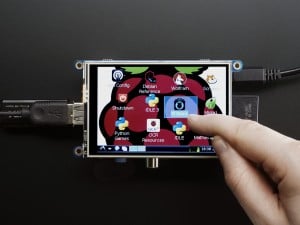
My favorite Raspberry Pi add-on is the PiTFT from Adafruit. With it, you easily get a Raspberry Pi GUI interface and touch screen. The PiTFT software install is just a few things and it is good to go.
This screen is what I needed for my IoT project. The Pi+Screen will act as the primary controller for all of my things. The problem is I didn’t know much about writing GUI applications in Linux. So what could I do to create a Raspberry Pi GUI?
Python is popular in Pi projects, so I decided to stick with it and find out what GUI toolkits are ready to go. “Ready to go” means they install easily on Raspian and work well on the Pi.
Here is how I got Qt5 for Python up and running to create a Raspberry Pi GUI.
Raspberry Pi GUI Libraries
If you start with this article on dice.com, you’ll find five potential python toolkits.
Not listed there is TkInter, which is the most used Python toolkit. If you have Python running on your system, you have TkInter. I decided not to use it though because the widgets have a very dated look to them.
The other toolkit I considered was wxPython. The UI widgets have a modern feel, though they not entirely native-looking. Also, plenty of documentation exists. However, I had some trouble getting wxGlade running, which is a WYSIWYG GUI editor.
This leads me to Qt.
Why Qt for Raspberry Pi GUI
In college, I used Qt for my senior design project: an electronic notebook. It was a PC with a 10” touch screen. You could write on it, and it’d save what you write, about ten years before Apple did it.
Having a little bit of familiarity with Qt, I looked into its Python bindings and was happy. I decided on the PyQt binding from Riverbank to go along with Qt5.
Note about licensing PyQt and Qt
PyQt is available as GPL or Commercial License while Qt is available under LGPL or Commercial license. I know even the mere mention of “commercial” will cause some people to turn away. And that’s fine. Qt is modern, and it’s free (since I’m not developing anything commercial.)
If you want “pure” open-source, then you might be happier with wxPython.
Development and Production
While the Raspberry Pi is a perfectly capable computer, I found developing on a 3.2” TFT a bit cumbersome. So I wanted to use my laptop “for development” and then deploy the code to my Pi when done.
In my case, I found it pretty easy to duplicate the Python/Qt environment on both.
Installing Python3
It wasn’t clear to me if Qt5 worked with the python2.7. I ran into problems and decided to use python3 instead.
Mac (aka PC) Instructions
Whether you’re on a Mac, Windows, or Linux, get python3 and Qt5 installed. I don’t have much to say about Windows or Linux but on the Mac, install python3 and Qt5 with homebrew.
Simple command:
brew install python3
brew install qt5
If you know all the directories, you can probably get away without re-installing these. However, I like that with the homebrew install; they can find each other.
Next, you need PyQt5, which installation varies by operating system.
On Mac, use homebrew:
brew install pyqt5On Linux, check your package manager. The PyQt5 download page has binaries for Windows.
Raspberry Pi Instructions
Assuming you’re running Raspian Jessie, you can install all three with apt-get:
sudo apt-get install python3 python3-pyqt5I’m no apt-get expert, but python3-pyqt5 might be enough to drag along python3.
Download QtCreator
On the PC you plan to develop from, download and install QtCreator. You can download that from Qt, after answering some questions about how you plan to use it.
Believe it or not, I think getting python3, Qt5, and PyQt5 installed is the hardest part. After that, it’s just a matter of copy/paste to get a GUI up and running.
Making a GUI in QtCreator
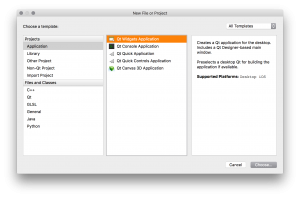
Start a new project in QtCreator and select “Desktop Application.”
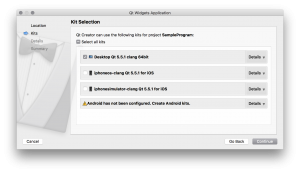
Where you save it, is up to you. (Note, OSX when selecting a directory, the “New Project” window gets hidden. It’s behind the initial QtCreator window.) On kit selection, I have been sticking with “Desktop Qt 5.5.1 clang 64bit.” No need to select the others. QtCreator is going to try and create a C++ program, but the only thing we are interested in is the MainWindow.ui file. So double-click that to open the GUI Editor.
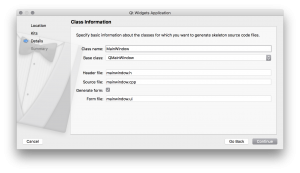
Last you need to name the class for your program. For this tutorial, leave it as MainWindow. That way the name will match up with the Python stuff later.
Finally, select none for version control, and then QtCreator creates C++ framework.
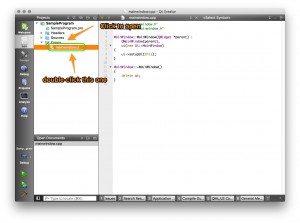
The only thing we are interested in is the MainWindow.ui file. So double-click that to open the GUI Editor. At this point, you’re going to add the GUI elements to create whatever GUI you want. I’m not going to go into depth about the different widgets or how they work. Plenty of better tutorials on those.

Instead, here are the critical things to know when creating your Raspberry Pi GUI.
- Set the Window to your Screen Size
- Pay attention to the widget name
- Set defaults for elements
1. Window Size / Screen Size
In my case, I am using the 3.5” PiTFT. Using this screen means I have 460 by 320 pixels available. This resolution is taking into account LXDE’s menubar. So I made sure to set my Window to that size.
2. Widget Name
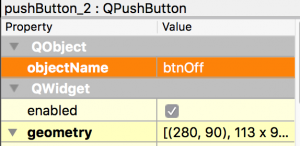
Here’s where my hardware background shows. I’m not sure what the right naming convention to use for widget elements. However, 25 years ago when I was forced to learn VisualBasic, I learned the xxxNamey convention. In this case, xxx is a three-letter abbreviation for the widget style and y is the numeric element. So for a button, it might be btnOK1 or btnRedOn1 and a Text Box would be txtName1.
If you know a better method, let me know. I encourage this one because it makes the code read easier later on.
In this code, I created two buttons On and Off named btnOn and btnOff respectively.
3. Set Defaults
Even if you plan for your program/script to fill in values in the GUI, make sure you set appropriate defaults. For example “PushButton” is a label text for the button. You CAN change it in your code, but why not set it now?
Create the GUI Code
Download Tutorial CodeOnce you have drawn your GUI elements, it is time to generate the matching Python code. Now, don’t worry if your GUI isn’t “done.” You can repeat the following steps as many times as you want.
In QtCreator, just save your GUI. It will update the MainWindow.ui file. In a terminal (or command shell for Windows), we’re going to make use of the pyuic5 utility. On Mac and Unix, here’s your command:
pyuic5 mainwindow.ui > mainwindow_auto.pyName the result whatever you want, I keep the name mostly the same. Each time you update the GUI in QtCreator, you’ll want to run pyuic5 to update the “auto.py” file.
Okay, you’re asking, are we done yet? Do we have a GUI? Yes and no. This code will run and create a GUI, but that’s not quite enough yet.
Add Basic Python Code
Create a new Python file in the same directory as your mainwindow_auto.py, with this initialization code. Not that it matters really, but I name my main python a very clever name: “main.py”. I know, right?
# always seem to need this
import sys

# This gets the Qt stuff
import PyQt5
from PyQt5.QtWidgets import *

# This is our window from QtCreator
import mainwindow_auto

# create class for our Raspberry Pi GUI
class MainWindow(QMainWindow, mainwindow_auto.Ui_MainWindow):
# access variables inside of the UI's file
def __init__(self):
   super(self.__class__, self).__init__()
   self.setupUi(self) # gets defined in the UI file

# I feel better having one of these
def main():
   # a new app instance
   app = QApplication(sys.argv)
   form = MainWindow()
   form.show()
   # without this, the script exits immediately.
   sys.exit(app.exec_())

# python bit to figure how who started This
if __name__ == "__main__":
   main()
With just those bits, you can run your new Python script and have basic GUI functions. Of course, buttons and other widgets won’t know what to do yet, but you can click them.
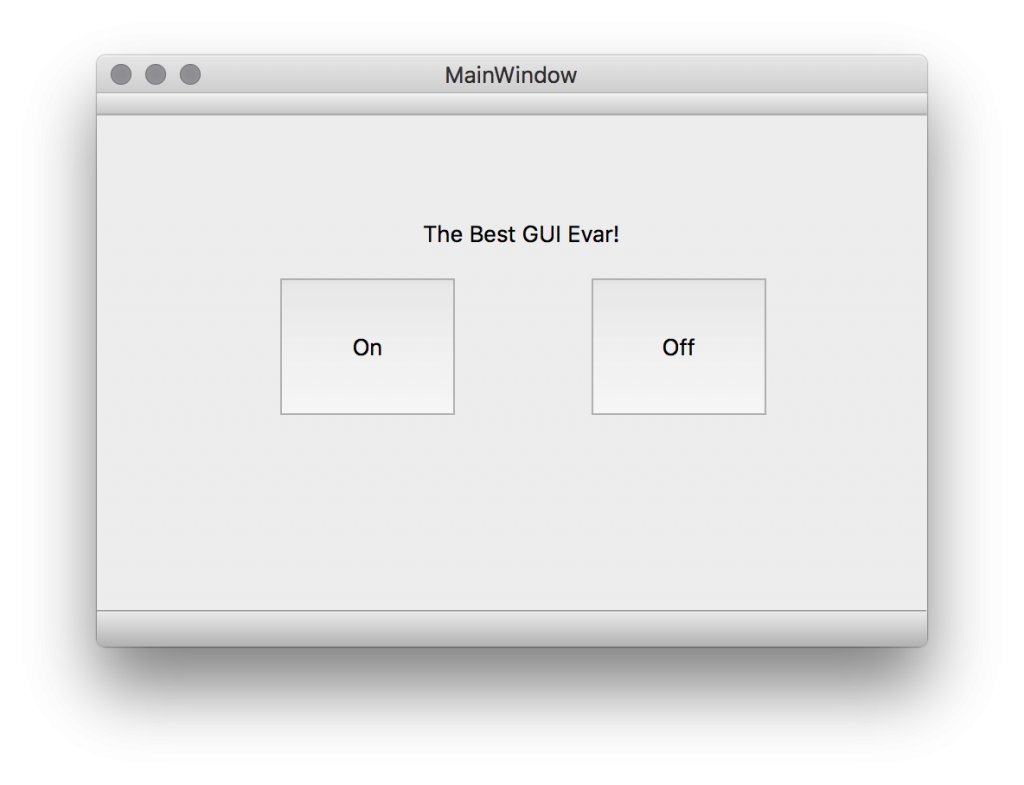
python3 main.pyAnd here’s my GUI:
Add Handlers
Remember when I said to pay attention to the widget names you create? This bit of code is why. Now we need to create handlers in the Python code for each button and widget. In your main.py file, you need to add some functions to your MainWindow class.
# create class for our Raspberry Pi GUI
class MainWindow(QMainWindow, mainwindow_auto.Ui_MainWindow):
# access variables inside of the UI's file
### functions for the buttons to call
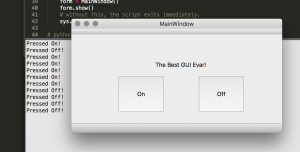
def pressedOnButton(self):
print ("Pressed On!")
def pressedOffButton(self):
print ("Pressed Off!")
def __init__(self):
super(self.__class__, self).__init__()
self.setupUi(self) # gets defined in the UI file
### Hooks to for buttons
self.btnOn.clicked.connect(lambda: self.pressedOnButton())
self.btnOff.clicked.connect(lambda: self.pressedOffButton())Replace the MainWindow class from the minimal example before with this code. When it runs a message will be printed on the console with each button press.
In this case, I’m only going to provide button examples. With a little bit of Google-fu, you can find example code for other widget types.
Running on startup
Okay if you’ve already configured the Pi to boot into X-Windows when it starts up, you might want to know how to make your python program run. Well first make sure your “main.py” and “mainwindow_auto.py” files are in the same directory. In my case, I leave them in my “pi” user’s home directory.
Edit this file:
nano /home/pi/.config/lxsession/LXDE-pi/autostartAnd add this line:
@/usr/bin/python3 /home/pi/main.pyNow issue a sudo reboot and it should load. (Note, you can use the “which” command to verify the location of the python3 binary.)
Download The Entire project
In case you want to download my Qt and Python code, here is a download button.
Download Tutorial CodeConclusion
As I said, I think the most difficult thing in this tutorial is getting all of the pieces installed—in two places.
That isn’t to say creating the proper handlers for the widgets is easy. However, there are tons (and tons) of help on how to build Qt programs—even if it the code is in C++.

52 Comments
Good afternoon my friend, congratulations for the explanation. Can you help me? I don’t know how to update a label with the temperature value of a concentrated raspberry sensor. My GUI is frozen and does not update the label.
The Adafruit PiTFT software install link is broken
Thanks. Looks like Adafruit consolidated all of the PiTFT instructions to one learning page. Fixed now.
Can you run this without X Server?
Hi
I have installed python, Qt5 and Pyqt5 on windows. I followed your example with the two buttons in QTcreator and got the mainwindow.ui file. I then used pyuic5 to convert to mainwindow_auto.py
I then wrote the main.py in the same directory and ran python main.py — It Runs through but does nothing. What could be the problem
I also ftp’d the directory to the Rpi with WinSCP.
installed Qt5,pyqt5 on the Rpi.
I first tried python main.py — it complained about not knowing Qt5
Then python3 main.py — this ran through but does nothing.
I know that python works, I used a small “Hello world” program to just print to terminal. — this works.
Any Ideas please.
Thanks
Willem
Hey mate! Thanks so much for this tutorial, I’m having a lot of fun getting into python with this. I have C and a bit of Assembler in my background. Im studying engineering at college here in Sweden, and my biggest issue a the moment is how to set values and define how the values change in a “virtual” display? I want for example have a clock in my GUI that fetches time from my RPI and updates every minute for example. Can you point me in the direction of where i should look to find the answer to this?
I tried to copy the lines of code from the generated python document and just enter values myself, but that doesn’t seem to work.
Any ideas? =)
Kind regards,
Rasmus
For everything I want to do in Python, I search for a library or example.
I ran into an issue on Windows 10 when redirecting pyuic5 output to a file. When running the app I get an error:
"... import mainwindow2_autoValueError: source code string cannot contain null bytes".
Using the -o option for output instead of redirecting with > fixed the issue. Changed:
pyuic5 mainwindow.ui > mainwindow_auto.pytopyuic5 -o mainwindow_auto.py mainwindow.uiand the example app worked fine.Cool. Thanks for the tip. Personally I don’t much experience with Windows, let alone Windows 10. Though I recently switched my virtual Windows machines from 7 to 10.
This is awesome! Thank you! I spent hours flailing around trying to decide what to use to write a GUI for the Pi to talk to a Modbus-controlled power supply I have coming, and then I ran across this. In a couple of hours I was able to build a prototype in QT Creator, convert it to Python, and run it on my Pi’s touch-screen display. Lots of work left to be done, but I’m very happy with the results so far. You rock!
Oh great bald one, I give homage for a really useful tutorial. I’ve dabbled in rpi and python a bit, but still a newbie. Many moons ago I used to use Visual Basic, and was rather bemoaning that Python did not appear to have a visual gui interface. Id had a quick look at some of the GUI packages for python and had even installed pyQT5. The missing link of course was to find the QtCreator and the python converter script as per your tutorial. I moan no longer. I daresay its all documented somewhere, but I seem to have missed the important QtCreator bit and its these small tutorials with tips that make all the difference to getting started along the road. Still, you know, that old VB was a mighty good program and for personal use who needs classes. Anyway, many thanks for all your wonderful stuff.
How to create an executable and installer for raspian after these steps.
Any reason than the qspinbox valuechange signal would crash python? I can find no reasons in online docs. I have switch from str to int with no change. If I comment out the valuechange lines form runs file. Spinboxes set to min 0 max 9.
import sys
# pyqt
import PyQt5
from PyQt5.QtWidgets import *
# gui
import sas
# Pandas
import pandas as pd
import numpy as np
# GUI class
class MainWindow(QMainWindow, sas.Ui_Dialog):
# access variables inside of the UI’s file
def __init__(self):
super(self.__class__, self).__init__()
self.setupUi(self) # gets defined in the UI file
self.SB1.valueChanged[int].connect(self.onChanged)
self.SB2.valueChanged[str].connect(self.onChanged)
def onChanged():
SB1value = self.SB1.value()
self.lable.setText(SB1value)
def main():
app = QApplication(sys.argv)
form = MainWindow()
form.show()
sys.exit(app.exec_())
if __name__ == “__main__”:
main()
From sas.py
self.SB1.setFont(font)
self.SB1.setMaximum(9)
self.SB1.setProperty(“value”, 0)
self.SB1.setDisplayIntegerBase(10)
self.SB1.setObjectName(“SB1”)
Hi and thanks for this article. Quick question: while I was fooling around with the whole thing, I’ve added a QWebEngineView and suddenly my experiment stopped working on pi saying:
ImportError: No module named ‘PyQt5.QtWebEngineWidgets’
It still works on my mac without any issue.
Thanks for the tutorial. Things were going well until I added the handlers, and got the following error:
In MainWindow
self.btnInc1.clicked.connect(lambda: self.pressedbtnInc1())
NameError: name ‘self’ is not defined
I’m a real python noob and am having trouble getting my head around the stuff around “self” being defined at function runtime
Indents! I didnt indend the handle code into the def __init__(self) function!
That takes a bit of getting used to with Python!
Hello and thanks for amazing guide.
Why do we need pyqt5 and python? Qt creator is in C++ language. Why we need to use python language to code in raspberry pi? Why not just use C++ in raspberry pi?
Sorry for noob question.
It isn’t a matter of “need.” Most people using a Raspberry Pi aren’t comfortable writing a C++ program. Python is much more popular, so I wanted an easy way to add a GUI to a python-based program/script.
Thank you. I’m going to start learning Python right away.
Thank you again.
Is your project running on raw framebuffer or do you need startx?
Running through X
Do you know if it is possible to run QT libraries directly on framebuffer, without X window system? Similar to pygame.
TKinter has native widgets with TTK is very easy to use and cross plattform.
/Library/Frameworks/Python.framework/Versions/3.5/bin/python3.5: Error while finding spec for ‘PyQt5.uic.pyuic’ (: No module named ‘PyQt5’)
this error is shucking , please give possible solution
Did you install python through homebrew? If so, make sure you are calling the pyuic5 located in /usr/local/bin
yes, i installed python using homebrew, i dont know how but, after restarting my mac ,its working. thanks buddy
Can we use some lightweight GUI toolkit? Pls suggest one
Hi James, Fantastic tutorial – thank you.
I am trying to build off this customise the button look using style sheets. While it displays correctly on my computer, when i run main.py, the GUI comes up blank (buttons still work but don’t appear). Do you know how to customise the button and still export through python?
Cheers,
Tom
Thanks for the tutorial. I tried to move the files to my RPI, and when I try to run the main.py with: python 3 main.py, I get the following error message:
QXcbConnection: Could not connect to display
Aborted
I am using a Raspberry Pi 2 with the 3.5″ PiTFT. Not sure if I need to define the screen being used somewhere.
Thanks,
If you used the Adafruit directions, you might have added these two lines into your .profile, which a terminal when it starts its shell:
export FRAMEBUFFER=/dev/fb1

export DISPLAY=:0
I had ssh display connection issues when I left those in, so I commented them out. Nothing seemed to break. Maybe give that a shot.
#export FRAMEBUFFER=/dev/fb1

#export DISPLAY=:0
I’ve got the same issue, but I don’t even have those lines in my .profile file. Any ideas?
It seems to work if I call main.py through once I’ve run startx (or through a tightVNC window), but it’s through ssh that it doesn’t work (and that’s how I want to do it…)
When you login with SSH, run “echo $DISPLAY”. Do it return anything?
I was able to solve the problem. I reformatted the SD card a few times, but it was a problem with the display not being defined.
In my original setup from Adafruit it never had the “export DISPLAY=:0”
line in my profile. When I ran echo $DISPLAY with SSH it would return a blank value. But when I ran echo $DISPLAY with Tight VNC, it would return :1
So I decided to add that line into my profile, and it worked. Here are my steps for adding a display. So far everything seems to be functioning.
– sudo nano ~/.profile
– I added the following line to the end: export DISPLAY=:0
– Reboot: sudo reboot <–This is a must!!!!!
– Run the main.py file
It worked through SSH – at least for me.
@James Lewis
Thanks for posting the echo $DISPLAY command line!
I also get the error message “QXcbConnection: Could not connect to display” when I use ssh. Those two lines make no difference if they are there or not, just the returned value of “echo $DISPLAY” changes from empty line to “:0”. Do you got an idea?
Did you manage to solve this issue? Getting the same error in my setup with the official raspberry pi 7 inch touchscreen.
Not yet. I use the raspi 7 inch touchscreen, too. But I even tried to use a normal PC-Monitor connected with HDMI, doesnt work either…
When I open startx, then open a terminal and then run python3 mainwindow.py then it does work.
Is this the way it is supposed to be or should it work through ssh as well?
I don’t know what your mainwindow.py includes. If it follows the code in my example’s “main.py”, then yes, it should work.
When I try to run “pyuic5 mainwindow.ui > mainwindow_auto.py” I get the error (: No module named ‘PyQt5’). Any ideas?
You might have only installed Qt5 for Python 2.7 and not Python 3. “pyuic5” is just a script that calls python
exec python3.5 -m PyQt5.uic.pyuic ${1+"$@"}To avoid issues, I installed Qt5 for both versions of Python.
How do I set which Python Qt5 gets installed? If I use brew again, it says that Qt5 is already installed.
Use which to see if you have multiple versions of pyuic5 installed on your machine.
which pyuic5On my machine, I only have one:
/usr/local/bin/pyuic5I’m pretty sure that is where brew installs by default.
Then use cat to see if one of them is using python3:
cat /usr/local/bin/pyuic5Try calling the command with python3, contained in the pyuic5 script.
I found what I think is causing the problem. Unfortunately, I don’t understand the explanations on the web on how to fix it. When I try to run configure.pi for PyQt5 I get the following message:”Error: Use the –qmake argument to explicitly specify a working Qt make.”
Sorry, I have no idea what that means. The steps in my post are all I did.
You need to follow the pattern of the line here
python3 configure.py –qmake ~/Qt/5.7/clang_64/bin/qmake
This is from a Mac but basically add –qmake and replace with path to qmake thats part of the Qt stuff
I got the same issue. In my case i figured out that the problem is that pyuic5 tries to execute python2.7 instead of python3! (probably because I have both installed)
I first did:
which pyuic5
To find where is this pyuic5 located (it is in my anaconda distibution file). Then I check what is inside with
cat pyuic5
I get
#!/bin/sh
exec pythonw2.7 -m PyQt5.uic.pyuic ${1+”$@”}
I then use nano to change the pythonw2.7 part with python3 and it works! All the joy!
You can still use Qt on commercial projects for free. What the license says is that you have to share your changes to Qt source code.
Your link to wdGlade seems to have a typo: http://wxglade.sourceforget.net/
sourceforgeT??
Thanks, fixed.
@James: nice article overall, a strait recipe for developing applications to run on Raspberry Pi with a decent GUI.
Regarding the name convention for widgets, I agree with you not to use the names from Qt Creator, and being myself a long time Qt developer, I follow most the same convention as you. Having a 3 or 4 letter prefix for the widget type (btn button, ledt lineedit, cbox checkbox and so on) I however avoid using the y number, as I try to use a name based on the purpose (ledtAddress, ledtName, btnOk, btnCancel). It’s very unlikely you end up with several buttons having the same purpose or label.