Category

Retro Gaming

Category

In this element14 Workbench Wednesdays episode, I review tools provided by Weller which are suitable for surface mount soldering. Throughout the soldering series, I have been using mini-projects to see how the gear works. Making this particular video was special to me. The subject was a TI-85. Back when I was a kid, one of my first soldering projects was to replace a capacitor in the TI-85. At the time, all I knew is that the change would make it run faster. I didn’t know why I just knew it worked.

Today, I now know that capacitor was part of an RC oscillator for the Z80 CPU. It clocked the processor. By putting in a lower value, such as 2.2 or 4.7 pF, the calculator would speed up. The trade-off, of course, is that it means the batteries drain faster! But hey, before someone created Zshell, this was the only way to make Breakout run fast.

Of course, the focus of the episode is the gear from Weller. So please, hit-up element14 and check that stuff out. You can also find the polls I mention at the end of the video there.

Watch, Comment, and Vote on element14
The last couple of weeks I have been making progress and posts on my RetroPie build. I’m putting a Raspberry Pi inside of an actual SNES (well Super Famicom). Part 1 covered the schematic for a Soft Power Controller. In Part 2 I broke down the RPSPC state machine. This 3rd and final post of the series is a Raspberry Pi startup script tutorial. It covers how to make scripts run at startup and shutdown.

When I started researching how to make Raspbian run a script at startup and shutdown, I found a ton of links and questions asking for help. None of them helpful. Why? Because they were wrong. At least, they are now.

/etc/rc.d doesn’t matter!

It turns out, Raspbian Jessie does not use SysV for init (anymore). So it does not matter what you scripts you put in /etc/rc.d. Pretty simple but missed by many!

Here is a correct Raspberry Pi Startup Script Tutorial.

The Key is systemd

Once I started researching how to make systemd do what I wanted, new problems emerged. The syntax for systemd is not as straightforward as I first thought. Thanks to readers, I was pointed towards the RedHat systemd manual. After reviewing it, I was able to create a service that runs at startup and shutdown.

In the end, I was unable to prevent this process from running during reboot. There seem to be some more layers to make sure systemd knows the difference. In the end, I decided it was not necessary to avoid the reboot.

The RetroPie project enables retro-gaming with a Raspberry Pi. All of the Pi models have enough computing power to emulate the major 8-bit and 16-bit computers of the 80s and 90s. With the Pi 3 I have even been able to play PS1 games with no problem. My current project is to put my Raspberry Pi running RetroPie into an old Super Famicom (SFC), or SNES, case. The catch? I want the original SPST power switch to work. And by work, I mean allow the Raspberry Pi to shutdown properly when the switch goes into the off position.  To accomplish this task, I am building a Raspberry Pi soft power controller.

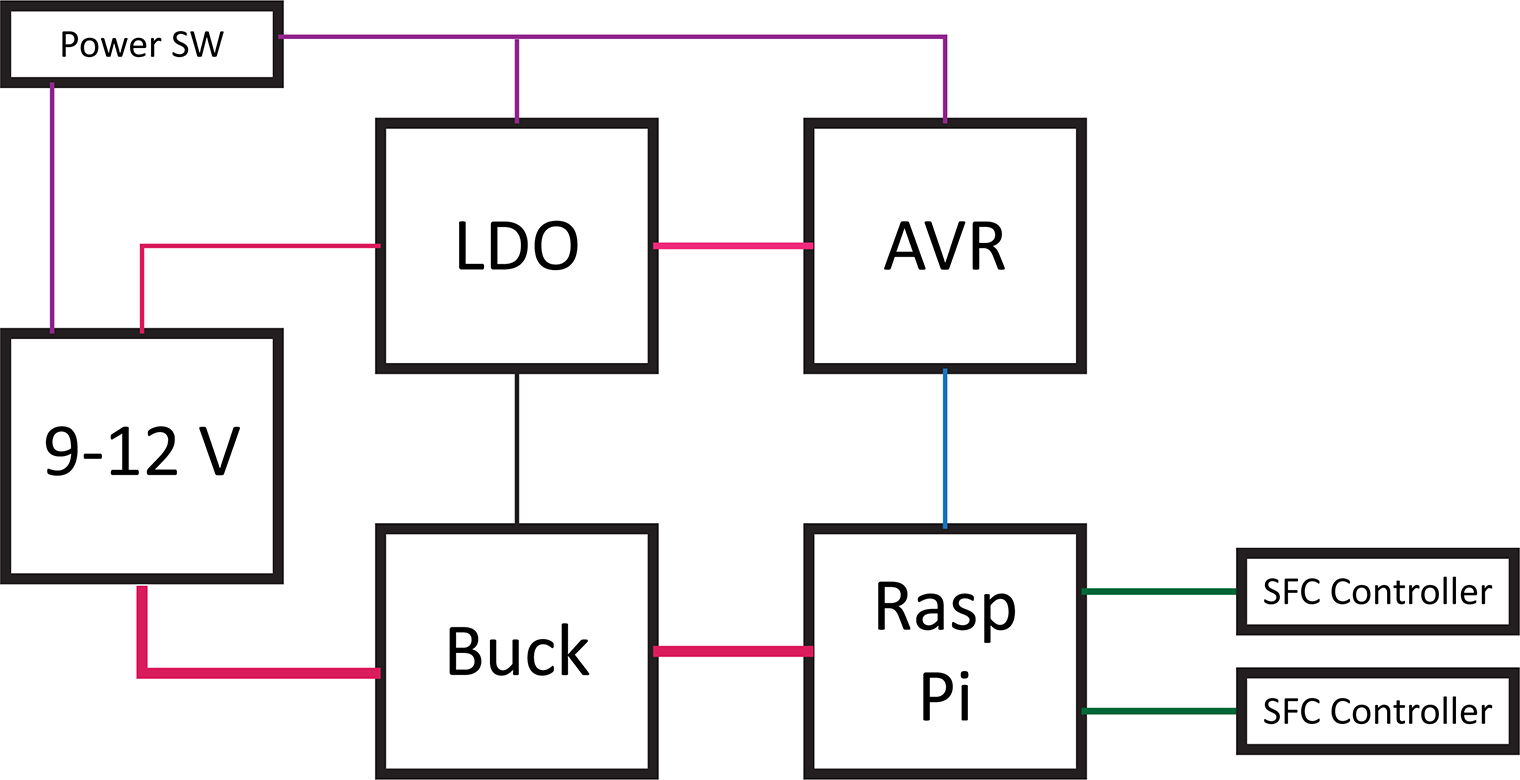
Raspberry Pi Soft Power Block Diagram

Here’s a block diagram of the power controller. The basic blocks in a Raspberry Pi soft power controller include the LDO, a switching supply for the Pi, an AVR-based microcontroller, and the Raspberry Pi. This post will describe each of these hardware blocks.

One design objective was to draw as little current as possible when off. For my RetroPie, I will not be running on battery. However, I do not like the idea of wasting energy when something is turned “OFF.”

This overview is a multi-post write-up. This first part is on the hardware. In the next post, I will explain the AVR’s firmware. Later, I will come back to the Raspberry Pi side of the project.

Last week’s post was on Project Sharing Sites. I’m using two for this project. Hackster.io will host the build log while GitHub has all of the design files. And by all of the file I mean the schematics, firmware, laser cutter files (soon), and Raspberry Pi code.

Hackster.io Project Page   GitHub Repo

When I made the AddOhms Tutorial on Linear Regulators, I made a comment about the 7805. I said it may be one of the most important Integrated Circuits (ICs) ever made. That’s a bold statement. The 555, 805,  or 7400 might all qualify for such a distinction. My feeling about the 7805’s importance is because it is a chip that is still popular today. It is used, or at least was used, in so many applications. And it is the heart of many 5V digital systems.

Including the Nintendo Super Famicom (and I assume the US SuperNES).

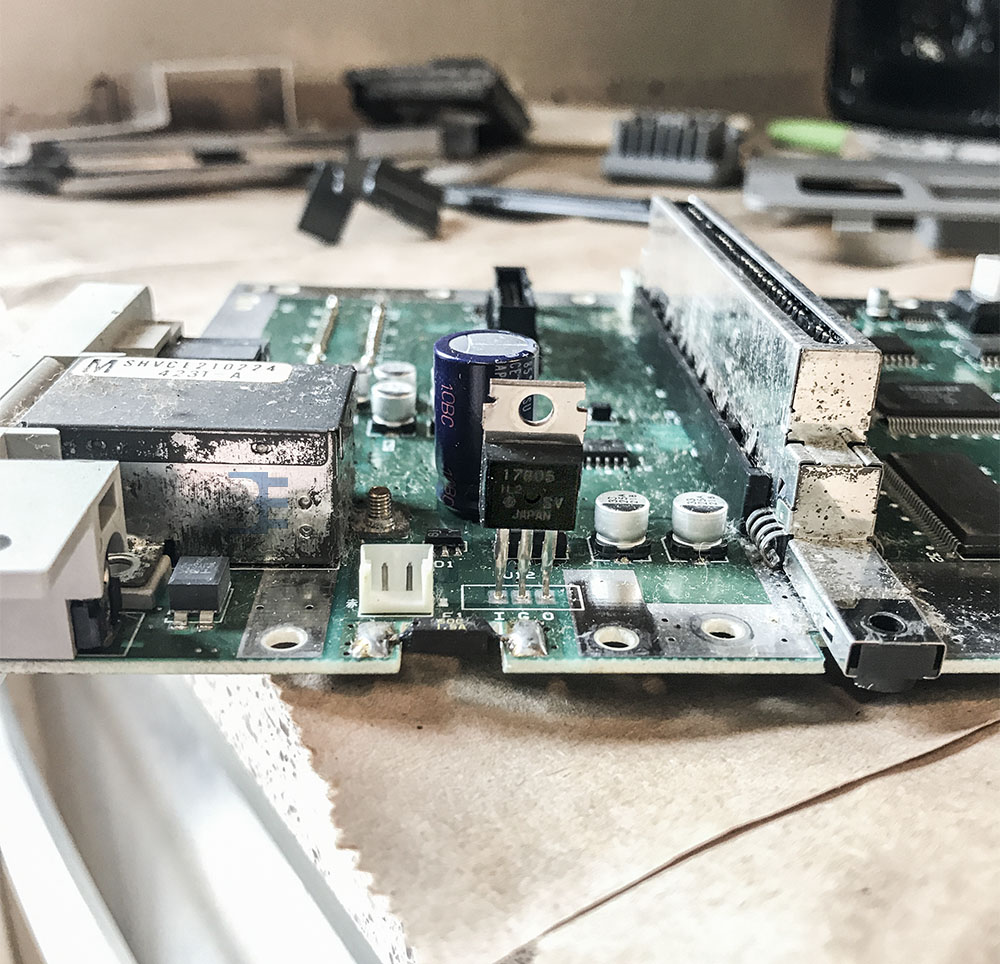
This picture is from an SFC I disassembled to repurpose the case. While taking it apart, the 7805 caught my attention because it was attached to a shield as a heat sink. Also, I find it fascinating that it is one of 3 or 4 through-hole components on the entire system. As you can see from the picture, it needs some cleaning. I might post more pictures later.

Wolfenstein 3D defined the FPS genre in a way no one could have predicted. Just like the Gameboy defined portable gaming in a way no one could have predicted. Cartridge based computing and gaming offered something that disk (or disc?) based media never could: additional hardware.

The most famous example of additional hardware is the “SuperFX” chip that debuted with the SNES game Starfox. (It was in used in others in addition to a successor.) Most NES cartridges had other hardware too: mappers, sound generators, additional ram, etc.