Category

AddOhms

Category

While many want to call 2016 the worst year ever, I feel that is an entirely undeserved title. It certainly could have been a better year, but it wasn’t the worst that I can remember. For the engineering community, both professional and hobbyist, it seems to have been a fantastic year. My gauge for this feeling is the activity on baldengineer.com. In 2016, I saw almost half a million sessions contributing over 1.2 million page views. (That’s 98% more people looking at 313% more tutorials compared to 2015.)

Here’s a breakdown of the most visited pages (tutorials) on the site.

Overall Top 5 Tutorials for 2016

First up is a simple list with the most views, across all content.

  1. MQTT Tutorial for Raspberry Pi, Arduino, and ESP8266
  2. Raspberry Pi GUI Tutorial
  3. millis() Tutorial: Arduino Multitasking
  4. Arduino, how do you reset mills()?
  5. Top 4 transistors for your kit

How a Brushed DC Motor works and how to use them

This Addohms Electronics Motor Tutorial goes into the third dimension. Using a 3D model, we show what makes a brushed DC motor, well, a “brushed motor.” (Hint: It’s the brushes!) Then, as usual, we break down two simple ways to control them with a microcontroller like the Arduino. You can use a single BJT Transistor (remember those from #10?), build a discrete H-Bridge to go in both directions, or use a popular H-Bridge chip like the L293D or L298D. (Notice the ‘D’!)

Tutorial Contents

The video starts with a couple of (mixed) motor examples. Do you know what a “stator” or “rotor” is? If not, that’s okay because that’s one of the first things we explain. After that, we add part like the commutator and brushes to make the Brushed DC Motor. After that is control with a transistor and an explosive reason you need a protection diode. 🙂 Then we show how an H-Bridge Works. Lastly, the advantages and disadvantages of this motor type.

You can see the full Brushed DC Motor Tutorial on YouTube or on the AddOhms page.

A couple of weeks ago I wrote about four current flow direction myths. As a follow up to that popular post, I decided to dedicate this month’s AddOhms electronics tutorial video to Current Flow. In episode #19, I tackle the question of which way does current flow.

You might have heard about “conventional flow” and “electron flow.” In conventional flow, we assume that current flows from the positive voltage towards the negative voltage. In digital, the “negative voltage” is usually called ground. However, that’s not how the electrons move nor is it how they carry the charge around a circuit path.

Electron flow is the description of how electrons carry a charge. Which is the negative voltage towards the positive? This confusion is a result of Ben Franklin mistakingly identifying how electrons moved so many years ago. Yet, we have kept the “positive” and “negative” labels as they are today.

The key though is that it doesn’t matter which method you use to analyze a circuit. Electrons move in a closed path. So whether they travel from positive to negative or from negative to positive, doesn’t matter!

AddOhms #19: Current Flow Direction

Check out the full AddOhms Electronics Video Tutorial on Which Way Does Current Flow on the AddOhms YouTube Channel.

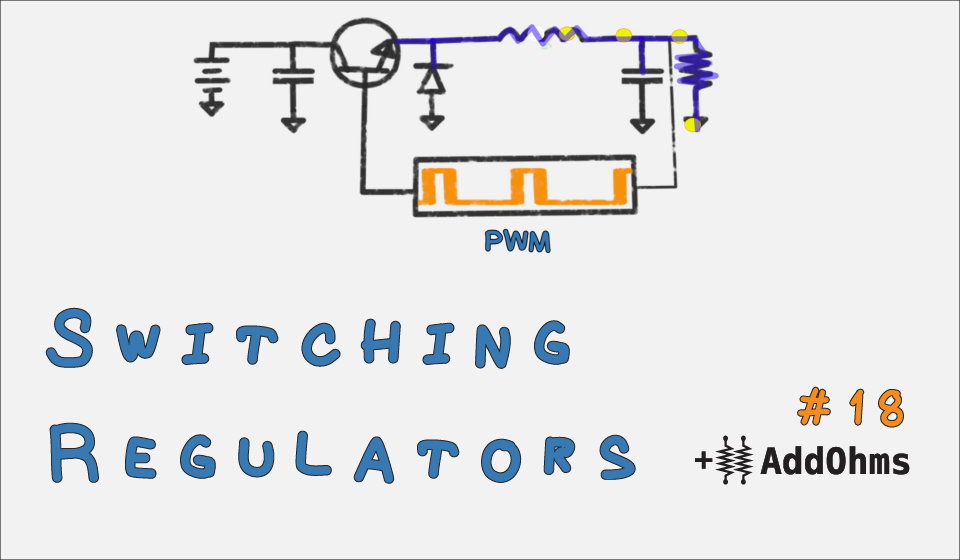
A switching voltage regulator is one of my favorite circuits. In school, they were the first circuits I built where I understood how transistors worked. In fact, they were the first circuit I saw an inductor being useful! Switching regulators are incredibly efficient when designed properly. Of course, this detail about design is important. They are not as simple as a linear regulator, which is basically an IC and two caps.

To understand the basics of a switching regulator, I released AddOhms #18 this week. This is video tutorial dedicated the Switching Voltage Regulator. If video tutorials aren’t your thing, then keep reading for my written tutorial.

The latest AddOhms looks at why you need a pull-up resistor when using push-buttons. This video goes into what happens when you leave a pin floating, what a floating pin means, and how the pull-up works. You can get more information about the video on the AddOhms Episode page.

[shareable]Pull-Up Resistors can be a difficult topic to understand. That’s why I made this video.[/shareable]

This tutorial is the 2nd time I’ve made a video on pull-ups. Despite being a single resistor, it can be a difficult topic for new hardware designers to understand. The pull-up video was the first video tutorial I ever made. In fact, the YouTube version uses YouTube’s “stabilization” algorithm, which gives the video a very warped feel.

AddOhms #15 shows improvements in skill over the past couple of years!

What’s another topic that I need to cover in an AddOhms Tutorial?