The Arduino IDE includes a “Serial Monitor” which is decent for basic serial communication. However, when you need real time serial interaction or data logging capabilities, that’s when one of these serial monitor alternatives can come in handy.
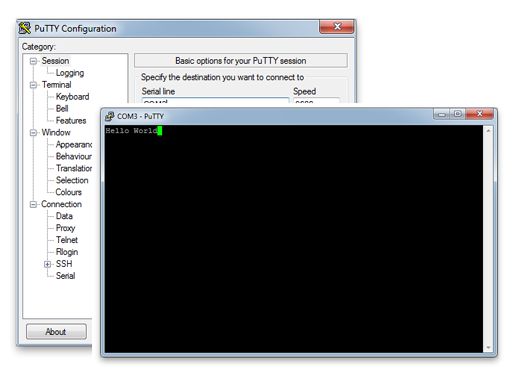
Hands-down one of my favorite terminal applications for Windows is PuTTY from Simon Tatham. In addition to being a great serial terminal it can also handle telnet, ssh, and a host of other things (no pun intended). The source is available and looks like it runs on UNIX platforms, but I have never tried. If you’re using Windows, this is probably your best go-to terminal application. Every Windows machine I use gets PuTTY in the Start Menu shortcuts.
Screen [Mac, Linux, Win]
Download: None (for Mac and Linux)
License: GPL
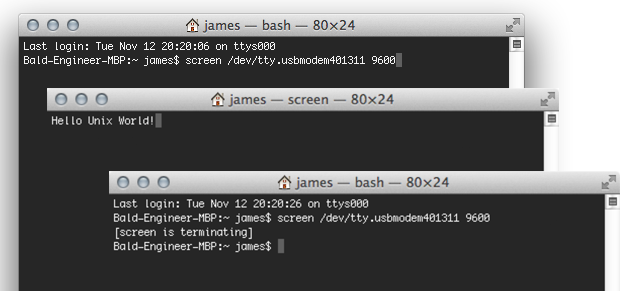
Screen is a command line based fullscreen VT100 emulator. It makes a create terminal client and has the ability to “detach” from the current terminal to run in the background. When it comes to serial communication, it’s the tool I used the most outside of the Serial Monitor. On Windows you will probably need to install Cygwin. On Linux and the Mac, you’ve already got it. Drop to a terminal and run screen.
screen <serial_port> <baud_rate>
Since it comes with all Unix systems it is hard to beat. Except, if you have a Mac. There’s one option that will beat it!
Cathode [Mac]
One of the coolest terminal emulators available is Cathode from Secret Geometry, which I’ve written about before (with video). It emulates old-school CRT monitors which sends any grey-bearded hacker (or soon to be) into a nostalgic frenzy. Which combined with screen can be super nerdy way to interact with your Arduino project. Go full screen and you’ll make new friends in your makerspace in no time.
It’s too beautiful for screen shots, so there’s a video of the Arduino ASCIITable Example.
Code For Testing Serial Monitors
To demonstrate screen and PuTTY, I loaded the following code on to my Arduino Uno. It sends back whatever characters it receives.
Fan of making things beep, blink and fly. Created AddOhms. Writer for Hackster.io News. Freelance electronics content creator for hire! KN6FGY and, of course, bald.
I just want to monitor the serial out put from my air compressors from any were in the plant and at home. they have an RS232 9 pin D-sub connector. Can I use Arduino to WiFi it to my android. This will be my first Aduino project.
You need to measure the signals to verify if they are “true” RS232. True-RS232 outputs can go up to +12V and down to -12V. Either range would be deadly to an Arduino. If the signal swings from 0v to 12v (meaning always positive), then you could use a voltage divider to safely monitor the signal. If the signal swings 0v to 5v, then you can safely monitor with a 5-volt Arduino. Basically Serial.read() and you’re good.
Instead of Arduino to WiFi, I would get an Adafruit ESP8266 Huzzah/Feather board. You will likely still need to do some logic shifting since that is a 3.3 volt board. But it is rather easy to do WiFi with it.
The name “Serial Monitor” has nothing to do with code “Serial.begin().” The IDE’s built-in serial monitor is JUST a simple terminal program. It opens a COM port, sends, and receives data. By using “Serial.begin()” you are telling your Arduino to send the computer serial data. Any program on your computer, such as these in this list, that can open a serial port can send/receive data to the Arduino.
So in other words, there are no additional steps necessary. You open the serial port on your Arduino with Serial.begin() and you open the serial port with a terminal program on the PC.
How do I send commands to the arduino when using putty? – When using serial monitor in the arduino IDE I can just type commands in the box at the top of the screen and hit enter but with putty I can see the arduinos serial output OK, but don’t see any way to enter commands?
There isn’t the concept of a “command” box like the IDE’s Serial Monitor. putty is more like a traditional dumb terminal. putty send keystrokes as you type them. If you want to “see” what you are typing, then you would need to enable “local echo” on the putty side (or echo the characters back on the arduino side.)
Ahh, knew there had to be an option in there somewhere! (Config – Terminal – Line Discipline Options. It was set to ‘Auto’ but I needed to force it to ‘On’)
I’ll need to tweek my arduino prog a little as it currently sends data out every second and this doesn’t allow me enough time to type a response before it overwrites what I’m typing!
Thanks for the pointer, much appreciated.
I am currently developing a free, open source terminal program called NinjaTerm, which can be downloaded from http://mbedded-ninja.github.io/NinjaTerm/. The objective is to provide improvements on RealTerm/PuTTy that would be useful to embedded engineers. Criticisms and feature requests can be made on GitHub at https://github.com/mbedded-ninja/NinjaTerm/issues. Thanks in advance!
HTerm: http://www.der-hammer.info/terminal/ This can input and output in hex. It’s handy if you’re using the serial port for communications to another device rather than just debug text. Windows only.
CoolTerm: http://freeware.the-meiers.org/. Also has hex functions, but looks more like a traditional terminal. Windows, Mac OS X, and Linux
Thanks, for some reason the serial monitor in my Arduino IDE won’t come out of the background so a little search brought me here. I’ve used Putty to connect to my Linux boxes for years and forgot how handy it is, just switch to com5 and I’m back monitoring… Cheers!
You might check the Arduino’s preferences.txt file for the entry “last.serial.location.” I believe the 4 parameters are loc_x, loc_y, width, height (but I may have those mixed up). Make sure the numbers are sane. For example, save their current value and then change to “100,100,100,100”. Or in my case, I have a 1440×900 screen and mine are “1601,491,500,500”.
You are correct, the preferences file had some huge number that would have pushed the window far off the screen. I guess it was moved while two monitors were being used and did not update itself for a single monitor. Thanks! I’m still keeping putty in my arsenal.
Like other websites, this one uses cookies to remember things. Mostly, I use Google Analytics to know how many people come here. ¯\_(ツ)_/¯
By clicking “Accept”, you consent to the use of ALL the cookies.
This website uses cookies to improve your experience while you navigate through the website. Out of these, the cookies that are categorized as necessary are stored on your browser as they are essential for the working of basic functionalities of the website. We also use third-party cookies that help us analyze and understand how you use this website. These cookies will be stored in your browser only with your consent. You also have the option to opt-out of these cookies. But opting out of some of these cookies may affect your browsing experience.
Necessary cookies are absolutely essential for the website to function properly. These cookies ensure basic functionalities and security features of the website, anonymously.
Cookie
Duration
Description
cookielawinfo-checkbox-advertisement
1 year
Set by the GDPR Cookie Consent plugin, this cookie is used to record the user consent for the cookies in the "Advertisement" category .
cookielawinfo-checkbox-analytics
11 months
This cookie is set by GDPR Cookie Consent plugin. The cookie is used to store the user consent for the cookies in the category "Analytics".
cookielawinfo-checkbox-functional
11 months
The cookie is set by GDPR cookie consent to record the user consent for the cookies in the category "Functional".
cookielawinfo-checkbox-necessary
11 months
This cookie is set by GDPR Cookie Consent plugin. The cookies is used to store the user consent for the cookies in the category "Necessary".
cookielawinfo-checkbox-others
11 months
This cookie is set by GDPR Cookie Consent plugin. The cookie is used to store the user consent for the cookies in the category "Other.
cookielawinfo-checkbox-performance
11 months
This cookie is set by GDPR Cookie Consent plugin. The cookie is used to store the user consent for the cookies in the category "Performance".
CookieLawInfoConsent
1 year
Records the default button state of the corresponding category & the status of CCPA. It works only in coordination with the primary cookie.
viewed_cookie_policy
11 months
The cookie is set by the GDPR Cookie Consent plugin and is used to store whether or not user has consented to the use of cookies. It does not store any personal data.
Functional cookies help to perform certain functionalities like sharing the content of the website on social media platforms, collect feedbacks, and other third-party features.
Cookie
Duration
Description
language
session
This cookie is used to store the language preference of the user.
Performance cookies are used to understand and analyze the key performance indexes of the website which helps in delivering a better user experience for the visitors.
Analytical cookies are used to understand how visitors interact with the website. These cookies help provide information on metrics the number of visitors, bounce rate, traffic source, etc.
Cookie
Duration
Description
_ga
2 years
The _ga cookie, installed by Google Analytics, calculates visitor, session and campaign data and also keeps track of site usage for the site's analytics report. The cookie stores information anonymously and assigns a randomly generated number to recognize unique visitors.
_ga_LHR6J24XSY
2 years
This cookie is installed by Google Analytics.
_gat_gtag_UA_42726312_1
1 minute
Set by Google to distinguish users.
_gid
1 day
Installed by Google Analytics, _gid cookie stores information on how visitors use a website, while also creating an analytics report of the website's performance. Some of the data that are collected include the number of visitors, their source, and the pages they visit anonymously.
browser_id
5 years
This cookie is used for identifying the visitor browser on re-visit to the website.
CONSENT
2 years
YouTube sets this cookie via embedded youtube-videos and registers anonymous statistical data.
Advertisement cookies are used to provide visitors with relevant ads and marketing campaigns. These cookies track visitors across websites and collect information to provide customized ads.
Cookie
Duration
Description
VISITOR_INFO1_LIVE
5 months 27 days
A cookie set by YouTube to measure bandwidth that determines whether the user gets the new or old player interface.
YSC
session
YSC cookie is set by Youtube and is used to track the views of embedded videos on Youtube pages.
yt-remote-connected-devices
never
YouTube sets this cookie to store the video preferences of the user using embedded YouTube video.
yt-remote-device-id
never
YouTube sets this cookie to store the video preferences of the user using embedded YouTube video.
yt.innertube::nextId
never
This cookie, set by YouTube, registers a unique ID to store data on what videos from YouTube the user has seen.
yt.innertube::requests
never
This cookie, set by YouTube, registers a unique ID to store data on what videos from YouTube the user has seen.


24 Comments
There is also micro_monitor. A super light weight, highly customizable and scalable Python implementation that works really well.
https://github.com/jaredellison/micro_monitor
I have screen on Ubuntu 18.04 and I can receive stuff just fine but how do you ACTUALLY SEND DATA to the arduino on the USB port?!
With screen? You type it.
I just want to monitor the serial out put from my air compressors from any were in the plant and at home. they have an RS232 9 pin D-sub connector. Can I use Arduino to WiFi it to my android. This will be my first Aduino project.
You need to measure the signals to verify if they are “true” RS232. True-RS232 outputs can go up to +12V and down to -12V. Either range would be deadly to an Arduino. If the signal swings from 0v to 12v (meaning always positive), then you could use a voltage divider to safely monitor the signal. If the signal swings 0v to 5v, then you can safely monitor with a 5-volt Arduino. Basically Serial.read() and you’re good.
Instead of Arduino to WiFi, I would get an Adafruit ESP8266 Huzzah/Feather board. You will likely still need to do some logic shifting since that is a 3.3 volt board. But it is rather easy to do WiFi with it.
Hi, can one find an LCD simulator instead of having real one?
How do I get Arduino to send data to the new terminal instead of it’s built in terminal?
Nothing to set here:
void setup() {
Serial.begin(9600);
or in Arduino preferences.
In everything I read about terminals, nowhere does anybody address this.
Is it supposed to automatically happen…somehow?
The name “Serial Monitor” has nothing to do with code “Serial.begin().” The IDE’s built-in serial monitor is JUST a simple terminal program. It opens a COM port, sends, and receives data. By using “Serial.begin()” you are telling your Arduino to send the computer serial data. Any program on your computer, such as these in this list, that can open a serial port can send/receive data to the Arduino.
So in other words, there are no additional steps necessary. You open the serial port on your Arduino with Serial.begin() and you open the serial port with a terminal program on the PC.
try YAT, far better than any of the other half built terminals ive come across
How do I send commands to the arduino when using putty? – When using serial monitor in the arduino IDE I can just type commands in the box at the top of the screen and hit enter but with putty I can see the arduinos serial output OK, but don’t see any way to enter commands?
There isn’t the concept of a “command” box like the IDE’s Serial Monitor. putty is more like a traditional dumb terminal. putty send keystrokes as you type them. If you want to “see” what you are typing, then you would need to enable “local echo” on the putty side (or echo the characters back on the arduino side.)
Ahh, knew there had to be an option in there somewhere! (Config – Terminal – Line Discipline Options. It was set to ‘Auto’ but I needed to force it to ‘On’)
I’ll need to tweek my arduino prog a little as it currently sends data out every second and this doesn’t allow me enough time to type a response before it overwrites what I’m typing!
Thanks for the pointer, much appreciated.
I am currently developing a free, open source terminal program called NinjaTerm, which can be downloaded from http://mbedded-ninja.github.io/NinjaTerm/. The objective is to provide improvements on RealTerm/PuTTy that would be useful to embedded engineers. Criticisms and feature requests can be made on GitHub at https://github.com/mbedded-ninja/NinjaTerm/issues. Thanks in advance!
Didn’t know that *screen* can do this. Thanks a lot for the information.
HTerm also has a Linux version. I haven’t tried that one yet.
Here are a couple more useful terminals:
HTerm: http://www.der-hammer.info/terminal/ This can input and output in hex. It’s handy if you’re using the serial port for communications to another device rather than just debug text. Windows only.
CoolTerm: http://freeware.the-meiers.org/. Also has hex functions, but looks more like a traditional terminal. Windows, Mac OS X, and Linux
Great post (as usual), James.
Have you had any experience with the “Tellurium” debugging library / serial monitor? It’s been discussed on the Arduino forum here:
http://forum.arduino.cc/index.php?topic=169518.0
Mark
Unfortunately, no I haven’t looked at Tellurium. Looks to be Windows-only, so maybe one day if I ever switch back to the PC world full time.
I see: unplug the arduino and screen closes!
Great! Already loved screen, but I didn’t know it was the serial monitor I was looking for… but how do I gracefully close the monitor?
Screen has a two “key” exit.
Press CTRL-A and then \ (backslash)
That’ll exit screen gracefully.
Thanks, for some reason the serial monitor in my Arduino IDE won’t come out of the background so a little search brought me here. I’ve used Putty to connect to my Linux boxes for years and forgot how handy it is, just switch to com5 and I’m back monitoring… Cheers!
You might check the Arduino’s preferences.txt file for the entry “last.serial.location.” I believe the 4 parameters are loc_x, loc_y, width, height (but I may have those mixed up). Make sure the numbers are sane. For example, save their current value and then change to “100,100,100,100”. Or in my case, I have a 1440×900 screen and mine are “1601,491,500,500”.
Or just keep using putty! 😉
You are correct, the preferences file had some huge number that would have pushed the window far off the screen. I guess it was moved while two monitors were being used and did not update itself for a single monitor. Thanks! I’m still keeping putty in my arsenal.