Tag

KiCad

Browsing

In April 2019, hardware hackers, hobbyist, and engineers joined together for the first KiCon. A couple of people asked me, “why is there a conference for KiCad?” Some questioned if KiCad was significant enough software to warrant a conference. That question is valid. But KiCon is larger than the KiCad software. Even in its first iteration, KiCon evolved more into a meeting for people building electronics hardware from small scale hobbyist to professionally designed systems, than just a conference on a single piece of software. Some might call it a maker conference. I call it a hardware developer conference. The key that tied everyone together is the open source software behind our printed circuit boards.

Twenty-five different talks covered basic KiCad usage, automating tasks, PCB layout techniques, and projects designed in KiCad. Wayne Stambaugh ended the first day with a State-of-KiCad discussion. He introduced the feature list for KiCad 6. Additionally, he announced four new lead developers and that he would be working on KiCad full time. That news means it is likely KiCad 6 will be here faster than the usual two-year release cycle.

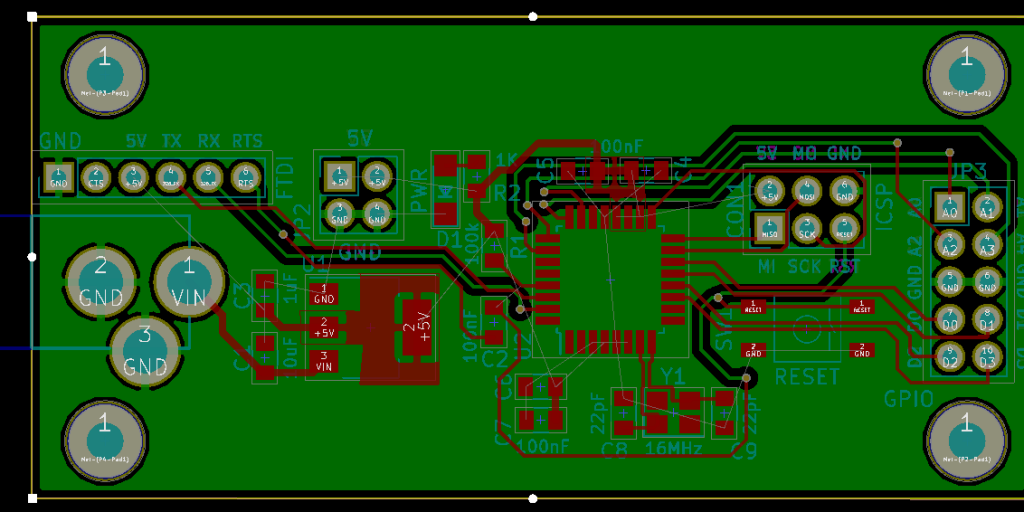
In addition to the talks, there were several workshops and panel discussions. The workshops included a getting started with KiCad lead by Shawn Hymel [link]. That one was cool to keep an eye on because people were designing their first PCB, milling it, and then soldering parts to make the boards blink. In another workshop, Anool Mahidharia provided a hands-on guided introduction to FreeCAD. It is a parametric mechnical cad tool. The panels featuerd PCB manufactureres, workflow discussions, and the KiCad development team.

Outside of the planned classes and activities, I finally shook hands with friends whom I only knew through social media. Even though we are all electronics enthusiast or professional engineers, it is rare we end up at the same place at the same time. See what I mean about KiCad connecting liked minded people together?

With so much going on, I realized I couldn’t cover everything. Instead, this post’s focus is the tidbits I learned at the conference and stuck with me after a little bit of time passed. Here are the six things I learned at KiCon 2019.

2020-04-04: This tutorial is based on KiCad 5. With KiCad 6, the bus feature works a little different (so I’m told.)

When your schematic has a large number of related signals, it is helpful to group them. In its schematic editor, KiCad has a few tools to help. Your end-goal helps determine which tools to use. For example, do you need a KiCad bus or a label? In this post, I explore how you can define signals, group them, and reference them across schematic sheets.

Up until recently, I did not need to use a bus or multiple sheets. However, the Apple IIgs project I’m working on is too large for a single page. In a KiCad live stream, I looked at how to create busses and connect them. In a separate tutorial, I will show how to work with multiple sheets in KiCad.

tldr; KiCad does not require the use of a bus to connect signals together. Wire labels already provide that connection. A KiCad bus offers two things: 1) a visual representation and 2) an easier way to create global connections (across sheets.)

Lastly, if you are not familiar, KiCad is an Open Source eCAD tool. Although I have used others, this one currently my preferred platform.

KiCad Bus, Label, and Wire

Before jumping to how to use a bus, first, we need to start with the basics. KiCad connects nodes with a “wire” element. KiCad gives each wire drawn a unique name unless it connects to an existing node. The user can override the name by adding a label.

KiCad Wire and Label Example
Wire and Label Example

A new project I have started working on involves the Apple IIgs. It was Apple’s last 16-bit (and 8-bit) computer. Inside are many application specific integrated circuits, or ASICs, that make the IIgs an extraordinary member of the Apple II family. One chip, in particular, is called the “MEGA-II.” This chip takes all of the individual logic chips from the original Apple II design and incorporates them into a single 84-pin PLCC.

The project I have in mind needs the MEGA-II. I need to design some printed circuit boards for it and a few other IIgs chips. That goal means I need at least one custom Kicad schematic symbol. I plan to create a custom library of Apple IIgs components.

Like other computers from the same era, complete schematics are available. However, they are not in a modern format. Since I need to create symbols for so many of the chips as it is, I may end up re-creating the entire IIgs schematic.

For now, here is the process I use to create custom KiCad schematic symbols and parts.

Continuing the DIY Arduino tutorial series, this AddOhms episode shows how to create a PCB in KiCad. I make a joke that the original design was a rectangle, which I found boring and pointless. So instead, I designed a triangle to give the board 3 points. Get it? Puns! I am calling it the Pryamiduino. To be honest, I found not having a constraint to be a problem. By forcing a specific board size and shape, many decisions were more manageable.

boring rectangular arduino nano clone
First design – Boring!

In the end, the video ended up more edited than I planned. KiCad is just so finicky and crashy that I could not make a coherent start to finish tutorial. At least, I could not work with a board at this level of complexity. Something simple like a 555 flasher would be easier to show from start to finish. I am planning some immediate follow-ups with quick tips on using KiCad. It is a frustrating suite of applications, but the results can be quite nice.

AddOhms Pyramiduino Show Notes

One of the last significant steps in a project is designing the custom PCB. This stage means creating a DIY Arduino board that is custom to the application. Two examples of my past projects are BinBoo, a Binary Clock, and Open Vapors, my reflow oven controller.

While working on a project for a friend, I got to thinking; it would be nice to have a checklist for circuit elements to include on a DIY Arduino board. In the early days, I forgot to add a filter cap to AREF, for example.

These tips are based on an 8-bit AVR design, like the ATmega328p chip. You could apply these tips to other 8-bit AVRs. Until now, I have not designed a custom board around a 32-Bit/ARM board. Though at only $16, I would be tempted to just solder the Teensy module directly to my finished board.

Below is a written list of items for a DIY Arduino checklist. If you’d like to see me design this board in KiCad, check out this AddOhms Tutorial.