")
When using delay() to flash a LED there is a time for the LED to be on and then off. This makes it easy to have independent control of the “on” and “off” times. The standard blink without delay example doesn’t give you this flexibility.
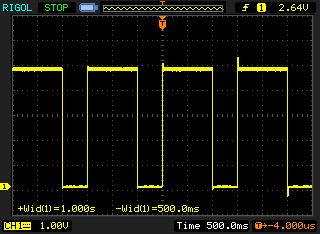
This example code gives you complete independent control of how long a LED (or any OUTPUT pin) stays “ON” or “OFF”. This also demonstrates a very simple two-state state machine.
The variable “LED13state” is used to track what should happen each time the millis() event fires.
// On and Off Times (as int, max=32secs)
const unsigned int onTime = 1000;
const unsigned int offTime = 500;

// Tracks the last time event fired
unsigned long previousMillis=0;

// Interval is how long we wait
int interval = onTime;

// Used to track if LED should be on or off
boolean LED13state = true;

// Usual Setup Stuff
void setup() {
   pinMode(13, OUTPUT);
}

void loop() {
   // Set Pin 13 to state of LED13state each timethrough loop()
   // If LED13State hasn't changed, neither will the pin
   digitalWrite(13, LED13state);

   // Grab snapshot of current time, this keeps all timing
   // consistent, regardless of how much code is inside the next if-statement
   unsigned long currentMillis = millis();

   // Compare to previous capture to see if enough time has passed
   if ((unsigned long)(currentMillis - previousMillis) >= interval) {
      // Change wait interval, based on current LED state
      if (LED13state) {
         // LED is currently on, set time to stay off
         interval = offTime;
      } else {
         // LED is currently off, set time to stay on
         interval = onTime;
      }
      // Toggle the LED's state, Fancy, eh!?
      LED13state = !(LED13state);

      // Save the current time to compare "later"
      previousMillis = currentMillis;
   }
}
 plus addition does not add up")


58 Comments
How code run ounce blink led 3 time using millis(); if some variable have true condition
I want blink my led 3 time if button have 4 pressed
Thanks James, I had almost given up on trying to get this scenario to work. This code works perfectly for my purposes. I had spent hours with it and you sorted me out in five minutes. Excellent job.
Peter
Thanks for this tutorial. I am new to arduino and have been practicing with sketches but your sketch is quite strange to me. I use original Arduino IDE downloaded from the net. I wanted to copy your sketch and make some few changes to suit my case. I need a 8 hour ON and 6 minutes OFF cyclic timer ( probably with adjustable OFF timer).
What happens to the output if millis get overflow?
My ON time is 20 Minute and OFF time is 40 minutes.
As long as the variables used to track millis() are defined as an “unsigned long”, it will take 47 days for milils() to roll-over. The code used in this example specifically handles the roll-over condition. So unless they roll-over twice, e.g. 94 days, without previousMillis being updated, there is no need to worry about roll-over–with this code.
Hi James!
I’ve been searching for a code that helps me control the timing of led on and off and luckily found yours.
This might be the answer to my project.
I’m starting to make a control for animatronics and got an idea of using micro controllers and having like this code (led on off).
I’m very new in coding and my learning are based only on watching tutorials and reading post like this .
It would be a great help if you can give me an idea on how to achieve my goal.
I am having hard time understanding the Millis() function. Since its the only function I can use to multitask.
what I’m trying to achieve first is to know how to switch on and off multiple led independently so in that way i have full control on what timings each led’s on and off.
From what i understand in your code and correct me if I’m wrong. If i want to use this code with multiple leds all i have to do is to copy it multiples time according on the count off leds and add more global variable?
Looking forward for your reply.
Thank you in advance James,
In general, yes, if you copy the key variables they can be used to control multiple LEDs.
The idea behind millis() is that it is a stopwatch. So you write code to check how much time has passed. Once enough time has passed you do the next action. e.g. turn on the LED, see if X milliseconds has passed yet, then turn off the LED.
This is different from writing procedural code that is “do this, then wait, then do this.”
James…excellent tutorials on Millis(). I am new to Arduino and am trying different examples.. When I loaded this sketch into my Nano it throws the following error pointing to line 22;
cannot convert ‘boolean {aka bool}’ to ‘Pin Status’ for argument ‘2’ to ‘void digitalWrite(pin_size_t, PinStatus)’
What are you using to compile the code?
James, I am using the online web editor. I found that by changing the line from digitalWrite(13, LED13state); to digitalWrite(13, (PinStatus)LED13state); the error went away
HI James, have been trying to use google assisant with my raspeberry pi to turn a relay on then off. I have managed to do this, BUT I have to issue 2 separate voice commans, one to turn relay HIGH and second command to turn relay LOW. I would like to issue only ONE command to turn relay HIGH and then after set time 2 seconds for the relay to turn LOW with out an extra voice command.Any help would be very much appreciated. Sean
It depends on how you’re controlling the Pi. If you’re using wiringPi on the Pi, then you could just do: digitalWrite(HIGH); delay(2000); digitalWrite(LOW);
Thanks for quick reply James .I’m using particle . So delay does not work .
Uh? Okay, well I can’t help you then. I would definitely look at this page though: https://docs.particle.io/reference/device-os/firmware/raspberry-pi/#delay-
Hi James,
i wrote some code to blink a led n times depending how many users are connected.
i use the delay function but want to convert that to milis().
can you push me in the right direction ?
the code now is:
[arduino firstline=”1″]
switch (aantal){
case 0:
digitalWrite(RedLed,LOW);
break;
case 1:
delay(350);
digitalWrite(RedLed,HIGH);
delay(700);
digitalWrite(RedLed,LOW);
break;
case 2:
delay(350);
digitalWrite(RedLed,HIGH);
delay(700);
digitalWrite(RedLed,LOW);
delay(350);
digitalWrite(RedLed,HIGH);
delay(700);
digitalWrite(RedLed,LOW);
break;
case 3:
delay(350);
digitalWrite(RedLed,HIGH);
delay(700);
digitalWrite(RedLed,LOW);
delay(350);
digitalWrite(RedLed,HIGH);
delay(700);
digitalWrite(RedLed,LOW);
delay(350);
digitalWrite(RedLed,HIGH);
delay(700);
digitalWrite(RedLed,LOW);
break;
[/arduino]
this goes up to 6
How to convert this ?
You need to create a state machine, like the example, I did here. I would start with making each pattern work correctly with millis() and then slowly integrate them together. It isn’t optimized, but I would consider using separate variables for the on/off times of each pattern.
where can i find the state machine ?
Hello
i have a question
if i want to print on/off time on LCD for each case separately, should i use this lcd.print( millis() / 1000); or what do you think?
Sure.
Hi James, I have an electric trainset, with points and signals. To control the points or signals (which are controlled by magnetics witches) I have to send a short pulse (1 or 2 seconds) to the switch by means of a relay). I need two relays for each poin or signal. I have four relays at this stage to control one point and one signal. I would like to control the relays at independant and differen times, over a span from one to two hours. For example point after 5min., than 30 min. than,80 min(of course in milli seconds), and the same for the signal. All tutorials show blinking lights, etc , but nothing like this. I tried normal arduino, but the delays are stuffing me up. Could you give me a code in Millis for this please. Regards, Martinus van Walsum
Sorry, I can’t provide detailed code like that. A good starting point would be to make a chart of the various “states” you want each of your relays to be in and their dependencies. It is the start of a state machine. For detailed help, I would suggest something like the Project Guidance forum on arudino.cc’s forums. There others can help you form the code you need.
Hi.
I want to do this:
light turn on and off at certain times with a nano arduino
my idea is that when turning on the arduino, take the time is eg. 00:00 a.m. (then connect it right then, at that time), and program it to turn on or off the light at certain times (14pm to 22pm (on) and the rest light off)
If for some reason it were to cut off the power supply, to set it to the time it would only have to turn it on at 00:00 am.
it is possible? can you give me a hand??
Sounds like you need a real-time clock (RTC) module. The DS1307 is popular, but I don’t care for it. It isn’t very accurate. The DS3231 is my favorite.
Hello sir
Your code is working well.
I am very thankful to you.
I need your help in a case
I am running this code in a condition in which when distance = 30 cm this statement gets on
I want led ” on” state every time the condition fulfill.
Rather than in a cycle in which some time it is on when “if ” statement fulfill or off th other time .
Thanks in advance
Hi James,
Thanks for all your great informative tutorials! Your millis examples have helped this novice out so much.
I’ve taken this code and successfully controlled a water pump via a relay (I needed the separate on/off times), but I am having issues with coding to allow an analog value from a water level sensor (funduino) to stop the water pump from being on. The analog values also have IF statements that light up LEDs to indicate water level.
I had previously thought I could set a boolean flag and add ” && waterLOW ==false” to the IF ‘millis timer’ statement. But due to the toggling variable, this meant that if the flag became true during the onTime of the pump that it wouldn’t reenter that IF statement and got stuck in the last state.
I then tried to make IF and ELSE IF statements using the variable toggle like so:
[code]
if (waterLOW == false) {
pumpSTATE = !(pumpSTATE);
} else if (waterLOW == true) {
pumpSTATE = false;
}
[/code]
But this didn’t seem to work either. Though I suspect something like this could work and it’s just my lack of grammar and knowledge of how to nest IF, ELSE and ELSE IF statements.
Am I on track thinking that I should use a boolean flag here and use IF and ELSE statements to direct the state changes? or are there any hints you can provide me with that will reorient me? I have previously read about state machines, but am I righting thinking I don’t need to go there yet?
Many thanks for all the help so far and for any if given here,
DanielKhan
I don’t understand your requirements well enough to advise. It sounds like you have a strange set of conditions that can’t easily be defined with a flag. I’m almost positive you don’t want a situation where you are just toggling the state of pumpSTATE. Every single time that if-statement runs it is going to flip, which is probably bad thing. Instead of a simple toggle, you probably need a more robust set of logic to determine if the pumpSTATE should be changed.
Hello
I am french, could you help me please
I would like to replace a relay, by a pwm led that turns on gradually, in my program I use a rtc DS1307 with arduino.
when I use “for” it blocks me the time, I hope to use “up” and “down”
but I can not .
Hi James; I tried your code, “Independent On and Off Times with Millis()”. Works great, I would like to add a simple counter to flash 10 times let’s say and stop until triggered to run again. Not being a code writer, I would appreciate your expert suggestions.
Thanks for the method to get away from “delay().
I would add a counter variable and set it to 10 when you want the flashing to start.
[code]
if (whatever happens)
counter = 10;
if (counter > 0) {
if (currentMillils – previousMillis > interval) {
// flashing code
counter–;
previousMillis = currentMillis;
}
}
[/code]
Something like that.
Hi James , can you help me?!(sorry for my bad english)
I have a arduino uno with lm35 sensor temperature and 4 relays(1 module) , i trying to change your code to turn on 1 relay every 2 hour.
By first , I change offTime to unsigned long, and put 7200000UL , but , dont work .
I try a test , with 10 seconds , 30 seconds and 60 seconds , every tests sucessful.
Can you help me?!
Change “interval” to unsigned long.
Hi James, congrats for your helpful website.
i am looking for a little help to figure out how to blink 3 leds.
In my real application those represents relays that will power on 3 electrovalves for a irrigation demostration of 3 independent sectors. The common solution with delays is to:
Sector1: Led1 ON, ontime1(ie:120 seconds), then OFF, then
Sector2 Led2 ON, ontime2(ie:240 seconds), then OFF, then
Sector2 Led3 ON, ontime3(ie:120 seconds), then OFF, then back to Sector1.
My problem is that in real life the next Led to be ON must not to start before the previous led go to OFF. This is for water pressure compensation and avoid a water hammer. So that time before to next led will be ON i will define it in my code as “OffsetTime” and for this example will be 10 seconds. So the led2 will be ON when the time elapse “ontime1” is 110 seconds and led3 will be ON when “ontime2” is 230 seconds. (ontime2-OffsetTime).
Can you help with a tips to figure out the code?
Thank you in advance!!
correction : Can you help with a tips to figure out the code with millis()?
Basically you could duplicate the timing variables and add some flags. You are building a simple state machine.
Thank you James, so much appreciated. The simple state machine example was very useful to learn enum.
Only don´t understand what you mean with “could duplicate the timing variables”… thanks!
Make another variable for previousMillis for the other LEDs. Then make variables, if necessary, for each of their time ON and time OFF. You might want to check out example #5 of my multitasking tutorial. It adds a 2nd LED to a millis example.
Hello. Thank you for the tutorial of millis() code in Arduino. I have a question for blinking the LED with the opposite on and off statement. I mean, the codes are like this:
digitalWrite(13,HIGH);
delay(10);
digitalWrite(13,LOW);
delay(10);
digitalWrite(12,LOW);
delay(10);
digitalWrite(12,HIGH);
delay(10);
If I’m using code millis() for the opposite blinking, what have I to add/change from those code I wrote before?
Thank you very much
If you’re using millis() then none of this code works.
Nice tutorial. But sir, how if use 2 LEDs, blinks alternatly. With off-delay both leds before they change their blink.
I don’t understand your question.
Thank you sir and sorry for my bad english. I mean…
( led 1 on , led 2 off ) then
( led 1 off, led 2 off ) then
( delay 5 second ) then
( led 1 off, led 2 on ) then
( led 1 off, led 2 off ) then
( delay 5 second )
And so on.
Hi There all
I hope someone can help me here.
So a quick question, I have a built a small greenhouse controller, with relays controlling the Humidifier and Temperature, that’s all working great with some sketch I found online.
The question I`m asking is when the humidity drops in the greenhouse the relay kicks in and starts a fine mist spray system, which is great but goes continuously until the humidity is back up above the trigger level, what I want is for the relay once its on to stay on for say one minute then off again for ten and repeat, until the humidity is up high again
I`m assuming its a very simple line of code to do that, but at this early stage in my learning of the code, I have no idea how to do that.
So if anyone can tell me how, or point me in the right direction of how I can make the relay output stay on for a bit, go off and repeat, I would be very happy.
Cheers Alan
The code on this example can do exactly that. The only caveat is when you setup the intervals. If you put something like “interval_OFF = 60000 * 10;” you’re going to run into a casting problem. So if you use inline math to calculate the interval, the compiler you intended to use an unsigned long, like this: “interval_OFF = 60000UL * 10UL;”
Lastly you might want to look at Delayed Events after a Button Press. Of course you aren’t using a button press in this case, but it shows how to “trigger” a timer.
Yes, it’s the same.
Thank you, I can get your sketch working, and have played with it a bit within the scope of the LED’s. I wondered if you have another tutorial similar to this but dealing with temperature or other variable that is not directly controlled by the user… (more of an if/then). Such as temp or other such sensor controls the LED(s), but the LED(s) stay on/off for set time before resetting to the original if/then condition. I get how this works by looking at the previous state, but either overthinking or missed how this could be used in something like my example where on or off is set by an IF statement, but delayed where the rest of the code still runs.
You would create a simple state machine. The if-statement would change the current stage.
I am doing a double traffic light project that also has a button, for pedestrian crossing, and a photo-sensor, for emergency vehicles. I’m trying not to use delay(); since if I press the button while the lights are on the program is on pause and won’t respond.
Sorry, I don’t provide project level help. I would suggest posting your project on arduino.cc’s “Project Guidance” forum.
Hi Abraham, did you get anywhere with this? I am working on something similar and would love to hear what you did.
Hi James.
I am new to arduino, and want to control 3 or 4 relays, triggering at different times, in sequence of each other. However the timing in between each step is not the same. I’ve writtin the code using “delay”, as it was the first example I got, and seemed easy. Now its restricting me to go further, and for example have an count down timer indicating time left untill all steps are completed. Please note the time I’ve put in is only for testing.The actual times are 1-8hours.
See below:
[arduino firstline=””]
int right=8;//right relay//
int left=10;//left relay//
int down=13;//down relay//
int ButtonTwo=2;//trigger 2 day programme//
int ButtonFive=4;//trigger 5 day programme//
int ButtonSeven=7;//trigger 7 day programme//
void setup() { //Setup runs once//
pinMode(right, OUTPUT); //Set right as an output//
pinMode(left, OUTPUT); //Set left as an output//
pinMode(down, OUTPUT); //Set down as an output//
pinMode(ButtonTwo, INPUT_PULLUP); //Set twoDay as an input//
pinMode(ButtonFive, INPUT_PULLUP); //Set fiveDay as an input//
pinMode(ButtonSeven, INPUT_PULLUP); //SetsevenDay as an input
}
void loop() { //Loop runs forever//
if(digitalRead(ButtonTwo)==LOW)
{
delay(1000); //for 3.5 seconds//
digitalWrite(right,HIGH); //Motor runs clockwise, Step 1//
delay(1000); //for 3.5 seconds//
digitalWrite(right, LOW); //Motor stops//
delay(1000); //Motor right wait for 2hours//
digitalWrite(left,HIGH); //Motor runs left//
delay(1000); //for 1 second//
digitalWrite(left,LOW); //Motor left Stops//
delay(1000); //Motor left stop for 1 second//
digitalWrite(left,HIGH); //Motor runs left//
delay(1000); //for 1 second//
digitalWrite(left,LOW); //Motor left Stops//
delay(1000); //Motor left stop for 1 Second//
digitalWrite(left,HIGH); //Motor runs left, Step 4//
delay(1000); //for 1 second//
digitalWrite(left,LOW); //Motor left Stops//
delay(1000);
digitalWrite(right,HIGH); //Motor runs clockwise, //
digitalWrite(down,HIGH); //Motor runs down, //
delay(1000); //for 3.5 seconds//
digitalWrite(right, LOW); //Motor stops//
digitalWrite(down, LOW); //Motor stops//
delay(1000);
[/arduino]
And so it goes on to five and seven day as well.
You need to build a state machine. And then step through each state (which relay is turned on then which one is turned off).
https://www.baldengineer.com/state-machine-with-enum-tutorial.html
James, I was able to get your Arduino code to work. I do have a particular problem I’m trying to solve using the Arduino though. I’m using a 12v LED and having to power it with a separate power source using a transistor. What I need the LED to do is (1) when a switch is closed LED is off (2) When switch first opens the LED flashes briefly then turns off. I have a circuit that works, but to throw an additional issue into the mix, I can only run one wire to the LED due to physical limitations. The circuit I have connects the LED to +12vdc then to the drain of a transistor. I do have the ability to run a ground to the case from one side of the LED. Would you happen to have any suggestions.
Hello,
How can I do a ON time of 1 hour? doent it work for longer time than 30 seconds?.
Thank you!
You need to change the data type for “onTime” from int to long, so it can hold:
$latex 1000ms\times60seconds\times60minutes=3,600,000$
[arduino firstline=”2″]
const unsigned long onTime = 3600000UL;
[/arduino]
This is great, Solved my problem of independent ON and OFF time. Thanks James
I am trying to calculate the time after occurrence of two different events (cool and heat), totally independent from each other. for starting cooling I have to wait for a specific time from last turn off, if time interval is reached and temperature condition also satisfied the cool function will start but heat should not start at same time. for heat also need to check the time from last turn off to now and by satisfying temperature condition the heat function will start. I tried to use millis but millis is turning on both functions with a very slight time difference. How i can use millis to independently monitor time interval for two independent tasks.
wow, this great, thanks for sharing,…
how if I use 3 or more led with diffrent on time and off time?
blinkLed(red, 50, 1000);             //led color,  on delay,  off delay

blinkLed(blue, 500, 50);              //led color,  on delay,  off delay

blinkLed(green, 1000, 2000);    //led color,  on delay,  off delay
Thanks for sharing. I was searching for last couple of days on how to solve independent on/off without using delay().