
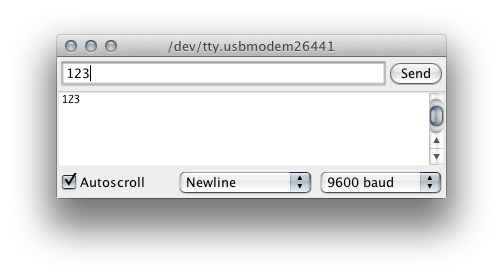
When Serial data is transmitted to an Arduino, it is sent one byte at a time. Even though you might type “123” in the Serial Monitor, that’s not quite what is sent. Instead the bytes “1” then “2” then “3” are sent. Once received into a buffer on the Arduino, these individual bytes need to be reassembled into something useful. The Arduino IDE provides Serial.readBytes() as one option. However, if you aren’t sure how many digits you are going to receive, this may not work. So another option is to use Serial.readBytesUntil() like so:
void setup() {
 Serial.begin(9600);
}

void loop() {
 char buffer[] = {' ',' ',' ',' ',' ',' ',' '}; // Receive up to 7 bytes
 while (!Serial.available()); // Wait for characters
 Serial.readBytesUntil('\n', buffer, 7);
 int incomingValue = atoi(buffer);
 Serial.println(incomingValue);
}
There are some limitations to using that method. For example, what if you want to keep your program active while waiting for Serial input to finish? Or if you want to ignore certain characters (like a comma or decimal). The following code gives you much more control over receiving multiple digit integers like 99 or 100 or 1000. There is also an explanation of how this code works, so you can modify it for your sketch.
Code Example
void setup() {
  Serial.begin(9600);
}

unsigned int integerValue=0;  // Max value is 65535
char incomingByte;

void loop() {
  if (Serial.available() > 0) {   // something came across serial
    integerValue = 0;		  // throw away previous integerValue
    while(1) {			  // force into a loop until 'n' is received
      incomingByte = Serial.read();
      if (incomingByte == '\n') break;   // exit the while(1), we're done receiving
      if (incomingByte == -1) continue;  // if no characters are in the buffer read() returns -1
      integerValue *= 10;  // shift left 1 decimal place
      // convert ASCII to integer, add, and shift left 1 decimal place
      integerValue = ((incomingByte - 48) + integerValue);
    }
    Serial.println(integerValue);   // Do something with the value
  }
}
Caution
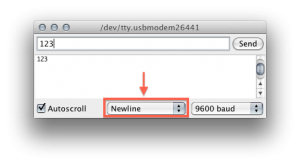
Two points of caution when using this code:
- You absolutely must enable “Newline” (only) termination in the Serial Monitor (or your favorite serial terminal program). Otherwise, the while(1) loop will never exit. See below for a screen shot on how to do this in the Arduino IDE.
- The maximum value you can send is 65535. There is no checking to verify if this will overflow.
If you have short routines, like a toggling LED / Heartbeat indicator, you can call them within the while(1) loop to keep your program running while waiting for input to finish.
Why does this work?
There are 4 lines of code that make this work. The first block are:
while(1) {
//...
if (incomingByte == '\n') break;
if (incomingByte == -1) continue;
The while(1) will cause the Arduino to wait until the character ’n’ is received. This is “Newline”, set by the Serial Monitor. The second is an important fact that Serial.read() will return -1 if no characters are available. This keeps the program from having to constantly check Serial.available(). Math can be fun and may make the next couple of lines look like magic, but let’s break them down.
integerValue *= 10;
integerValue = ((incomingByte - 48) + integerValue)
When a decimal number (base 10) is multiplied by 10, all of the digits shift left once. So each time a digit is entered, the value of integerValue is shifted to the left and the new digit is added. Cool, eh? Why do the subtraction? Because… the variable ‘incomingByte’ has an ASCII value in it. The character “0” has an ASCII value of 48. (See this ASCII Chart for more information.) So by subtracting 48 from the incomingByte, we get the integer value of that ASCII character. [Note: This is why you are limited to “65535”. This is the maximum value that can be held by an unsigned int.]
Conclusion
Either the Serial.readUntil() method or the code above can be used to receive big integers. They both have advantages and potential disadvantages. It just depends on what you need to do in your code. Keep in mind, both methods require having the IDE set the line termination to ’n’ (newline).