189 Results

Arduino

Search

I had the chance to spend some time with the Arduino team before and during Maker Faire Bay Area 2019. I also attended Massimo’s “State of Arduino” talk. In short, there are new Arduino Nano boards coming, a certification available today, updates on the Vidor, interesting education kits, and one more special announcement.

It rained most of the weekend, which I am sure caused attendance to take a hit. Normally this would not be a big deal, but there was some talk it may be the last year for the Bay Area’s show. As usual, I walked the show on Friday and did take note there were several new exhibitors throughout. For that reason, I hope it is not the last one.

Depsite the grim news, spirits from attendees were high. On Saturday I helped answer questions and give out t-shirts at the Arduino booth. The time flew by fast but not before I got to overhear and explain tidbits about this year’s Arduino announcements.

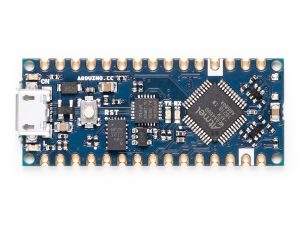
New Arduino Nano (Every, IoT, BLE, and BLE Sense)

My favorite announcement, hands down, is the new Arduino Nano boards. The boards are a new small form factor featuring castellated edges. A “castellated edge” means you can solder the entire module to a PCB. It is a cost-effective way for adding a complex microcontroller solution to small and medium run products. You might be familiar with the concept from the ESP, WiFi, or Bluetooth modules.

The board form factor is really the only thing these new Arduino Nano boards have in common. Each offers a slightly different feature set. Oh, and the price for each is shocking for an Arduino branded board.

New Arduino Nano Every

New Arduino Nano Every
Arduino Nano Every

Looking through my parts boxes, I have counted at least 15 distinct “Arduino boards” in my collection. Either they are variants of the Uno form factor or they have different processors from the 8-bit boards. That number easily goes to 30 if I include boards with just the “Arduino header” on them. This pile of microcontrollers got me thinking, how does anyone ever choose the right board?

For example, I have had several people tell me the ESP32 is the “ultimate Arduino.” But is it? Well, yes and no. Extra hardware you do not need can lead to complexity and unexpected behavior. When using an advanced module like the ESP32, it is important to learn how to use sleep modes to limit current consumption, especially for battery applications. But if you need WiFi, Bluetooth, I2C, SPI, UART, and high-performance processing, capacitive touch, GPIO, and analog inputs then the ESP32 is an obvious choice.

As for the other boards, I have written a guide to picking the right Arduino. You can find it over on the Hackster.io blog.

Read: Picking an Arduino

In the past, I’ve covered how to reset Arduino millis() and have provided a growing list of examples using millis(). While reviewing the code for the elegoo Penguin Bot, I was reminded of a millis() mistake I see often: addition. The only way to properly handle millis() rollover is with subtraction. Let’s look at why (and how.)

What is Arduino millis()

The Arduino library has a function called millis() which returns the number of milliseconds the processor has been running. On other platforms, you might see references to a “tick counter.” It is the same idea. A hardware timer keeps incrementing a counter at a known rate. In this case, that rate is milliseconds.

A mistake new programmers often make is trying to “reset millis().” A better method is to compare two time-stamps based on millis(). So this if-statement is comparing a previous timestamp to the current value of millis().

Learning to use a new oscilloscope can be daunting. In this video, I show 5 measurements you can make using just an Arduino as your DUT. Learn how to offset voltage, setup measurements, enable infinite persistence, save reference waveforms, AND trigger (and decode) serial signals. For this video, Rohde & Schwarz was kind enough to send me an RTM3004. This video is a follow-up from an ealier blog post which featured 6 scope measurements you can make with an Arduino.

Check out the AddOhms Episode 28 Show Notes for links related to the episode.

Watch On YouTube

Earlier this week, I looked at the Arduino MKR Vidor 4000 during an AddOhms live stream. My goal was to understand the Vidor better. It is the new FPGA-based Arduino which started shipping this month. It runs about $60. You can learn more at the Vidor Product Page on the Arduino website.

In this post, I briefly touch on the difference between an FPGA and a microcontroller. Then I walk you around the MKR Vidor 4000’s board. Using one of the examples, I talk a bit about how the various chips communicate with each other. This section also highlights what makes the Arduino FPGA board different from other development boards. Lastly, I answer “should you buy an Arduino MKR Vidor 4000?”