Category

Tutorials

Category

Unless you have a BNC or SMA connector your board, you will need a probe to get signals into an oscilloscope. Understanding what kind of oscilloscope probes are out there, which ones should you have for your scope and which ones to use for different measurements can be daunting. In this post, I look at some common scope probe types and offer some suggested measurements for each.

Special thanks to Rohde and Schwarz for providing the equipment used in this post. You can learn more about their scopes and probes at rohde-schwarz.com .

This post is not a comprehensive guide of oscilloscope probes. I am covering the types I have used. I do think this information should be enough to least form questions to ask your vendor before purchasing. Asking questions is important. If you have never bought specialized oscilloscope probes, you might not realize they can cost more than the scope itself. Maybe not an individual probe, but get one for each channel, and the cost rises. So picking the correct probe type is essential.

Autodesk released EAGLE 9. This new version continues the improvement that Autodesk has been providing since acquiring the infamous ECAD tool. There are three areas I look at in this AddOhms Livestream.

How I looked at EAGLE 9

In the beginning, I use an old training class I wrote about five years ago when I was using EAGLE daily. It shows how to design a 555 flashing circuit from schematic to PCB. A follow-on class taught how to mill the PCB on a Shopbot. I might update the course and release it if I have time. The exercise class helps me find some surprises with EAGLE’s incremental improvements.

After that, I check out three new features. I also looked at the “Design Blocks” stuff which is a way to incorporate completed schematics like the Adafruit PowerBoost circuit. I need to come back and look at that function again later. Also, I am not positive, but I think that feature was introduced before 9.

1. Quick Routing

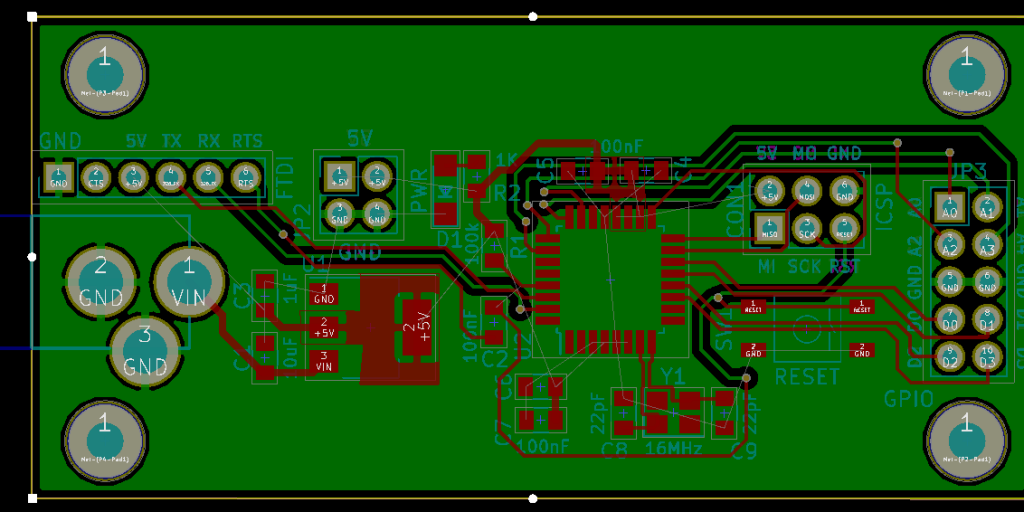
The quick routing reminds of the old “follow me” option. You can select individual airwires, entire nets, or multiple signals to route interactively. Unlike the Autorouter, which routes the board as the whole. In the video, I build a simple 555-based PCB. I couldn’t try out routing multiple signals, like address and data for DDR memory. The value I see most from this feature is selectively routing your critical signals and then quick routing the remaining non-critical nets.

2. Device Manager

This informational window provides a clean break-down of many pieces of data. Need to know what layers a footprint use? How about the length of an entire net? In the video, I show that you can use this feature to verify all of your passive components have the same package style. The information is all there, Device Manager brings it to your attention.

3. Breakout

Spoiler Alert: I really like the Breakout Feature. (For those that say I don’t smile in videos, I did this time.) Long story short, this is a shortcut to expand all of the pins for an IC. A great example is in the AddOhms Pyramiduino DIY PCB episode. In the beginning, you can see my time lapse as I break out each of the GPIO pins. That can happen in EAGLE now with a single click.

Check it out

Have you had a chance to check out EAGLE 9 yet? If so, what are your thoughts?

Watch EAGLE 9 First Look on YouTube

Whether you are developing a WiFi-enabled coffee maker, a sensor to detect rainfall, or a livestock tracking drone, an IoT device will follow the same product development cycle.

[featured-image single_newwindow=”false”]

A common mistake that engineers will make is trying to own the development at each stage, at least up until “deliver.” Who can blame us? The idea of delegating any part of our new product introduction can be daunting. Delegating, or outsourcing can be a powerful tool. It allows you to focus on the elements of your process that only you can do. Let others handle the rest. If your core contribution is the machine learning algorithm, then focus your effort there. Spending time designing the enclosure, or negotiating with suppliers, or even laying out the printed circuit board is a waste. Let the people who excel in each of those areas apply their expertise to your product.

Production, or making, is the prominent point for outsourcing. It is common to work with a contract manufacturer to build your product. Some offer complete services that allow them to source your components, produce the product, package it, and drop ship it to your customer. This next statement might sound recursive, but consider outsourcing the step of finding someone to outsource manufacturing.

Let’s look at the Idea, Design, and Source stages for a typical IoT device. At each of these steps, I give some pointers to help identify what you should focus on and what you can delegate to a third-party, as well as, introduce you to a partner to consider.

Continuing the DIY Arduino tutorial series, this AddOhms episode shows how to create a PCB in KiCad. I make a joke that the original design was a rectangle, which I found boring and pointless. So instead, I designed a triangle to give the board 3 points. Get it? Puns! I am calling it the Pryamiduino. To be honest, I found not having a constraint to be a problem. By forcing a specific board size and shape, many decisions were more manageable.

First design – Boring!

In the end, the video ended up more edited than I planned. KiCad is just so finicky and crashy that I could not make a coherent start to finish tutorial. At least, I could not work with a board at this level of complexity. Something simple like a 555 flasher would be easier to show from start to finish. I am planning some immediate follow-ups with quick tips on using KiCad. It is a frustrating suite of applications, but the results can be quite nice.

AddOhms Pyramiduino Show Notes

My recent SONOFF WiFi Switch experience reminded me of something from high school. I attended an off-site electronics class with my best friend. As teenage boys, we were prone to doing stupid things. One of our favorite games was to see who could handle the highest voltage. Our bench had a variable AC supply that went from 0 to 120 volts. So we would grab the alligator clips while the other person slowly turned the knob up. John once made it to 50 volts. I seem to recall my tolerance around 30 volts. First, DO NOT do this. It was stupid. Second, I think this game is why handling AC makes me so uncomfortable.

While I am not an electrician, I do know the basics about wiring mains AC circuits. So when one of my studio lights needed a new switch, I was okay to replace it. Mains AC does not scare me when it is off. I did not have a mechanical switch available. Instead, I opted for a SONOFF WiFi Switch. I did not intend to connect WiFi, at least not yet. I just wanted to control the light with the manual push button.

The clever solution seemed to be clever, at least for a few minutes. Suddenly the light turned off. I thought maybe there was a timeout for the manual button. Annoying, but workable. The lamp remained off for about another 2 minutes when I started to smell that unmistakeable burning plastic odor. Touching the case of the SONOFF identified the culprit immediately.

Great. So I have an AC mains switch that isn’t working, but I do not want to go poking my multimeter into it. What do I do?

Turns out, that SONOFF module was defective. I wanted to debug it, but I did not want to measure anything while connected to AC. Here’s how I used a thermal camera to debug my SONOFF.

What is a SONOFF?

See the ESP8266 and Antenna?

The SONOFF WiFi switch is an inexpensive AC relay. Internally it has an ESP12 chip, which became popular with the ESP8266. There is even an unpopulatd serial header which can be used to reflash the firmware. Among hackers, these modules are a popular way to get an AC relay that is easily programmed.