
Introducing my KiCad BOM Experiment: An ESP8266 Based RGB LED Controller
Currently, I am designing an ESP8266 based RGB LED controller. I sent my first revision of the board to OSH Park. (After I get this first board built, I’ll add it to my list of projects.) While the boards are getting made, I turned my attention to ordering the parts to load onto the PCB. Here’s how I optimized my work to get a good BOM.Drawing the KiCad Schematic
When drawing a KiCad schematic, you likely know the exact semiconductors and their packaging you plan to use. For example, if designing a microcontroller based project you already know what chip and whether or not you are using a through-hole or surface mount component. This knowledge makes picking an exact part number easy. What about passive components? An easy trap to fall into is placing resistors, inductors, and capacitors into a design and only changing their value and footprint fields. For example, drop in a capacitor and change the value to 47 uF. You know you want to use a surface package, so you pick something like “0805” or “1206” as its footprint. These actions make designing the printed circuit board easy but are going to give you grief when you generate your KiCad BOM.1. Add Fields for Type, Voltage, and Tolerance
For semiconductors (or chips) the part number is specific. However, for passive components, you need more than just a value and footprint–which are the default fields KiCad gives you. Ideally, you want a particular manufacturer’s part number. However, you may not want to spend much time during schematic capture to research all of the capacitor options. In that case, you should add other data to make lifer easier later on. Here are some example parameters you may want to record when building your schematic in KiCad.- Material Type. This property is of particular importance for capacitors. Defining a capacitor dielectric (or a property of the dielectric) is critical. For a ceramic capacitor, you want to call out C0G, X5R, or X7R. For an aluminum electrolytic cap, you want to define whether a “wet” (traditional) or newer Organic-Polymer should be used. Resistors come in thin and thick film types. Inductors… are a whole different post. 🙂
- Voltage. What is the minimum rated voltage needed for a component? Ceramic capacitors lose capacitance when driven close to their rated voltage, so you may want to specify a voltage rating two or three steps higher than what you will apply.
- Tolerance. Resistors, inductors, and capacitors do not ship with absolute values. What is the tolerance range you can tolerate? (No pun intended). 1%, 5%, 10%, and 20% are all common “tolerance” values. Keep in mind on inductors and capacitors if you are selecting the highest value for a given rated voltage, you may be limited to higher tolerance values.
- ESR. Defining the equivalent series resistance (ESR) of capacitors can be significant, especially in LDO designs. Do you have a max you can tolerate?
- Case Size. Footprints in KiCad clearly state the “X” and “Y” directions for a component’s size. However, you may also want to define a maximum height or thickness.
Put these details in a field
Even if you have a manufacturer’s part in mind, there is a good reason to record this information: What if it is not in stock and you need to cross to another? [shareable]Here’s why part desc help when ordering a KiCad BOM[/shareable] There are two methods you can enter this information. You can add a field for each property. This clunky option is an area where KiCad fails, in my opinion. One benefit though is when you export a KiCad BOM, you’ll get a CSV with each of these fields. Distributors can more easily import and cross parts when this extra information is defined.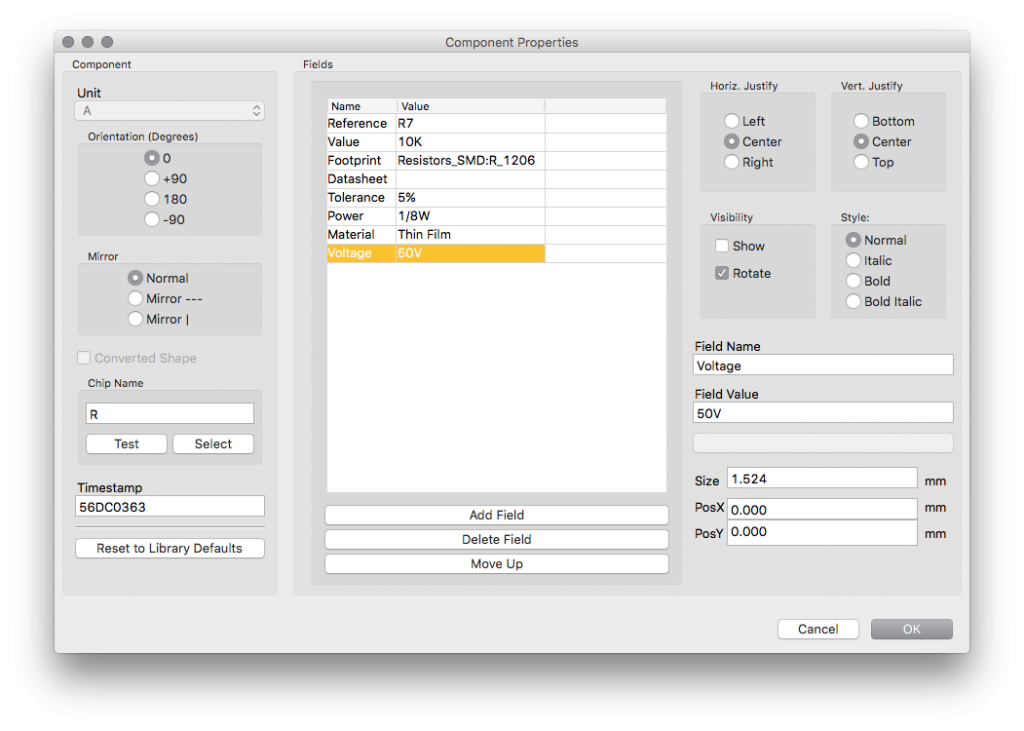
2. Describe the part as the Value
An alternative is to enter the critical information as part of the “Value” field. It’ll make the schematic and printed circuit board a little messier but makes choosing a vendor specific part easier.Note when I choose this method, I end up hiding the value field in PCB and manually adding labels if I want the value on the PCB.
#Component# #Type# #Size# #Voltage# #Value# #Tolerance#CAP X7R 0805 10V 1UF 10%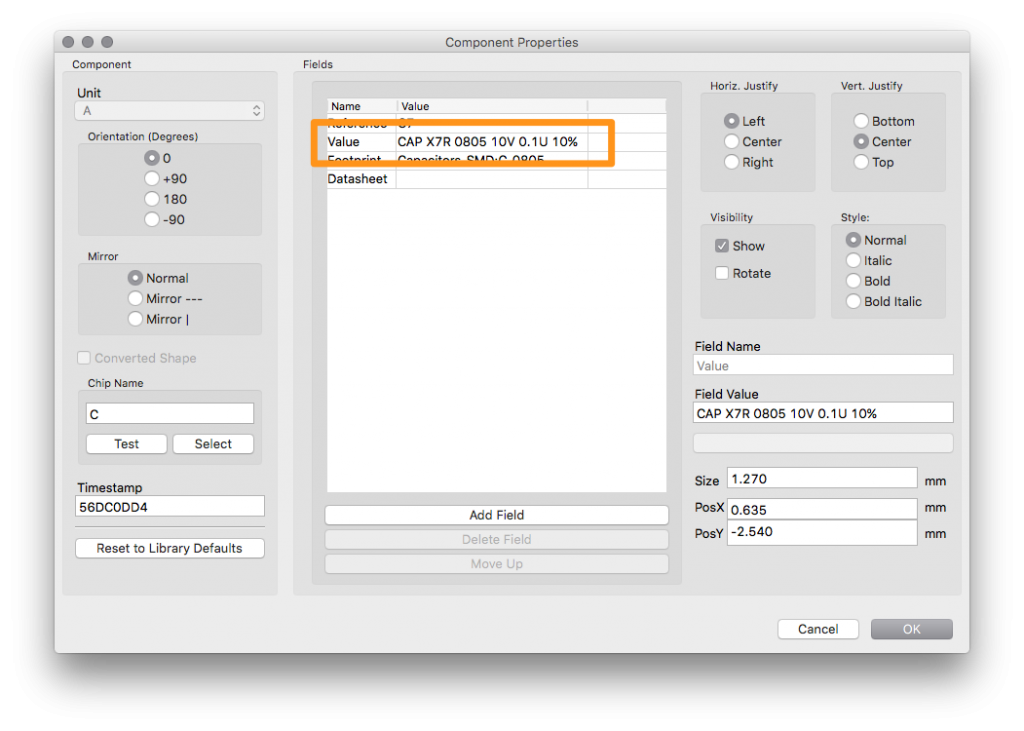
3. BOMs-Away by Jeff Ciesielski
While there are many KiCad BOM utilities, BOMs Away (available on Github) caught my attention. It helps to close the loop to get my parts from KiCad into Mouser (or Digikey). Writing out the long descriptions like above gets tedious quickly. Especially if you are using common parts for a decoupling capacitor or pull-up resistor. (Also, CMD-C doesn’t work on the Mac version of KiCad. So that gets in the way of copy and paste.) BOMs-Away is a fantastic Python-based app that consolidates components with the same values and footprints into a single list. So all of your 100nF 0805 capacitors can be summarized in a single line. Once summarized, you to define a manufacturer, manufacturer part #, supplier (distributor), and supplier part # (distributor SKU). By doing this consolation, you can make sure you aren’t missing or have conflicting values. My next phase is to look into some KiCad tools to help choose parts. For now, I am just going to Mouser and searching for what’s available.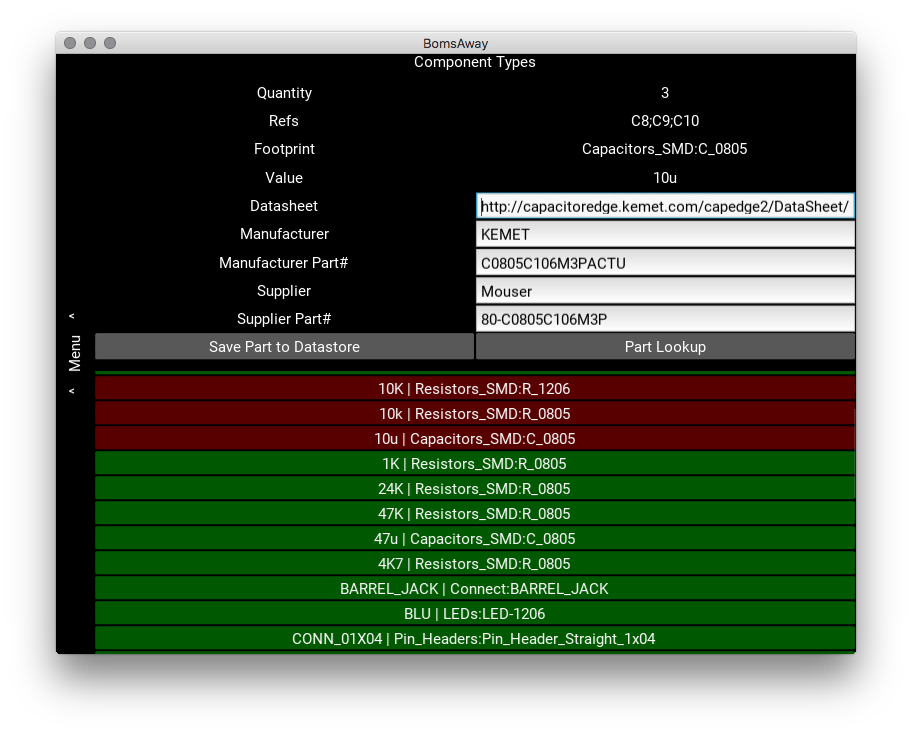
Notes on using BOMs Away
BOMs-away uses an odd combination of python modules. I had no trouble installing them, but I could see that being an issue. Make sure you read the readme on Github closely. The UI’s unique look takes a little bit of time to get comfortable using it. There is a feeling of a mobile app running on a PC. For what the tool does, though, I do not consider either of those notes “complaints.” Just notes.Saving Schematic
Once you add information like the Manufacturer, Supplier, and Supplier SKU, BOMs-Away can export the data directly into your KiCad Schematic. BOMs-Away even export directly to CSV for upload to Mouser or Digikey. No need to re-load eeschema just to generate a KiCad BOM export.Conclusion
In an ideal world, a component database would be part of the KiCad suite. And when you export the BOM it would export a distributor-friendly part description. Since KiCad, currently, lacks that functionality BOMs Away is a workaround. One of these methods for managing your BOM should help your design flow.What tools or techniques do you use to manage your KiCad BOMs?

4 Comments
I don’t understand where Kicad stores the generated BOM.
Generally, it stores it in the Project Directory.
But because the “BOM Generator” work by using external scripts, it entirely depends on what command is run. The default command looks like:
python "C:\Program Files\KiCad\6.0\bin\scripting\plugins/bom_csv_grouped_by_value.py" "%I" "%O.csv"The last parameter is “%O.csv” which means the output file ends in .csv and is in the “current” directory. Which, is the project’s directory.
This looks like a pretty awesome tool. However, I absolutely love KiField. It’s a simple Python-based command line plugin that allows you to export all the objects from a schematic. It allows you to recurse through hierarchical schematics, group components like you mentioned above, and even make backups of the file it’s writing to. But the best part is that after extracting all of the data into a CSV file, you can edit the file and then re-import it back into the schematic to update all of the fields automatically. It’s pretty brilliant. Just make sure to install it with Python 3 though, because it has issues with Python 2 doing the re-import. Super easy to install too:
pip3 install kifield
Then just type “kifield –help” for info.
Very useful information for a beginner. Thank you.