Category

Programming

Category

When I started working on Open Vapors, I thought the stumbling point would be the PID algorithm or safe AC line control. However, it turned out; I spent a significant amount of time understanding how to print to the Arduino LCD display correctly.

Grove Character LCD with RGB Backlight

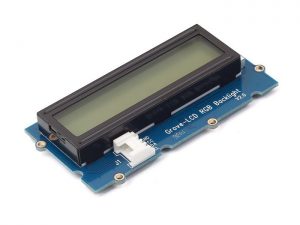
If you need an easy to use RGB LCD, check out the Grove LCD from SeeedStudio. They sent me one to check out. The LCD comes with Seeed’s “grove connector system” which can connect to a variety of their Arduino-compatible boards. You can also pick up the Grove Base Shield which adds a variety of Grove connectors to an Arduino Uno. The Grove LCD makes it super easy to connect up a character LCD. It is very plug-and-play.

As I dig into my latest project, the lessons I learned back then are coming back to me. Here are 7 tips for driving an Arduino LCD display, like one with 2×20 or 4×20 characters.

A question came up on IRC regarding how to PWM a 3-pin PC fan with an Arduino using analogWrite(). Controlling the fan was seemingly straightforward. The problem was that the hall effect sensor, or TACH signal, was incredibly noisy. The noise made it impossible to measure the fan’s rotation. Working through the question, I found three issues to tackle:

  1. You need to use a PNP transistor
  2. Filter capacitors help
  3. Create a non-blocking RPM measurement (with millis())

This post addresses all three issues regarding how to PWM a 3-pin PC fan with an Arduino.

Previously I looked at the hardware needed to build a Raspberry Pi soft power supply. This week I’m looking the state machine for the microcontroller. Why is such a complicated circuit necessary? I am replacing a Super Famicom (SNES) motherboard with the Pi. The trick is, I want to use the original power switch to turn the Pi on and off.

This requirement presents a problem. When the switch goes into the “OFF” position, power needs to stay on long enough for the Pi to properly shutdown. So the switch itself can’t provide power to the Pi directly. With minor changes, the code in this state machine could be made to work with push buttons as well. If I add that feature in the future, I’ll update the code on the RPSPC GitHub project.

Before continuing with the state machine, first I need to thank all the mailing list members. You guys really rock. When I asked for state machine diagraming tool suggestions, you guys sent me enough options for an entire (future) post to compare them. 
The Arduino serial monitor is usable when you want to watch data from an Arduino. However, it does not have a built-in method for saving the data. Here are some ideas if you want to build an Arduino data logger with or without a PC.

Important note on Arduino Data Logger examples

With all of these examples, please remember that whenever you open the Arduino’s serial port, the board will reset. So if your log file shows “Initializing SD card…” with a few data lines in between, it is because there is a reset happening.

Initializing SD card…initialized.
Temp: 34, Time: 03:24:44
Temp: 33, Time: 03:24:45
Temp: 34, Time: 03:24:46
Tem

Initializing SD card…initialized.
Temp: 34, Time: 03:24:50
Temp: 34, Time: 03:24:51
Temp: 33, Time: 03:24:52
Temp: 34, Time: 03:24:53
In that code you can see data logging started and then restarted. What happened is that after programming, the board starts logging. Then when you open the Serial Monitor, the data logger restarts. To solve this issue, either disable auto-reset, add a 3-4 second delay at the start of setup(), wait for a character to be received, or wait for a button press. That will give you time to open the Serial Monitor.
Sending simple serial commands to an Arduino is the easiest way to communicate between an Arduino and a computer. The computer could be a PC, a Raspberry Pi, or any device that communicates with serial. By sending and “decoding” a single character it is easy to add a simple debug menu or even serial menu. Plus, it is easy to extend.

Single Character vs. Full Words

The mistake I see many people make is that they try to send full-text strings as serial commands. For example, to turn on a LED, I have seen (silly) commands like “RED LED ON” or “RED LED OFF.” While you could use something like strcmp(), as I showed on the Multiple MQTT Topics example, that tends to be overkill for most serial commands. Humans like words, computers like binary. Just send one character over serial.

switch (variable) {
  case 'a':
	// A Stuff

  case 'b':
  case 'c':
	// B and C Stuff
  break;
}