Controller Update")
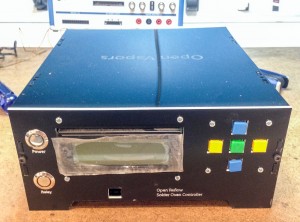
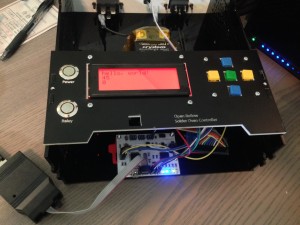
The Open Vapors project has taken some big steps forward recently. The controller’s enclosure is now a custom box, has a front panel, and the LCD’s menu system is almost done.
Hardware
Some notes on the hardware pieces, pretty much everything has been
Enclosure
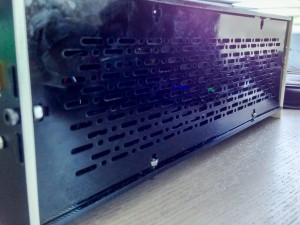
The dimensions of the closure are similar to a Rigol DM3058 DMM. The idea was they could sit next to each other on the bench. It took some effort in Illustrator, but a neat ventilation pattern was used for the side panels.
One mistake I made is that the bottom (and top) panels don’t slot into the front and back panels. Even after a week or so, I’ve noticed the bottom panel is already starting to sag.
Spacers
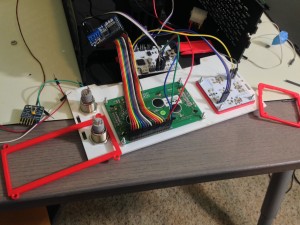
Bolting the various circuit boards directly to the acrylic caused some alignment issues. Using a 3D printer, I made some brackets to offset each of the boards their appropriate amount. The 3D printed options seem better than ordering 100s of stand-offs from McMaster, since each circuit board has different stand-off requirements. Also, 3d Printers are fun to use!
Front Panel
The biggest improvement is the front panel. There is a dedicated Power switch and a SSR override switch. These are available from Adafruit. Nice switches that look great on the front, but aren’t functional yet.
D-Pad
The D-Pad is using version 1 the PCB. Turns out I shorted the two sides of the push buttons. So it took a lot of dremel work to get the board working. The biggest disappointment is that the de-bouncing capacitors don’t work.
Control Board
The control board is a custom PCB based on the ATmega32u4, like the Leonardo. While doing my initial testing it was functional. However, once installed in this enclosure the USB port seems to have failed. It is no longer able to enumerate, even though the board is entirely functional. To re-program, I have to use a USBTiny to program the board. Which leads me to the EEPROM>
Software
The control software (and PID) for the oven hasn’t been worked on much. All of my focus has been making a LCD-based menu system that doesn’t require constant reprogramming. The goal is a closed-box solution, that works until major functionality is necessary.
Menu System
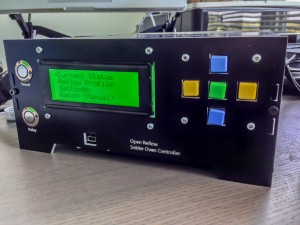
I’m still working through a menu system. I’ve learned how to implement structs which I’ve turned into a state machine. That’ll be a write up later, because I think it’s an elegant option. There is also an integer editor that lets you individually edit each digital of a number.
EEPROM
Turns out, you need to be careful using a standalone programmer when dealing with the built-in EEPROM. Currently I’m editing my code in Sublime Text with the Stino plugin. When it calls avrdude to program my code (without the bootloader), its wiping out the EEPROM. I had to modify Stino’s scripts so that when avrdude is called, the fuses are set properly.
The key fuse to keep EEPROM from being reset when programmed is called “Preserve EEPROM memory through the Chip Erase cycle; [EESAVE=0]”. The AVR Fuse Calculator is an awesome tool for this purpose. This isn’t a problem when programming over serial with the bootloader, only when using a programmer.
Code
The code I have, which is a mess, is up on GitHub on the Open Vapor project.
Demo
If you want to see the Menu System working, checkout this quick video.
Next Steps
The next major step is integrating the actual control code in with the menu code. Once that’s done, the first major version will be considered done. Eventually, I’d like to take the Menu State Machine code I’m working on and turn it into a standalone library.